
Starting a backyard beehive sounds simple, right? Just grab some bees, put them in a wooden box, and let nature do the rest. But surprise. More than 40 percent of beginner beekeepers lose their colonies in the first year. Turns out, the secret to thriving bees lies in careful planning, from picking the right sun-soaked spot to understanding what tools and timing matter most—details that even seasoned gardeners often overlook.
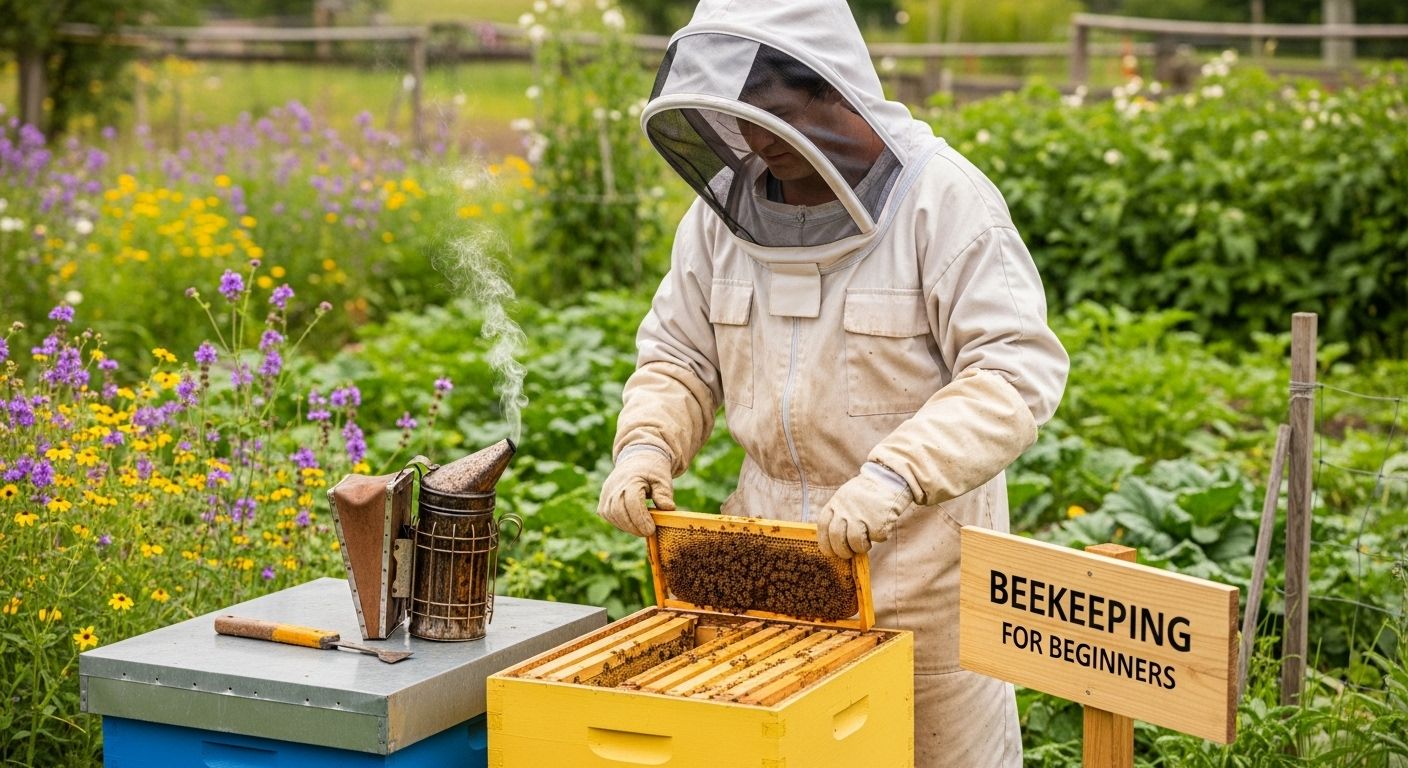
Table of Contents
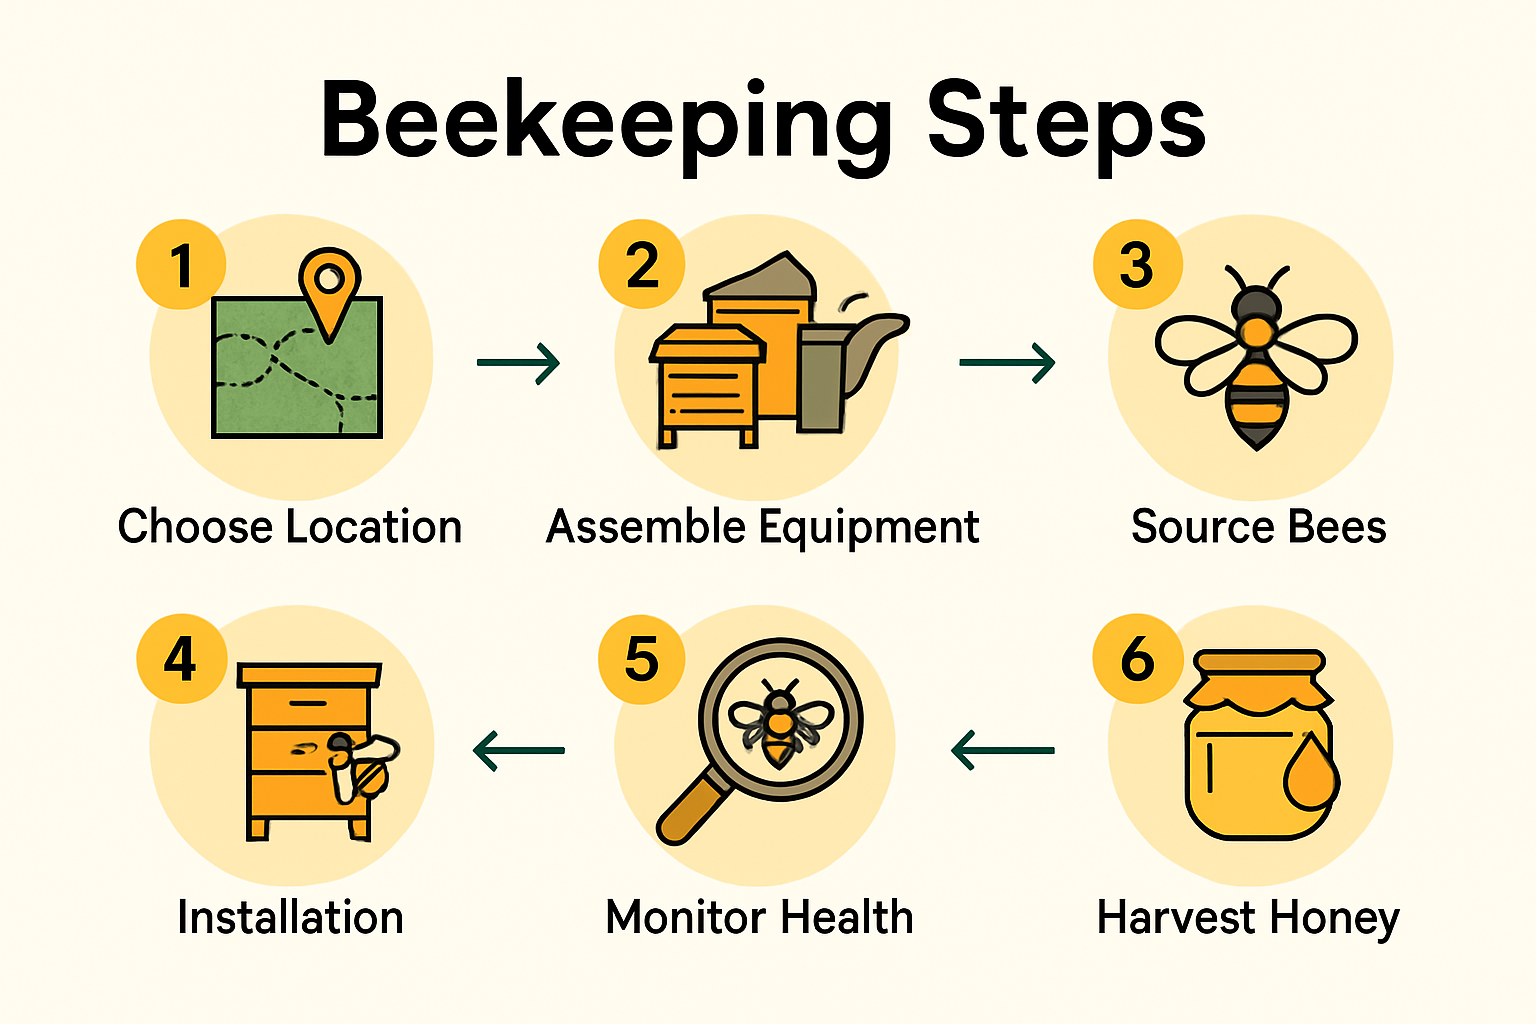
- Step 1: Choose Your Beekeeping Location Wisely
- Step 2: Assemble The Essential Beekeeping Equipment
- Step 3: Obtain Your First Bee Package Or Nucleus
- Step 4: Install Your Bees In The Hive
- Step 5: Monitor Hive Health Regularly
- Step 6: Harvest Honey And Maintain The Hive
Quick Summary
| Key Point | Explanation |
|---|---|
| 1. Choose the right beekeeping location | Ensure your hive is in a sunny spot with minimal disturbances to promote the bees’ health and productivity. |
| 2. Assemble essential beekeeping equipment | Invest in quality tools like a Langstroth hive, protective gear, and necessary beekeeping tools for successful management. |
| 3. Select your first bee package or nucleus | Decide between economical package bees or advanced nucleus colonies based on your goals and local climate suitability. |
| 4. Install bees carefully in the hive | Follow a patient procedure for bee installation, ensuring a calm environment to help the colony settle successfully. |
| 5. Monitor hive health regularly | Conduct systematic inspections to identify potential issues, ensuring the colony remains healthy and productive throughout the year. |
Step 1: Choose Your Beekeeping Location Wisely
Selecting the perfect location for your beehive is a critical first step in successful beekeeping for beginners. Your chosen site will significantly impact your bees’ health, productivity, and overall colony survival. Before setting up your hive, carefully evaluate several key environmental factors that will determine your bees’ long term success.
Your apiary location needs strategic planning to provide optimal conditions for bee colonies. According to Utah State University Extension, the ideal site should offer six to eight hours of direct morning sunlight, with the hive entrance facing southeast. This orientation helps bees warm up quickly in the morning and start their foraging activities earlier.
Consider the surrounding landscape carefully. You want an area with minimal human and animal traffic to reduce potential disturbances. The location should provide a clear flight path for bees, meaning at least 10 to 15 feet of open space in front of the hive. Elevate your hive stand 12 to 18 inches off the ground using cinder blocks or a specialized hive stand to protect against ground moisture and potential predators.
When evaluating potential sites, also assess water and nectar sources within a three mile radius. Bees require consistent access to clean water and diverse flowering plants. Look for locations near gardens, orchards, or wildflower meadows that can provide abundant foraging opportunities. Avoid areas with heavy pesticide use, which can harm your bee population.
Additionally, consider local regulations and neighborhood restrictions regarding beekeeping. Some municipalities have specific zoning laws or require permits for maintaining beehives. Check with local agricultural extension offices or municipal authorities to ensure compliance before establishing your apiary.
To verify you have selected an appropriate location, observe the site throughout different times of day and seasons. Watch for potential wind exposure, shade patterns, and proximity to potential hazards. A well chosen location sets the foundation for a thriving bee colony and a rewarding beekeeping journey.
Step 2: Assemble the Essential Beekeeping Equipment
Equipping yourself properly is crucial for successful beekeeping for beginners. Your initial investment in quality equipment will set the foundation for a healthy and productive bee colony. According to University of Missouri Extension, selecting the right hive and tools is more than just a purchasing decision it is about creating a safe and supportive environment for your bees.
Start with the primary hive structure, which typically follows the Langstroth design. This standard configuration includes an eight or ten frame hive with multiple components. You will need two brood boxes for the queen to lay eggs, two honey supers for honey production, a bottom board, entrance reducer, inner cover, and telescoping outer lid. Select frames with foundation options including wax, plastic, or combination styles to support your bees’ natural comb building processes.
Protective gear is non negotiable when working with bees. Invest in a full bee suit or jacket with an integrated veil that provides complete coverage. Choose gloves made from durable materials like leather or thick canvas that protect your hands while maintaining dexterity. Sturdy boots that cover your ankles will prevent accidental stings and provide stability while working around the hive.
Critical tools for your beekeeping arsenal include a smoker, hive tool, and bee brush. The smoker helps calm bees during hive inspections by mimicking a natural threat response that reduces their aggressive behavior. A hive tool allows you to carefully separate hive components and scrape away excess propolis and wax. The bee brush helps gently move bees without causing harm during maintenance and honey harvesting.
Additional essential equipment includes bee feeders for supplemental nutrition during low nectar periods, a queen excluder to manage queen movement within the hive, and storage containers for harvesting and processing honey. Consider purchasing a beginner beekeeping kit that bundles many of these items together, which can simplify your initial setup and ensure you have matched, compatible equipment.
Before your first bee installation, practice assembling and disassembling your hive components. Familiarize yourself with each piece and how they interconnect. A well prepared beekeeper with the right equipment creates a solid foundation for a thriving and productive bee colony.
Step 3: Obtain Your First Bee Package or Nucleus
Launching your beekeeping journey requires careful selection of your initial bee population. According to Mid-Atlantic Apiculture Research and Extension Consortium, you have two primary options for acquiring bees: package bees or nucleus colonies, each with unique advantages for beekeeping beginners.
Package bees represent the most economical entry point for new beekeepers. These are typically three pound collections of worker bees with an unrelated, separately purchased queen, shipped in specialized screened containers. When selecting package bees, work with reputable local or regional bee suppliers who can provide healthy, disease free populations. Timing is critical order your packages early, typically between January and March, to ensure availability during spring installation.
A nucleus colony, or nuc, offers a more advanced starting option. These miniature established colonies include three to five frames with bees in various developmental stages, a proven laying queen, and existing brood. Nucs provide a faster path to colony establishment, as they arrive with an existing social structure and queen who has already demonstrated egg laying capabilities. While more expensive than package bees, nucs often integrate more quickly into your prepared hive and have a higher initial survival rate.
Regardless of your chosen method, plan your bee acquisition carefully. Research local bee suppliers, attend beekeeping association meetings, and seek recommendations from experienced beekeepers in your area. Consider factors like local climate, bee subspecies suited to your region, and the supplier’s reputation for healthy stock.
When your bees arrive, prepare to install them immediately. Have your hive fully assembled, positioned in its predetermined location, and ready for immediate population. If using package bees, you will need to carefully introduce the queen and gradually integrate the worker population. For nucs, the transfer process is more straightforward simply move the existing frames into your prepared hive, ensuring minimal disruption to the colony.
Key considerations for successful bee acquisition include timing, supplier selection, and immediate installation preparation. A thoughtful approach to obtaining your first bee population sets the foundation for a thriving, productive apiary. Your careful selection and installation will determine the initial strength and potential of your bee colony.
To help you choose between the two main ways to start your first hive, heres a table comparing package bees and nucleus colonies, based solely on information from this article.
| Option | Description | Advantages | Key Considerations |
|---|---|---|---|
| Package Bees | 3-pound box of worker bees plus an unrelated queen, shipped in a container | Most economical, widely available | Requires careful installation, order early in season |
| Nucleus Colony (Nuc) | Miniature colony w/3-5 frames of bees, brood, and a proven laying queen | Integrated social structure, faster establishment, higher survival rate | More expensive, but easier transfer process |
Step 4: Install Your Bees in the Hive
Installing your bees is a critical moment in your beekeeping journey that requires patience, precision, and careful handling. According to Penn State Extension, the first installation sets the foundation for your colony’s future success. Choose a calm, mild day with temperatures between 60 and 70 degrees Fahrenheit and minimal wind for this delicate process.
Preparation is key before opening your bee package or nucleus colony. Wear your full protective gear including a bee suit, gloves, and veil. Have your smoker ready to calm the bees and a hive tool for managing frames. If you are installing a package, you will first need to remove the queen cage from the package and inspect her for health and activity. Gently remove the cork from the queen cage’s end, replacing it with a small marshmallow that worker bees can gradually eat through, allowing a controlled release.
For package bee installation, begin by lightly spraying the bees with sugar water to temporarily suppress their flying abilities and reduce potential aggression. Gently shake the package to settle the bees at the bottom, then carefully remove the queen cage. Suspend the queen cage between two center frames, ensuring the candy plug faces upward. This positioning allows worker bees to gradually release her while protecting her initial integration into the colony.
Next, dramatically shake the package bees into the hive, focusing on distributing them evenly across the frames. Do not be alarmed by the loud buzzing this is normal bee behavior during installation. Once most bees are in the hive, place the frames back carefully, ensuring the queen cage remains securely positioned. Reduce the hive entrance using the entrance reducer to help the new colony establish and defend their space.
If installing a nucleus colony, the process is more straightforward. Carefully transfer the existing frames from the nuc box into your prepared hive, maintaining their original orientation. This method provides an immediate established social structure and significantly increases your colony’s initial survival probability.
After installation, provide supplemental sugar syrup in a feeder to help the new colony establish themselves. Monitor the hive closely over the next week, checking that the queen has been successfully released and begins laying eggs. Successful installation results in calm bee behavior, gradual queen integration, and the beginnings of brood development within seven to ten days.
Step 5: Monitor Hive Health Regularly
Regular hive monitoring is the cornerstone of successful beekeeping, transforming you from a novice beekeeper into a proactive colony manager. According to USDA Agricultural Research Service, consistent health checks are essential for identifying and mitigating potential threats to your bee population.
Establish a systematic inspection schedule that aligns with seasonal changes. During spring and summer, conduct hive inspections every two to three weeks, while winter checks can be less frequent but equally critical. Always choose warm, calm days when most bees are out foraging, typically between 10 am and 2 pm with temperatures above 60 degrees Fahrenheit.
Equip yourself with essential monitoring tools before each inspection. Your bee suit, gloves, hive tool, and smoker are mandatory. Bring a notebook or digital device to record observations about colony population, queen performance, honey stores, and any potential health concerns. Visual and physical examination are your primary diagnostic methods. Look for signs of robust queen activity by checking for consistent, centered brood patterns. Healthy brood should appear uniform, with worker cells tightly packed and larvae appearing pearly white and glistening.
Critical health indicators include monitoring for Varroa mite populations, which can devastate a colony if left unchecked. Use a white sheet of paper or specialized monitoring board to perform a mite drop test. Count fallen mites and calculate the infestation rate. Generally, more than three mites per 100 bees indicates a significant problem requiring immediate intervention through chemical treatments or natural management techniques.
Pay close attention to the hive entrance and external behaviors. Unusual bee activity such as excessive dead bees, erratic flying patterns, or reduced foraging can signal underlying health issues. Inspect frames for signs of disease including discolored or sunken brood cells, unusual odors, or irregular comb development. These visual cues can help you diagnose potential problems like American foulbrood, Nosema, or viral infections before they compromise the entire colony.
Successful hive monitoring is about developing a keen observational skill set. Your ability to detect subtle changes and respond proactively will determine your beekeeping success. Maintain detailed records of each inspection, tracking population growth, honey production, and any interventions. This documentation becomes an invaluable resource for understanding your colony’s unique characteristics and predicting future management needs.
Heres a checklist summarizing what to look for and do during each hive inspection, as detailed earlier in the article. Use this as a quick reference for your regular beehive checks.
| Inspection Task | Purpose | Signs to Look For |
|---|---|---|
| Inspect colony population and activity | Assess overall hive strength and vitality | Consistent foraging, active bees |
| Check brood pattern and queen presence | Ensure healthy queen and brood development | Centered, uniform brood, new eggs |
| Monitor honey stores | Confirm colony has enough food reserves | Full honey frames, capped cells |
| Evaluate for mite or pest issues | Prevent disease and colony failure | Mite test results, visible pests |
| Look for disease symptoms | Detect and address health problems early | Discolored brood, odd odors |
| Record observations and interventions | Maintain accurate hive history and notes | Detailed inspection log |
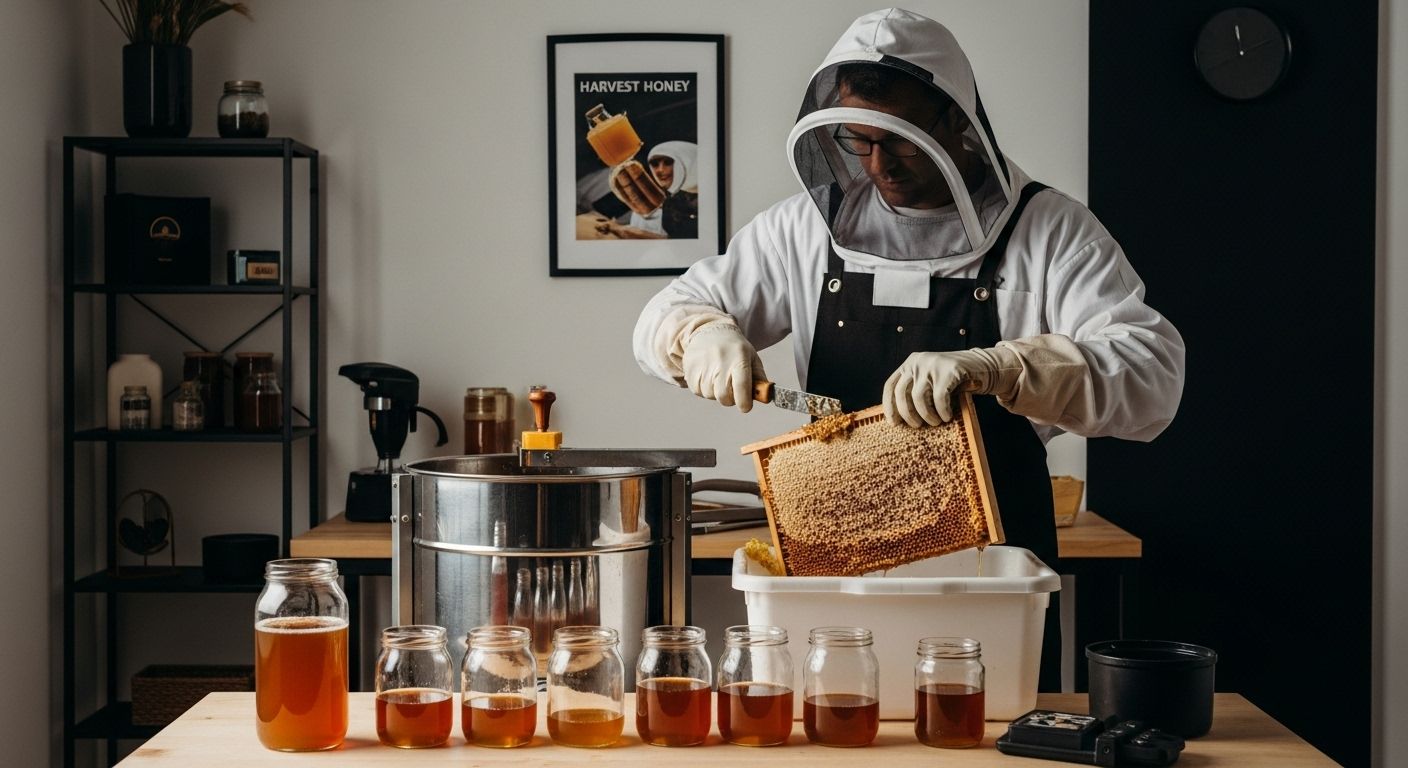
Step 6: Harvest Honey and Maintain the Hive
Harvesting honey represents the most rewarding phase of your beekeeping journey, transforming months of careful colony management into liquid gold. According to University of Georgia’s Bee Research, successful honey harvesting requires strategic timing and careful hive management to ensure both bee and beekeeper benefit.
Timing is everything when planning your honey harvest. Wait until at least 80% of the honey frames are capped, indicating the bees have processed and dehydrated the nectar to proper honey consistency. Typically, this occurs in late summer or early fall, depending on your local flowering seasons. Before extraction, use your bee brush or bee blower to gently remove bees from honey supers, avoiding aggressive techniques that might stress the colony.
Prepare your honey extraction equipment in advance. You will need an uncapping knife or roller, honey extractor, strainer, and clean storage containers. Wear clean protective gear and work in a space that can be easily cleaned. Begin by carefully removing the wax cappings from honey frames using a heated uncapping knife. Move slowly and deliberately to preserve the maximum amount of honey and minimize damage to the delicate comb structure.
After uncapping, place frames in a mechanical honey extractor that uses centrifugal force to spin honey from the comb. Most extractors can process multiple frames simultaneously, allowing efficient honey collection. Once extraction is complete, strain the honey through a fine mesh to remove any wax particles or debris. Store your harvested honey in clean, sterilized glass jars, keeping them in a cool, dark place to preserve quality.
Post harvest, critical hive maintenance becomes paramount. Ensure your bees have sufficient honey stores for winter survival. If honey reserves seem low, supplement with sugar syrup during late summer and early fall. Clean and inspect equipment, replacing any damaged frames or boxes. Consider treating the hive for Varroa mites using approved methods to prevent winter colony collapse.
Successful honey harvesting is about balance preserving enough resources for your bee colony while collecting your well earned reward. By practicing careful extraction techniques and providing attentive post harvest care, you transform from a novice beekeeper into a skilled apiarist capable of supporting a thriving, productive bee ecosystem.
Power Up Your Beekeeping Journey With Secure, Reliable Solutions
Are you worried about keeping your new hive safe from predators, pests, and unwanted disturbances after all your careful planning and setup? As the article highlights, choosing the right location, protecting your bees from local wildlife, and keeping your setup stable are real concerns for every beginner. Your bees depend on more than just a well-built hive. They need a protected, stable environment for healthy growth and honey production. This is where strong, versatile fencing and animal management can make all the difference.

Discover how FenceFast.ca can help you secure your apiary for lasting success. We provide proven fencing components, easy-to-install electric fencing, and practical animal management supplies trusted by rural hobbyists and seasoned farmers throughout Canada. Shop now for durable products and expert support to give your bees a safe home and build your beekeeping legacy today. Visit our site and take control of your hive’s future with solutions made just for rural life.
Frequently Asked Questions
How do I choose the right location for my beehive?
Selecting a location for your beehive involves ensuring it receives six to eight hours of direct morning sunlight, has minimal human and animal traffic, and provides clear flight paths. Additionally, ensure proximity to clean water and diverse nectar sources, avoiding areas with heavy pesticide use.
What essential equipment do I need to start beekeeping?
To start beekeeping, you will need a primary hive structure (like a Langstroth hive), protective gear (suit and gloves), a smoker, hive tool, and a bee brush. Additionally, consider purchasing bee feeders, a queen excluder, and containers for honey storage.
How do I install my first bee package or nucleus colony?
For package bees, prepare by wearing protective gear, use a smoker, and introduce the queen cage with a marshmallow plug. Shake the package into the hive, ensuring an even distribution. For a nucleus colony, simply transfer the existing frames with bees into your hive.
How often should I monitor the health of my hive?
Regular hive monitoring should occur every two to three weeks during spring and summer, while winter checks can be less frequent. Choose warm, calm days for inspections and pay attention to queen performance, colony population, and potential health issues like Varroa mite levels.
Recommended
-
[
Corral T-Post Rope Corner Insulator 4/pkg – FenceFast Ltd.
](https://fencefast.ca/products/corral-t-post-rope-corner-insulator-4-pkg)
-
[
Gate Wheel – FenceFast Ltd.
-
[
Gripple Small Cable Cutter – FenceFast Ltd.
-
[
Gallagher Turbo Wire 2.5mm – FenceFast Ltd.

