
Electric fences protect livestock and mark boundaries, but most people do not realize that poor grounding causes 80 percent of all electric fence failures. You might expect that more power or stronger wires would solve the problem, right? Actually, the smartest fix starts below your feet, not above ground, and the right grounding setup is the key that separates a fence that simply sags from one that stands guard 24/7.
Table of Contents
- Understanding Electric Fence Grounding Basics
- Step-by-Step Guide to Installing Ground Rods
- Troubleshooting Common Grounding Problems
- Best Practices for Different Property Types
Quick Summary
| Takeaway | Explanation |
|---|---|
| Proper Grounding is Essential | An effective electric fence relies on proper grounding, which completes the electrical circuit and enables consistent shock delivery to deter animals. |
| Ground Rod Specifications | For optimal performance, install multiple galvanized steel ground rods (6-8 feet long) spaced at least 10 feet apart, with a minimum of 3 feet of rod per joule of energizer output. |
| Regular Maintenance is Crucial | Ongoing inspection and maintenance of ground rods, including checking for corrosion and ensuring adequate soil moisture, are vital to maintain fence effectiveness. |
| Tailor Strategies to Property Types | Electric fence grounding strategies must be adapted to specific soil conditions and environmental factors, such as using different techniques for rocky or dry terrains. |
| Advanced Troubleshooting Techniques | Conduct systematic checks for grounding performance issues, including measuring ground rod voltage and evaluating soil conductivity, to ensure proper fence operation. |
Understanding Electric Fence Grounding Basics
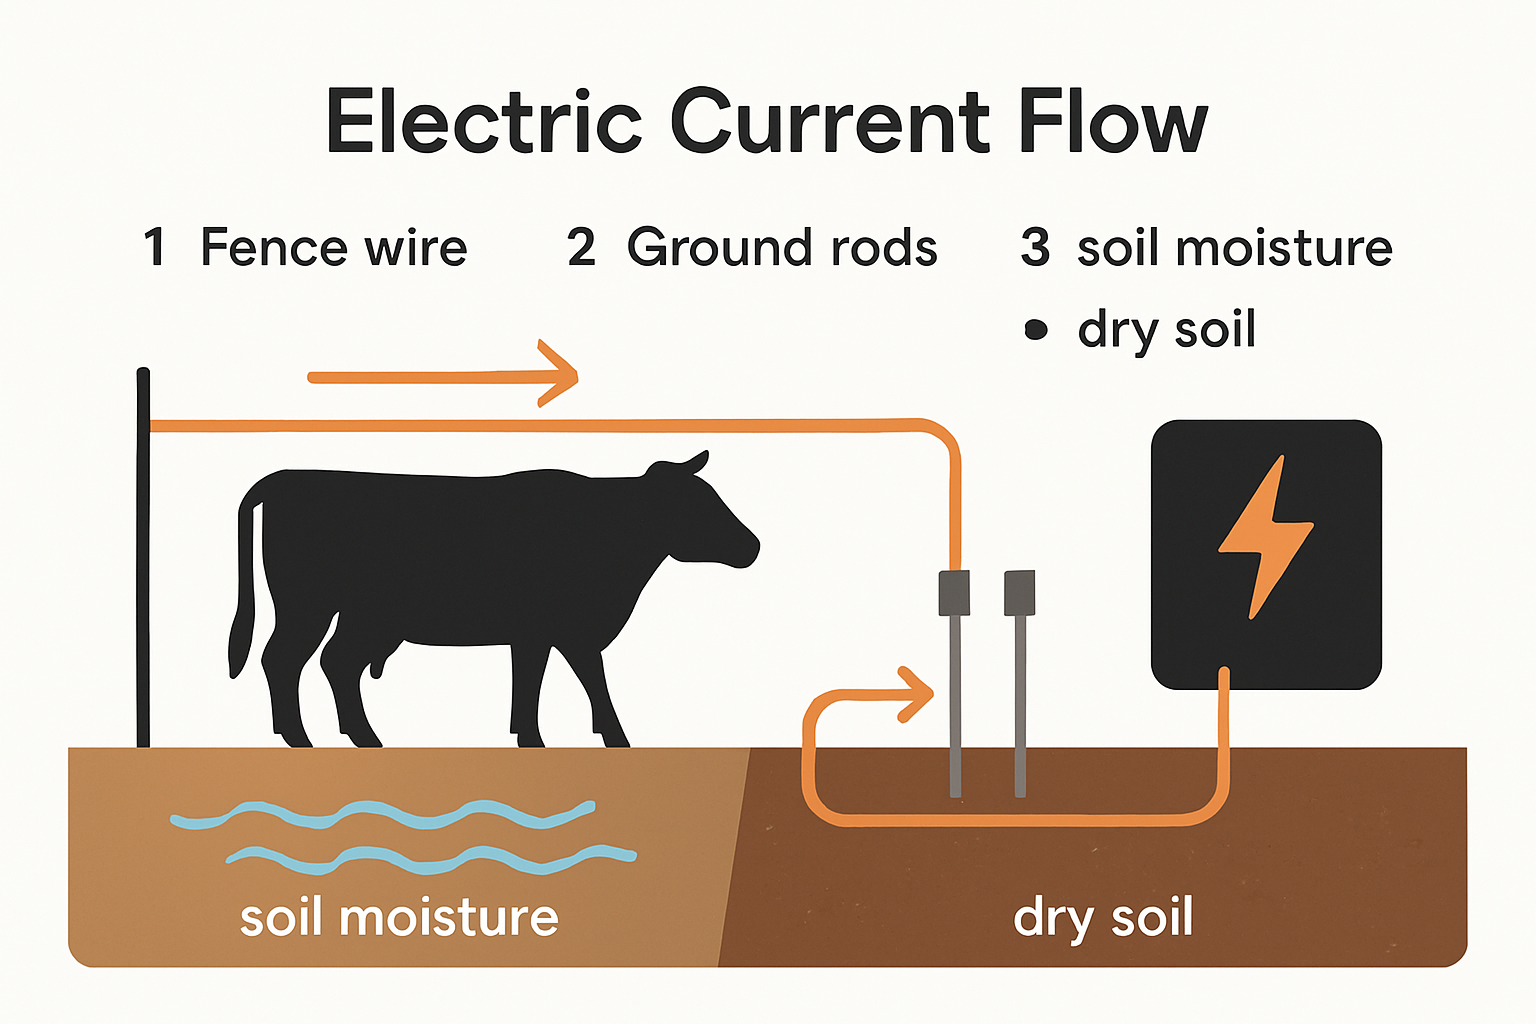
Grounding is the critical foundation of an effective electric fence system. Without proper grounding, your electric fence becomes little more than a decorative wire with minimal functionality. The primary purpose of grounding is to complete the electrical circuit, allowing the electrical pulse to flow effectively and create a consistent deterrent for animals.
The Science Behind Electric Fence Grounding
When an animal touches an energized fence wire, electricity seeks the fastest path to complete its circuit. This path involves traveling through the animal’s body to the ground, then back through the ground rods to the energizer. According to the University of Maine Cooperative Extension, poor grounding is responsible for 80% of electric fence performance issues, making it a critical component of your fencing system.
The effectiveness of your electric fence depends on creating a low-resistance path for electrical current. Moisture plays a significant role in ground conductivity. Dry, sandy, or rocky soils can dramatically reduce the fence’s performance, requiring more extensive grounding strategies. Virginia Tech’s Cooperative Extension recommends specific ground rod configurations based on the energizer’s power output.
Optimal Grounding Configuration
Michigan State University Extension provides clear guidance on ground rod installation. Their research suggests installing a minimum of 3 feet of ground rod per joule of energizer output. For a 15-joule fence charger, this translates to at least 45 feet of ground rod coverage. The recommended setup typically involves:
- Multiple Ground Rods: Install at least 3-5 ground rods, each 6-8 feet long
- Proper Spacing: Place ground rods at least 10 feet apart
- Depth Matters: Drive ground rods at least 5.5 feet into moist soil
- Material Selection: Use galvanized steel rods for best conductivity
Environmental conditions significantly impact grounding effectiveness. Areas with clay or consistently moist soil provide better conductivity compared to sandy or rocky terrain. In dry regions, you might need to supplement your grounding system by periodically moistening the ground around the rods or installing additional rods.
Understanding these grounding basics is crucial for anyone looking to implement an effective electric fence. Whether you’re protecting livestock, managing agricultural boundaries, or securing a property, a well-grounded electric fence ensures consistent performance and reliable animal containment. Proper installation and maintenance of your grounding system will maximize the fence’s effectiveness and longevity.
Remember, the goal is not just to install a fence but to create a reliable, consistent barrier that meets your specific agricultural or property management needs.
Step-by-Step Guide to Installing Ground Rods
Installing ground rods correctly is crucial for creating an effective electric fence system. The process requires careful planning, precise execution, and attention to environmental factors that can impact electrical conductivity.
Selecting the Right Ground Rod Materials
According to Virginia Tech’s Cooperative Extension, choosing the appropriate ground rod material is your first critical decision. Galvanized steel rods are recommended over copper due to their durability and resistance to corrosion. Aim for rods that are at least 6-8 feet long and 5/8 inch in diameter. The rod’s length ensures deep ground penetration and better electrical conductivity.
When selecting ground rods, consider these key factors:
- Corrosion Resistance: Galvanized steel provides superior long-term performance
- Diameter: Thicker rods offer better electrical conductivity
- Length: Longer rods provide more consistent grounding in varying soil conditions
Below is a table summarizing ground rod material selection and specifications for electric fence grounding.
| Material | Recommended? | Typical Length | Diameter | Corrosion Resistance |
|---|---|---|---|---|
| Galvanized Steel | Yes | 6-8 feet | 5/8 inch | High (Preferred by extensions) |
| Copper | Not advised | 6-8 feet | 5/8 inch | Lower (Prone to corrosion issues) |
Ground Rod Installation Technique
The University of Maine Cooperative Extension provides detailed guidance on proper installation techniques. Begin by identifying a location with good soil moisture and minimal rocky interference. Use a post driver or sledgehammer to install the ground rod, ensuring it’s driven vertically into the ground.
Follow these precise installation steps:
- Choose a location at least 33 feet away from utility grounds or metal water pipes
- Ensure the ground is moist and free from large rocks or debris
- Drive the rod vertically, leaving no more than 2-3 inches above ground
- Space multiple ground rods at least 10 feet apart
- Connect ground rods using high-quality ground wire clamps
Troubleshooting and Maintenance
Michigan State University Extension emphasizes the importance of ongoing ground rod maintenance. Regularly test your grounding system’s effectiveness using a digital voltmeter or ground rod tester. In dry regions, consider periodic moistening of the soil around ground rods to improve conductivity.
Key maintenance tips include:
- Annual Inspection: Check ground rods for signs of corrosion or damage
- Soil Moisture: Monitor ground conductivity, especially in arid regions
- Connection Integrity: Ensure ground wire connections remain tight and corrosion-free
The following table organizes the main troubleshooting steps and common performance issues related to grounding.
| Issue Identified | Diagnostic Tool/Action | Solution/Action Taken |
|---|---|---|
| Inconsistent Shock Delivery | Test voltage on fence and ground rods | Tighten connections, check energizer |
| Corrosion at Connections | Visual inspection | Clean or replace clamps/connections |
| Voltage Fluctuations | Use a digital voltmeter | Add ground rods, check soil moisture |
| Reduced Fence Effectiveness | Physical inspection, animal behavior | Repair damaged rods/wires, moisten soil |
Proper ground rod installation is more than a technical requirement it’s a fundamental aspect of creating a reliable electric fence system. By following these detailed steps and maintaining your ground rods, you’ll ensure consistent electrical performance and maximize the effectiveness of your fence.
Remember that each property presents unique challenges. Soil composition, climate, and specific agricultural needs will influence your ground rod installation strategy. Take time to assess your specific environment and adapt these guidelines accordingly.
Troubleshooting Common Grounding Problems
Electric fence grounding problems can significantly compromise the effectiveness of your entire fencing system. Understanding how to diagnose and resolve these issues is crucial for maintaining a reliable animal containment solution.
Identifying Grounding Performance Issues
According to Field Crop News, improper grounding represents the most frequent cause of electric fence malfunctions. Recognizing the signs of poor grounding is your first step in resolving potential problems.
Key indicators of grounding performance issues include:
- Inconsistent Shock Delivery: Animals experiencing unpredictable or weak electrical pulses
- Voltage Fluctuations: Significant drops in fence line voltage
- Corrosion at Connection Points: Visible deterioration of ground rod connections
- Reduced Fence Effectiveness: Animals frequently breaching fence boundaries
Diagnostic and Repair Strategies
The University of Maine Cooperative Extension recommends a systematic approach to diagnosing grounding problems. Start by verifying that your energizer is functioning correctly and that all connections remain secure and clean.
Effective troubleshooting steps include:
- Use a digital voltmeter to measure ground rod voltage
- Check for loose or corroded ground wire connections
- Inspect ground rods for physical damage or excessive rust
- Evaluate soil moisture and conductivity around ground rods
- Verify proper ground rod spacing and depth
Advanced Grounding System Optimization
Virginia Tech’s Cooperative Extension suggests advanced techniques for optimizing your grounding system. They recommend a comprehensive approach that goes beyond basic installation.
Consider these advanced optimization strategies:
- Moisture Management: In dry regions, periodically moisten soil around ground rods
- Additional Ground Rods: Install extra rods if initial grounding performance is suboptimal
- Seasonal Adjustments: Modify grounding configuration based on seasonal soil conditions
- Professional Testing: Utilize specialized ground testing equipment for precise measurements
Remember that environmental factors play a significant role in grounding effectiveness. Clay soils typically provide better conductivity compared to sandy or rocky terrain. In areas with challenging soil conditions, you might need to implement more complex grounding strategies.
Proper maintenance and regular system checks are essential. A well-maintained grounding system not only ensures consistent fence performance but also extends the overall lifespan of your electric fencing infrastructure.
Ultimately, understanding and addressing grounding problems requires patience, systematic investigation, and a willingness to adapt your approach based on specific environmental conditions. Each property presents unique challenges, so approach troubleshooting with a flexible and thorough mindset.
Best Practices for Different Property Types
Electric fence grounding strategies must be tailored to specific property characteristics, recognizing that soil composition, terrain, and land use significantly impact grounding system effectiveness. Understanding these nuanced requirements ensures optimal electric fence performance across diverse agricultural and rural environments.
Agricultural and Livestock Properties
The University of Maine Cooperative Extension recommends specialized grounding approaches for livestock management. For pastures and farmland, ground rod installation requires careful consideration of soil conditions and animal containment needs.
Key agricultural grounding considerations include:
- Pasture Configurations: Install ground rods at 1,500-foot intervals for extensive fence lines
- Livestock Density: Adjust ground rod quantity based on animal type and pasture size
- Seasonal Variations: Implement additional grounding strategies for dry or fluctuating soil conditions
Challenging Terrain and Environmental Conditions
Virginia Tech’s Cooperative Extension provides comprehensive guidance for managing grounding systems in diverse environmental contexts. Rocky, sandy, or clay-based terrains demand unique approaches to ensure consistent electrical conductivity.
Strategies for challenging environments:
- Rocky Terrain: Use alternative grounding techniques like horizontal ground wire installations
- Dry Regions: Implement regular soil moistening or use specialized super-grounding mixtures
- Clay Soils: Leverage natural conductivity by careful ground rod placement
Specialized Property Management Techniques
The University of Missouri Extension emphasizes adaptable grounding strategies for unique property configurations. Their research highlights the importance of understanding specific environmental constraints and implementing targeted solutions.
Advanced grounding recommendations include:
- Trenched Ground Systems: Install ground rods in moisture-consistent areas like north-facing shed drip lines
- Multiple Energizer Setups: Design independent grounding systems for complex property layouts
- Seasonal Adaptation: Modify grounding configurations to accommodate changing environmental conditions
Successful electric fence grounding transcends standard installation techniques. It requires a nuanced understanding of your specific property’s unique characteristics. Consider factors like soil type, moisture levels, terrain complexity, and intended animal management goals when designing your grounding system.
Remember that no single approach works universally. Each property presents its own set of challenges and opportunities. Invest time in understanding your specific environmental context, and be prepared to adapt your grounding strategy accordingly. Regular monitoring, maintenance, and willingness to adjust your approach will ensure a reliable and effective electric fence system.
Frequently Asked Questions
How important is grounding for an electric fence?
Proper grounding is essential for an electric fence, as it completes the electrical circuit and ensures consistent shock delivery to deter animals. Poor grounding can account for up to 80% of electric fence failures.
How many ground rods do I need for my electric fence?
For optimal performance, you should install at least 3-5 ground rods of 6-8 feet each, spaced a minimum of 10 feet apart, depending on the energizer output.
What materials are best for electric fence ground rods?
Galvanized steel rods are recommended for electric fence grounding due to their durability and corrosion resistance. They should ideally be at least 6-8 feet long and 5/8 inch in diameter for maximum conductivity.
How can I troubleshoot grounding issues with my electric fence?
To troubleshoot grounding issues, check for inconsistent shock delivery or voltage fluctuations. Use a voltmeter to measure the ground rod voltage, inspect for corrosion at connections, and ensure adequate soil moisture around ground rods.
Turn Your Electric Fence Knowledge Into Reliable Protection for Your Farm
After learning how poor grounding often leads to electric fence failure, you know how crucial the right setup is for keeping your animals safe. Many farmers struggle with inconsistent shock delivery and frustrating voltage drops, especially in tough Canadian soil conditions. If you want to stop worrying about weak fences or animals escaping, you need proven components and expert guidance that address these real pain points.

Why put your trust and investment at risk with guesswork or second-rate supplies? Find everything you need for effective electric fence grounding at FenceFast.ca. Explore our premium selection of galvanized rods, ground wire, energizers, and livestock management tools designed to solve exactly the challenges discussed in this article. Our online catalog is tailored for Canadian farm conditions and includes support from experts who understand your property’s unique requirements. Break the cycle of fence frustration and upgrade your project with confidence. Shop now and leave grounding issues in the past.
Recommended
-
[
Gallagher Earth Ground Stake KIWITAH – FenceFast Ltd.
](https://fencefast.ca/products/gallagher-kiwitah-ground-stake)
-
[
200 WATTS 12 VOLTS MONOCRYSTALLINE SOLAR BUNDLE KITS – FenceFast Ltd.
](https://fencefast.ca/products/200-watts-12-volts-monocrystalline-solar-bundle-kits)
-
[
Gallagher Vine-Line Wire Connector – FenceFast Ltd.
](https://fencefast.ca/products/gallagher-vine-line-wire-connector)
-
[
Corral Euro Reel Eco – FenceFast Ltd.
-
Eco-Friendly Pest Control Methods For Texas Homes In 2025 - Pest Control Van Alstyne, TX - Pestico Pest Control

