
Accurately measuring land size might sound simple, especially with high-tech tools available now. Most people still get it wrong, even though one acre is precisely 43,560 square feet. Surprising, right? Many property owners rely on rough estimates or outdated maps, but with the right technique and a few tools, anyone can achieve survey-level accuracy without needing a professional.
Table of Contents
- Step 1: Gather Necessary Tools For Measurement
- Step 2: Select The Area To Be Measured
- Step 3: Outline The Perimeter Of The Area
- Step 4: Measure The Length And Width
- Step 5: Calculate The Acreage
- Step 6: Verify The Measurements And Adjust If Necessary
Quick Summary
| Key Point | Explanation |
|---|---|
| 1. Assemble Accurate Measurement Tools | Utilize both digital and traditional tools for precise land measurement. Recommended tools include GPS devices, measuring tapes, and topographic maps. |
| 2. Identify and Mark Measurement Area | Select the area to measure by gathering property documents and understanding boundaries, ensuring precise area selection. |
| 3. Systematically Outline Property Perimeter | Mark the perimeter using brightly colored stakes while recording distances to ensure clarity and precision in your measurements. |
| 4. Employ Precision Measurement Techniques | Measure length and width accurately, applying the right techniques for both rectangular and irregular land shapes to enhance accuracy. |
| 5. Verify Measurements and Adjust as Needed | Cross-check measurements through multiple sources and techniques, correcting discrepancies to ensure reliable land assessment before finalizing calculations. |
Step 1: Gather Necessary Tools for Measurement
Measuring acreage requires precision and the right equipment to ensure accurate land assessment. Before venturing into the field, you’ll need to assemble a comprehensive toolkit that will transform your land measurement from guesswork to scientific precision.
Essential Measurement Equipment
The foundation of successful acreage measurement starts with selecting the right tools. Professional land surveyors recommend a combination of traditional and modern measurement devices to guarantee the most reliable results. Your primary tools should include a high-quality GPS device with mapping capabilities, a reliable measuring tape or laser distance meter, and detailed topographical maps of your property.
A handheld GPS receiver with mapping functionality will provide precise geographical coordinates and help you track boundaries with remarkable accuracy. For larger properties, consider investing in a professional-grade GPS unit that can record complex terrain details and provide digital mapping solutions. These devices can store multiple measurement points and create comprehensive land overview maps that will be invaluable for future reference.
Complement your digital tools with traditional measurement equipment like a long measuring tape (preferably 100 feet or longer), marking flags to indicate measurement points, and a compass to help orient yourself and establish true directional measurements. Learn more about property boundary marking techniques to enhance your land management strategy.
Additional recommended items include sturdy field notebooks for recording measurements, colored stakes or flags for marking critical points, protective gear like work gloves and comfortable outdoor clothing, and a smartphone or tablet with offline mapping applications as a backup navigation tool. By preparing thoroughly and selecting the right equipment, you’ll set the stage for accurate and efficient land measurement.
Below is a summary table of essential land measurement tools, their primary purpose, and details to help you choose the right equipment for your acreage project.
| Tool/Equipment | Primary Purpose | Details/Specifications |
|---|---|---|
| GPS Device | Geographical coordinate measurement | Handheld with mapping functionality |
| Measuring Tape/Laser Meter | Length and width measurement | Preferably 100 feet or longer |
| Topographical Maps | Visual reference and boundary mapping | Detailed maps of your property |
| Marking Flags/Stakes | Marking reference and measurement points | Brightly colored for visibility |
| Compass | Orientation and direction | For establishing true directional lines |
| Field Notebook | Recording measurements and notes | Sturdy for outdoor use |
| Smartphone/Tablet | Backup navigation and mapping apps | With offline mapping capability |
| Protective Gear | Safety and comfort while measuring | Work gloves, sturdy clothes, boots |
Step 2: Select the Area to Be Measured
Selecting the precise area for measurement is a critical step that requires careful planning and strategic approach. This phase transforms your land management from a vague concept to a targeted, systematic process that will provide actionable insights about your property.
Strategic Area Identification
Understanding the boundaries and specific sections of your land is paramount before beginning any measurement process. Start by gathering all available property documents, including deed maps, property surveys, and land registry records. These documents will provide an initial framework for identifying the exact area you need to measure. Pay close attention to legal boundaries, natural landmarks, and existing fence lines that might demarcate your measurement zone.
If you are working with agricultural or rural property, consider the specific purpose of your measurement. Are you calculating grazing land, crop areas, woodland sections, or assessing total property size? Explore property boundary marking techniques to ensure precise area selection. Different land uses require different measurement approaches, so clarifying your objective will help you select the most appropriate section for detailed assessment.
Utilize digital mapping tools like Google Earth Pro or specialized GPS mapping software to create a preliminary digital outline of your target area. These tools allow you to draw polygon boundaries, measure distances, and get a comprehensive visual representation of the land section you intend to measure. Marking key points digitally before field measurement can significantly improve accuracy and reduce on-site measurement time.
When selecting your measurement area, consider practical challenges such as terrain complexity, vegetation density, and accessibility. Steep slopes, dense woodland, or marshy ground can complicate measurement processes. Plan your approach by identifying the most navigable routes and potential measurement reference points that will help you maintain precision throughout your land assessment.
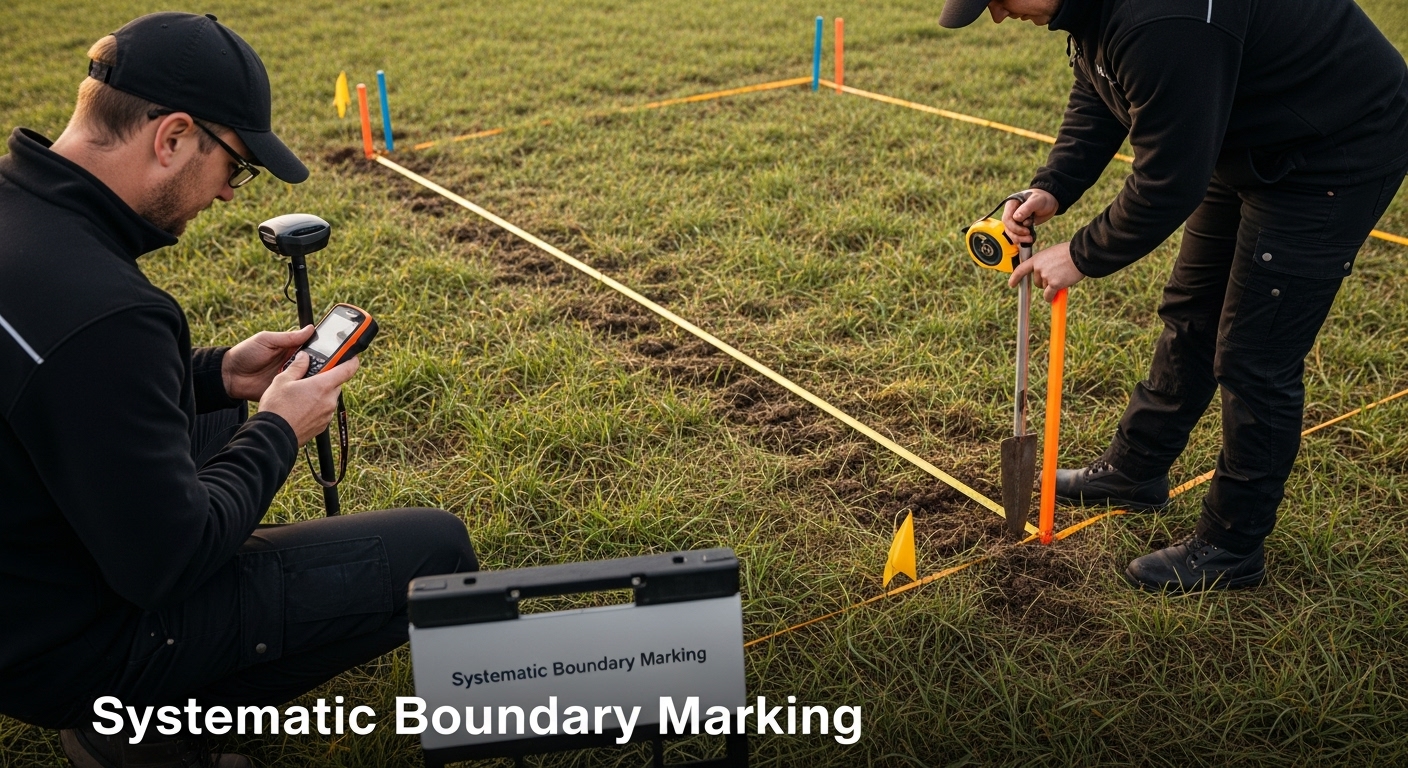
Step 3: Outline the Perimeter of the Area
Outlining the perimeter of your land is a precise process that requires methodical approach and careful attention to detail. This step transforms your initial area selection into a clearly defined boundary that will serve as the foundation for accurate acreage measurement.
Systematic Boundary Marking
Begin by establishing clear reference points around the area’s edge using brightly colored marking flags or stakes. These visual markers will help you maintain a consistent path and track your progress as you move around the property. Start at a distinct landmark or corner of your property and move systematically in a single direction, either clockwise or counterclockwise, to ensure you do not miss any sections or accidentally cross your own path.
Utilize your GPS device and measuring tape to record distances between each marker. Precision is crucial during this phase, so take your time and double-check each measurement. For irregular terrain, break the perimeter into smaller, more manageable segments that can be measured individually. Learn more about property boundary marking techniques to refine your approach.
When dealing with complex landscapes, such as properties with significant elevation changes or dense vegetation, consider using additional tools like a laser distance meter. These devices can provide accurate measurements even in challenging environments, helping you capture precise distances without physically traversing every inch of rough terrain.
Pay special attention to natural boundaries like streams, tree lines, or rock formations that might complicate your measurement process.
As you complete your perimeter outline, create a detailed sketch or digital map that documents each measurement point. This record will serve as a critical reference for future land management decisions and provide a comprehensive overview of your property’s exact dimensions.
 Verify your measurements by comparing GPS data, manual measurements, and any existing property documentation to ensure absolute accuracy.
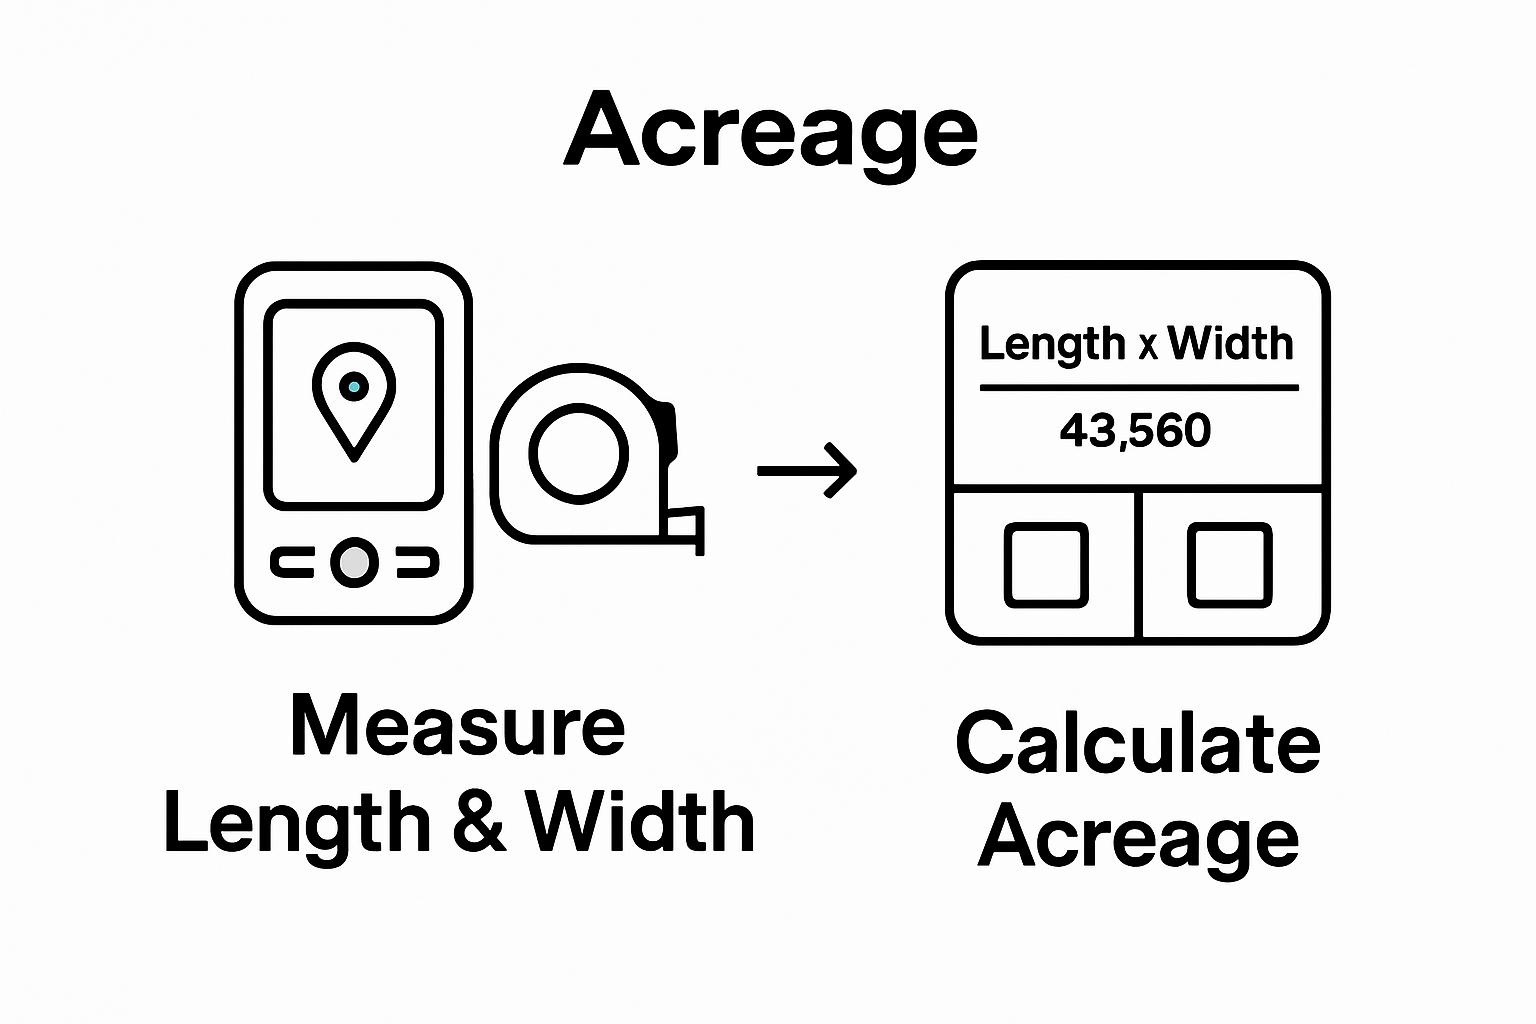
Step 4: Measure the Length and Width
Measuring the length and width of your land represents a critical phase in accurate acreage calculation, transforming your preliminary boundary markers into precise numerical data. This step requires methodical approach and strategic technique to ensure reliable measurements across varied terrain.
Precision Measurement Techniques
Start by identifying the most linear and accessible sections of your property for initial measurements. Use your long measuring tape or laser distance meter to capture the primary length and width dimensions. When dealing with rectangular or near-rectangular properties, measuring opposite sides will provide the most straightforward calculation method. Professional land surveyors recommend taking multiple measurements and averaging the results to account for potential measurement variations.
For irregular land parcels, break the area into smaller geometric segments that can be more easily measured. Triangulate complex sections by establishing baseline measurements and using trigonometric principles to calculate areas that do not conform to simple rectangular shapes. Learn more about property boundary marking techniques to enhance your measurement strategy.
When measuring challenging terrain, incorporate additional technologies like GPS mapping tools and digital measurement applications. These technologies can provide supplementary data points and help compensate for natural landscape irregularities. Utilize your GPS device to confirm manual measurements and cross-reference digital mapping information. Pay special attention to elevation changes, natural obstacles, and potential measurement interference from vegetation or terrain features.
Complete your measurement process by documenting each length and width calculation in your field notebook. Record not just the numbers, but also the specific measurement method used, date, and any notable environmental conditions that might have impacted your readings. This comprehensive documentation will provide a robust reference for future land management decisions and serve as a reliable record of your property’s precise dimensions.
Step 5: Calculate the Acreage
Calculating acreage transforms your precise measurements into a comprehensive understanding of your land’s size, a crucial step for effective property management and strategic planning. This phase requires careful computation and an understanding of different measurement techniques based on your property’s specific configuration.
Computational Strategies
For rectangular or near-rectangular properties, the calculation becomes straightforward. Multiply the length by the width and divide the result by 43,560 (the number of square feet in one acre). Precision is key, so use a calculator and double-check your computations. If your property measurements were taken in meters, convert to feet first by multiplying the meter measurements by 3.28084 before performing your calculations.
Irregular land parcels demand more complex computational approaches. Break the area into geometric shapes like triangles, rectangles, and trapezoids, calculating each section’s area separately and then summing the total. Explore strategies for successful land management to understand how accurate acreage measurement impacts broader agricultural planning.
 Digital mapping tools and GPS devices can provide additional computational support, offering automated area calculations that complement your manual measurements.
Verify your calculations through multiple methods. Cross-reference your manual computations with digital mapping tools, GPS measurement functions, and any existing property documentation. Professional land managers recommend taking three separate measurements and averaging the results to ensure maximum accuracy. Pay special attention to terrain variations, slope, and natural boundaries that might influence your measurement precision.
Document your final acreage calculation comprehensively. Record not just the total area, but also the measurement methods used, date of measurement, and any notable environmental factors. This detailed record will serve as a valuable reference for future land management decisions, property assessments, and potential agricultural or development planning.
Step 6: Verify the Measurements and Adjust if Necessary
Verification represents the critical final phase of acreage measurement, transforming raw data into reliable and actionable land information. This step ensures the accuracy of your previous measurements and provides an opportunity to identify and correct potential errors before finalizing your land assessment.
Comprehensive Measurement Validation
Begin by comparing measurements from multiple sources and techniques. Cross-reference your manual measurements with digital GPS data, aerial mapping tools, and any existing property documentation. Discrepancies of more than 2-3% should trigger a comprehensive review of your measurement methodology. Professional land surveyors recommend using at least three independent measurement techniques to establish a robust verification process.
Utilize advanced digital mapping technologies to validate your ground-based measurements. Geographic Information System (GIS) tools and satellite imagery can provide an additional layer of verification, helping you identify potential measurement challenges such as terrain variations, boundary irregularities, or natural landscape features that might have impacted your initial calculations. Learn more about property boundary marking techniques to refine your verification approach.
When encountering measurement variations, systematically investigate the potential sources of discrepancy. Factors like slope, vegetation density, GPS signal interference, and measurement tool calibration can all contribute to variations in land area calculations. Approach these differences methodically, re-measuring problematic sections and documenting your findings in detail. Consider consulting a professional land surveyor if significant discrepancies persist, as they can provide expert insight and precise measurement techniques.
Complete your verification process by creating a comprehensive documentation package that includes your original measurements, digital mapping data, verification notes, and final acreage calculation. This detailed record serves not just as a measurement validation tool, but as a critical resource for future land management decisions, potential property transactions, and long-term strategic planning.
The following table provides a checklist to guide you through validating your acreage measurements, including recommended actions and what to document at each step of the process.
| Validation Step | Recommended Action | What to Document |
|---|---|---|
| Cross-Comparison | Compare manual, GPS, and digital mapping measurements | Note discrepancies exceeding 2-3% |
| Digital Mapping Verification | Use GIS tools or satellite imagery for cross-checking | Log visual differences and variations |
| Re-Measure Inconsistent Sections | Systematically remeasure areas with discrepancies | Record new data and changes observed |
| Investigate Measurement Variations | Examine factors like slope or vegetation affecting results | Detail potential sources of variance |
| Consult Professional (if necessary) | Seek surveyor advice for unresolved differences | File professional recommendations |
| Final Documentation | Compile all measurement evidence and verification notes | Include date, method, conditions |
Ready to Put Your Acreage Measurements into Action?
You have worked hard to measure your land accurately for better property management and productivity. But marking boundaries and protecting your acreage comes with new challenges. Unclear fence lines or unreliable supplies can quickly undo your careful work. The article’s focus on perimeter outlining, property boundaries, and verification is crucial. To fully protect your investment and secure your property, you need the right tools and expertise—right when you need them most.

Make your next step count. Explore FenceFast.ca for a complete selection of fencing materials, animal management solutions, and expert guidance tailored to rural and agricultural landowners. Not sure which fencing system or supplies are best for your newly measured acreage? Discover practical tips and property marking solutions in our property boundary marking guide, or get started with our fencing and farm supply catalog. Secure your land and livestock with proven products and knowledgeable support—shop now to make your acreage work for you.
Frequently Asked Questions
What tools are necessary for measuring acreage accurately?
To measure acreage accurately, you should use a high-quality GPS device with mapping capabilities, a reliable measuring tape or laser distance meter, and detailed topographical maps of your property. Additional items like marking flags, a compass, and field notebooks are also beneficial for effective land assessment.
How do I select the correct area to measure on my property?
Start by gathering all available property documents, such as deed maps and property surveys. Identify legal boundaries, natural landmarks, and existing fences. Consider the specific purpose of your measurement, whether for agricultural use or land assessment, to select the most relevant area for accurate measurement.
What is the recommended method for outlining the perimeter of my property?
Begin by establishing clear reference points around the edge of your property using marking flags or stakes. Use a GPS device and measuring tape to record distances, moving systematically in a single direction. Break the perimeter into smaller segments if dealing with irregular terrain to ensure accuracy.
How can I verify the accuracy of my acreage measurements?
To verify your measurements, compare data from multiple sources, including manual and GPS measurements. Ensure discrepancies of 2-3% prompt a comprehensive review. Use digital mapping technologies and systematic re-measurement to address any inconsistencies before finalizing your acreage calculations.
Recommended
- Understanding Land Management Strategies for Better Outcomes – FenceFast Ltd.
- How to Start a Farm: A Step-by-Step Guide for Success – FenceFast Ltd.
- Marking Property Boundaries: A Step-by-Step Guide – FenceFast Ltd.
- Understanding Buying Land in Canada: Key Insights – FenceFast Ltd.
- DFW Complete Watering Guide

