
More than $1 billion in livestock losses occur each year due to inadequate fencing. For farmers and ranchers, a secure electric fence means the difference between peace of mind and costly escapes. Proper planning, the right tools, and detailed installation steps will help keep your animals safe while saving you time and money in the long run.
Quick Summary
| Key Point | Explanation |
|---|---|
| 1. Assess livestock needs thoroughly. | Evaluate your pasture size and livestock type to determine specific fencing requirements. This sets the foundation for your project. |
| 2. Prioritize high-quality energizer and grounding. | Select an energizer that meets voltage needs and ensure proper grounding with quality materials to prevent system failures. |
| 3. Securely install posts and insulators. | Use robust materials and maintain appropriate spacing to stabilize your fence, ensuring it can effectively contain your livestock. |
| 4. Maintain correct wire tension and configuration. | String the electric wire tightly and follow recommended heights and strand counts for different livestock types to enhance containment. |
| 5. Systematically test the electric fence. | Conduct thorough voltage and grounding tests after installation to confirm functionality and address any issues immediately. |
Table of Contents
- Step 1: Assess Fencing Needs And Gather Equipment
- Step 2: Install Fence Posts And Insulators Securely
- Step 3: String And Tension The Electric Wire Correctly
- Step 4: Connect Power Supply And Safety Components
- Step 5: Test And Troubleshoot The Electric Fence System
Step 1: Assess fencing needs and gather equipment
Building an effective electric fence starts with understanding your specific livestock management requirements and preparing the right equipment. This initial planning stage determines the success of your entire fencing project and ensures your animals stay safely contained.
Start by evaluating your pasture size and the type of livestock you need to manage. Cattle require different fencing specifications compared to horses or sheep. Measure the total area you want to enclose and consider future expansion possibilities. Read our guide on fencing for small farms to help determine your specific needs.
According to agricultural research from Manitoba’s government, you will want an energizer that provides sufficient voltage for effective livestock control. Aim for 2000 volts during summer and up to 4000 volts in winter to maintain a strong deterrent. This means selecting an energizer slightly larger than your current requirements to compensate for potential power loss from vegetation or moisture.
For your equipment list, gather these essential items:
- Electric fence energizer
- Galvanized ground rods (minimum three)
- Fence posts
- Insulators
- Fence wire or tape
- Voltage tester
- Grounding system components
Proper grounding is critical for electric fence performance. As the Manitoba agricultural guide recommends, install at least three galvanized 6 8 ft ground rods spaced approximately 3 meters apart. This ensures consistent electrical current and prevents system failures.
Warning: Never compromise on grounding equipment or energizer quality. A weak electrical system can lead to livestock escapes or ineffective containment.
Once you have assessed your needs and gathered equipment, you are ready to move forward with your electric fence installation. The next step will involve strategic post placement and wire configuration.
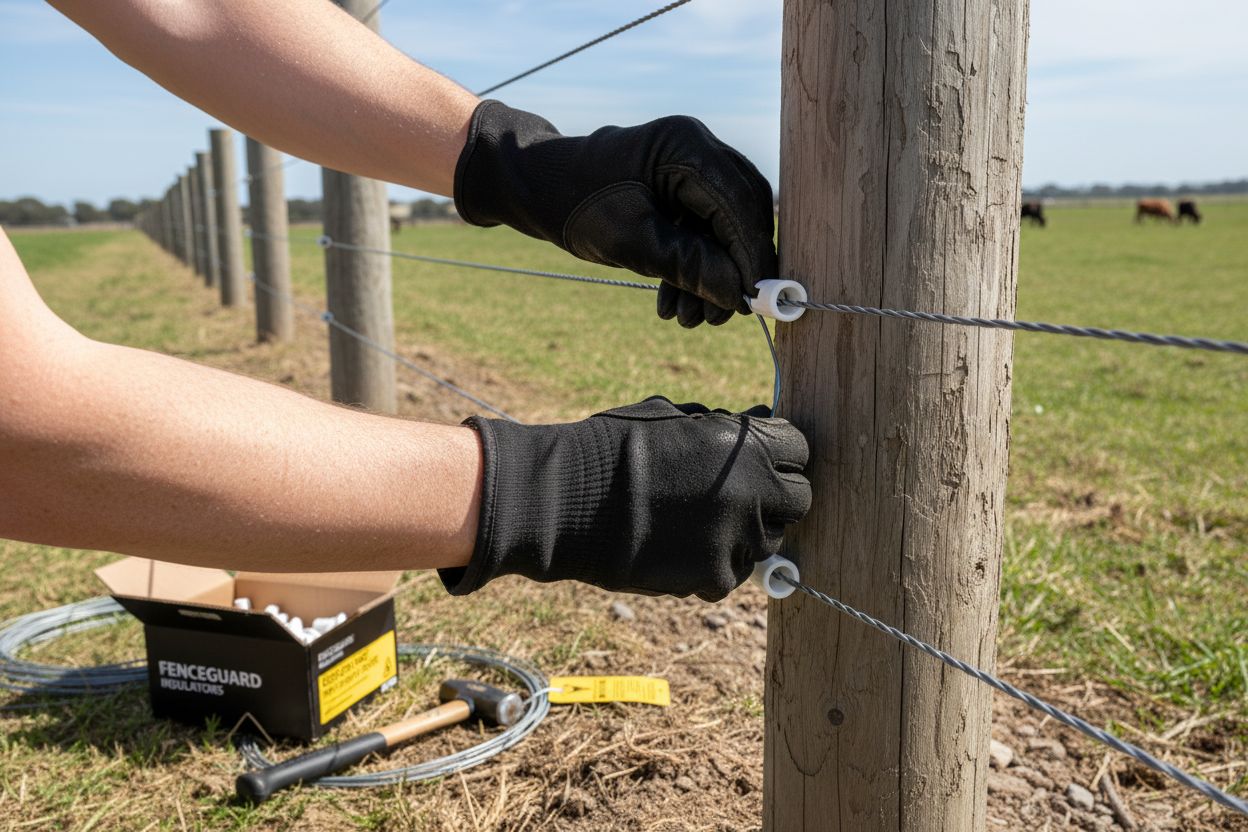
Step 2: Install fence posts and insulators securely
With your equipment gathered, it is time to strategically install fence posts and secure the critical insulators that will make your electric fence effective and reliable. This step requires precision and careful planning to ensure your livestock remain safely contained.
Start by selecting robust corner posts made of timber or steel. According to research from Daltons Supplies, these corner posts should be securely braced and provide the foundational strength for your entire fence system. Learn more about electric fence post insulators to understand their critical role in your installation.
Post spacing is crucial for maintaining fence integrity. For cattle and horses, place posts approximately 3 to 4 meters apart. If you are managing sheep or poultry, you can extend this spacing to 5 to 6 meters. When setting your posts, a critical rule is to embed one third of the post underground for maximum stability. This deep setting prevents posts from shifting or leaning over time.
Your choice of insulators can make or break your electric fence performance. As research from TDMI warns, using low voltage AC insulators can lead to significant problems like voltage sag, leakage, and potential fence failure. Choose high quality insulators specifically rated for 5000 to 10000 V pulses. Look for UV stabilized polyethylene or porcelain insulators that can withstand outdoor conditions.
For wooden or steel posts, you will need separate insulators to prevent electrical current from grounding out. If you are using plastic or fibreglass posts, many come with moulded clips that might eliminate the need for additional insulators.
Warning: Never compromise on insulator quality. A single weak point can render your entire electric fence ineffective and risk livestock escaping.
With your posts and insulators securely installed, you are now ready to move on to the next critical stage connecting your electrical wire and establishing a complete circuit.
Step 3: String and tension the electric wire correctly
Now that your posts and insulators are securely in place, it is time to string and tension your electric wire with precision. This critical step determines the effectiveness of your livestock containment system and requires careful attention to detail.
According to fencing experts at Kencove, you will want to use 12½-gauge high tensile wire for optimal performance. Check out our essential tools for fence building to ensure you have the right equipment for this task.
Wire tension is crucial. Research recommends maintaining a tension between 180 and 220 pounds (800 to 1000 newtons). This range prevents wire sagging while avoiding unnecessary strain on your posts and insulators. Use secure self-locking knots or professional crimps to attach the wire firmly.
The height and number of wire strands depend entirely on the type of livestock you are managing. According to research from ManoMano, different animals require specific wire configurations:
Here’s a summary comparing typical electric fence configurations for different livestock:
| Livestock Type | Number of Wire Strands | Recommended Heights (cm) |
|---|---|---|
| Cattle | 3 | 40 70 100 |
| Horses | 2-3 | Varying, based on size |
| Sheep | 5 | 25 40 55 75 100 |
| Goats | 5 | 25 40 55 75 100 |
- Cattle: Three wires at approximately 40 cm, 70 cm, and 100 cm heights
- Goats: Five wires spaced from 25 cm to 100 cm
- Horses: Typically two to three wires at varying heights
When stringing the wire, walk the entire fence line and ensure each wire passes smoothly through the insulators. Check for any potential snags or points of friction that could compromise wire movement or tension.
Warning: Uneven wire tension can create weak spots in your fence. Take your time and adjust each section methodically to maintain consistent tension throughout.
With your wire correctly strung and tensioned, you are now prepared for the final stage of electric fence installation: connecting the energizer and establishing a complete electrical circuit.
Step 4: Connect power supply and safety components
With your electric fence wire strung and tensioned, it is time to bring your system to life by connecting the power supply and critical safety components. This stage transforms your physical fence into an active livestock management tool.
Choosing the right energizer is crucial. According to research from Teagasc, you have three primary power options: mains electricity, battery, or solar powered systems. Check out our electric fence power solutions to match your specific farm requirements. Ensure your energizer output in joules exceeds the total length and complexity of your fence system.
Grounding remains the most critical safety component. Install at least three galvanized ground rods spaced approximately 3 meters apart. These rods must be isolated from other electrical systems to prevent interference and ensure safe operation. Connect your ground rods using high quality copper wire, driving them deep into moist soil for maximum conductivity.
Safety guidelines are paramount when installing your electric fence. As research from Farm and Dairy suggests, follow these key precautions:
- Use only one energizer per fence system
- Keep the energizer away from combustible materials
- Maintain distance from power or telecommunication lines
- Post warning signs every 300 feet in publicly accessible areas
- Avoid running fence wires parallel to existing power lines
When connecting your energizer, carefully follow manufacturer instructions. Ensure all connections are secure and use appropriate wire connectors designed for electrical fencing. Test the voltage at multiple points along your fence to confirm consistent electrical flow.
Warning: Improper electrical connections can create dangerous situations for both livestock and humans. Always double check your work and consider professional consultation if you are uncertain.
With your power supply and safety components properly installed, your electric fence is nearly ready for its final functionality test.
Step 5: Test and troubleshoot the electric fence system
Your electric fence is now installed and ready for final testing and calibration. This critical evaluation ensures your livestock remain safely contained and your system operates at peak performance.
Learn more about advanced electric fence troubleshooting before beginning your systematic testing process. According to research from Grains Shed, you will want to systematically check your fence voltage at multiple intervals.
Start by testing the energizer output first. Your voltage targets will vary depending on livestock type. For cattle, aim for 3000 to 5000 volts. Sheep and goats require slightly higher ranges between 5000 to 7000 volts. Use a dedicated fence voltmeter to take precise measurements.
Grounding tests are essential for ensuring system reliability. Research from Datamars recommends a comprehensive testing approach:
- Short the fence approximately 330 feet from the energizer
- Measure fence voltage (ideal range is under 2 kilovolts)
- Check ground system voltage (should be under 0.3 kilovolts)
- Record and compare readings against optimal ranges
Factors like vegetation density, soil composition, and metal selection can significantly impact your fence performance. Walk your entire fence line and look for potential interference sources such as tall grass, fallen branches, or metal objects touching the wire.
Warning: Inconsistent voltage readings could indicate serious grounding issues, wire damage, or component failure. Address these problems immediately to prevent livestock escape.
Once you have completed your comprehensive testing, you will have a fully functional electric fence system ready to protect your livestock.

Take Control of Livestock Safety With Proven Electric Fence Solutions
Are you worried about keeping your animals safe and securely contained? Building and maintaining an effective electric fence can feel overwhelming, especially with so many choices for energizers, insulators, posts, wires, and grounding systems. The step-by-step approach you just read highlights how vital the right equipment and setup are to avoiding escapes and fence failure. At FenceFast.ca, we understand that each farm or ranch has unique fencing needs, whether you manage cattle, horses, sheep, or goats. We make it easy to find everything you need in one place, from high-quality energizers and wire to expert advice tailored for Canadian farmers. Explore our latest fencing tools and components to start on the right foot.

Is your fence ready to stand up to Canada’s toughest weather and livestock? Browse FenceFast.ca now for reliable electric fencing systems and livestock management solutions. Take advantage of our knowledgeable support, easy online ordering, and nationwide shipping. Be proactive—visit us today and make your farm safer and more efficient!
Frequently Asked Questions
How do I assess my fencing needs before building an electric fence?
To assess your fencing needs, evaluate the size of your pasture and the type of livestock you manage. Measure the total area you want to enclose, considering different specifications for animals like cattle, horses, or sheep.
What equipment do I need to install an electric fence for livestock?
Essential equipment for an electric fence includes an electric fence energizer, galvanized ground rods, fence posts, insulators, and fence wire or tape. Collect these items before starting the installation process to ensure you have everything on hand.
How far apart should I space my fence posts for different types of livestock?
For cattle and horses, space posts approximately 3 to 4 meters apart, while for sheep or poultry, you can extend this to 5 to 6 meters. This spacing ensures fence stability and effectiveness in containing your animals.
What voltage should my electric fence energizer provide for effective livestock containment?
Aim for an energizer output of at least 2000 volts during summer and up to 4000 volts in winter to effectively contain livestock. Test the voltage at various points along the fence to confirm consistent electrical flow.
How do I properly tension the electric wire on my fence for safety?
To tension the electric wire, maintain a tension of 180 to 220 pounds (800 to 1000 newtons). Use secure knots or crimps to attach the wire firmly and regularly check for sagging to prevent weak spots in your fence.
What are the key steps to test and troubleshoot my electric fence after installation?
Begin testing by measuring the energizer output to ensure it meets required voltage levels for your livestock. Walk the fence line to check for any obstructions or grounding issues that might impact performance.

