
Did you know a solar fence energizer can save up to 60 percent on electricity costs while protecting your livestock day and night? Choosing the right system goes beyond simple hardware. The right solar kit ensures every corner of your property is covered and your animals stay secure. This guide brings expert steps and surprising insights to help you set up a reliable solar-powered fencing solution for any property size with confidence.
Quick Summary
| Key Point | Explanation |
|---|---|
| 1. Choose a suitable solar kit | Match the energizer’s joule output to your property size for effective fencing. |
| 2. Prepare proper grounding | Use three galvanized ground rods for optimal electrical conductivity to prevent system failures. |
| 3. Ensure secure wire connections | Tight and insulated connections are crucial for maintaining effective electrical flow in the fence system. |
| 4. Test system performance regularly | Conduct comprehensive tests in various conditions to ensure consistent operational efficiency of your electric fence. |
| 5. Optimize solar panel placement | Position the solar energizer for maximum sunlight exposure to ensure effective battery charging. |
Table of Contents
- Step 1: Select The Right Fence Energizer Solar Kit
- Step 2: Prepare The Site And Gather Necessary Tools
- Step 3: Install And Secure The Solar Energizer Unit
- Step 4: Connect Fencing And Grounding Components
- Step 5: Test And Troubleshoot The Solar Fence System
Step 1: Select the Right Fence Energizer Solar Kit
Choosing the right solar fence energizer isn’t just about buying equipment. It’s about protecting your property and livestock with a smart, efficient system. You’ll want to match your solar kit precisely to your specific property needs.
Start by measuring your total fence length and understanding your terrain. According to research from Virginia Tech, you should plan on approximately one output joule per mile of fence. This means if you have a 5-mile fence perimeter, you’ll want an energizer delivering around 5 output joules.
Property size plays a crucial role in energizer selection. As insights from Electric Fencing Kenya reveal, your acreage determines your joule requirements:
Here’s a comparison of recommended solar energizer kit specifications by property size:
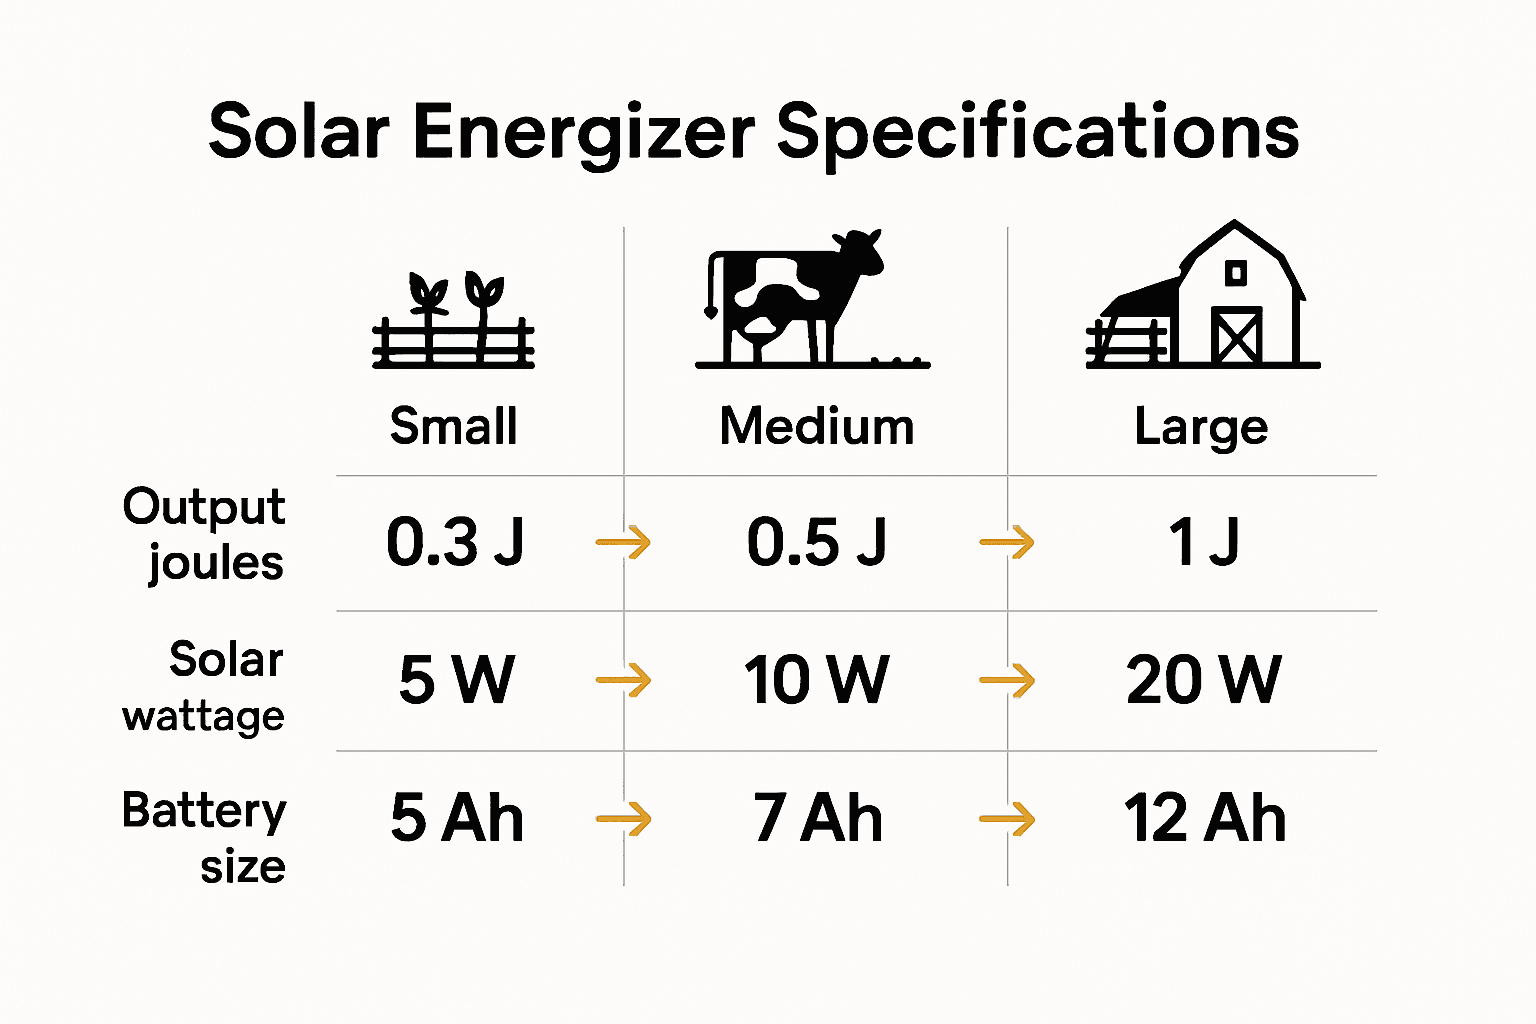
| Property Size | Output Joules | Solar Panel (W) | Battery Capacity (Ah) |
|---|---|---|---|
| Small (1–10 acres) | 2–3 | 20–40 | 10–20 |
| Medium (10–50 acres) | 3–8 | 40–80 | 20–60 |
| Large (50+ acres) | 8–20+ | 80–160+ | 60+ |
• 1 10 acres: 2 3 joules • 10 50 acres: 3 8 joules • Over 50 acres: 8 20+ joules
Don’t just look at the stored joules. Solar energizers typically deliver under 1 output joule, so check the actual output rating. Larger 2 joule models work best for more extensive properties or challenging terrains with heavy vegetation or uneven ground.
Pro Tip: Always match your grounding system size to the energizer output for maximum effectiveness.
Consider your specific needs beyond just acreage. For small garden or hobby farm applications, a compact system with 0.5 1 joules using 20 40 W panels and 10 20 Ah batteries might be perfect. Larger livestock operations will require more robust systems.
Your next step? Measure your property, assess your specific fencing needs, and select an energizer that provides reliable, consistent power coverage. Read more about electric fence design to ensure you get the most out of your solar energizer system.
Step 2: Prepare the Site and Gather Necessary ToolsInstalling a solar fence energizer requires careful preparation and the right equipment. You’ll be setting up a system that protects your property and livestock with precision and reliability. Essential tools for fence building will help make this process smoother.
First gather your essential tools. According to installation guidelines from multiple manufacturers, you’ll need a screwdriver, wire cutters, post driver, and digital volt meter. These basic tools will help you create a robust electric fencing system.
Preparing your ground system is critical. As research from Forcefield’s manual highlights, most electric fence failures trace back to poor grounding. You will need at least three galvanized ground rods and ground rod clamps to create an effective grounding network. Ensure each rod is driven deep into moist soil to maximize electrical conductivity.
When selecting wire and accessories, prioritize quality. Use insulated hook‑up wire rated for 20 kV or higher. Your kit should include line clamps, a cut‑out switch, and critical safety components like a lightning choke and surge protector for AC units.
Pro Tip: Keep a minimum of 25 meters clearance from utility lines to prevent potential electrical interference or safety hazards.
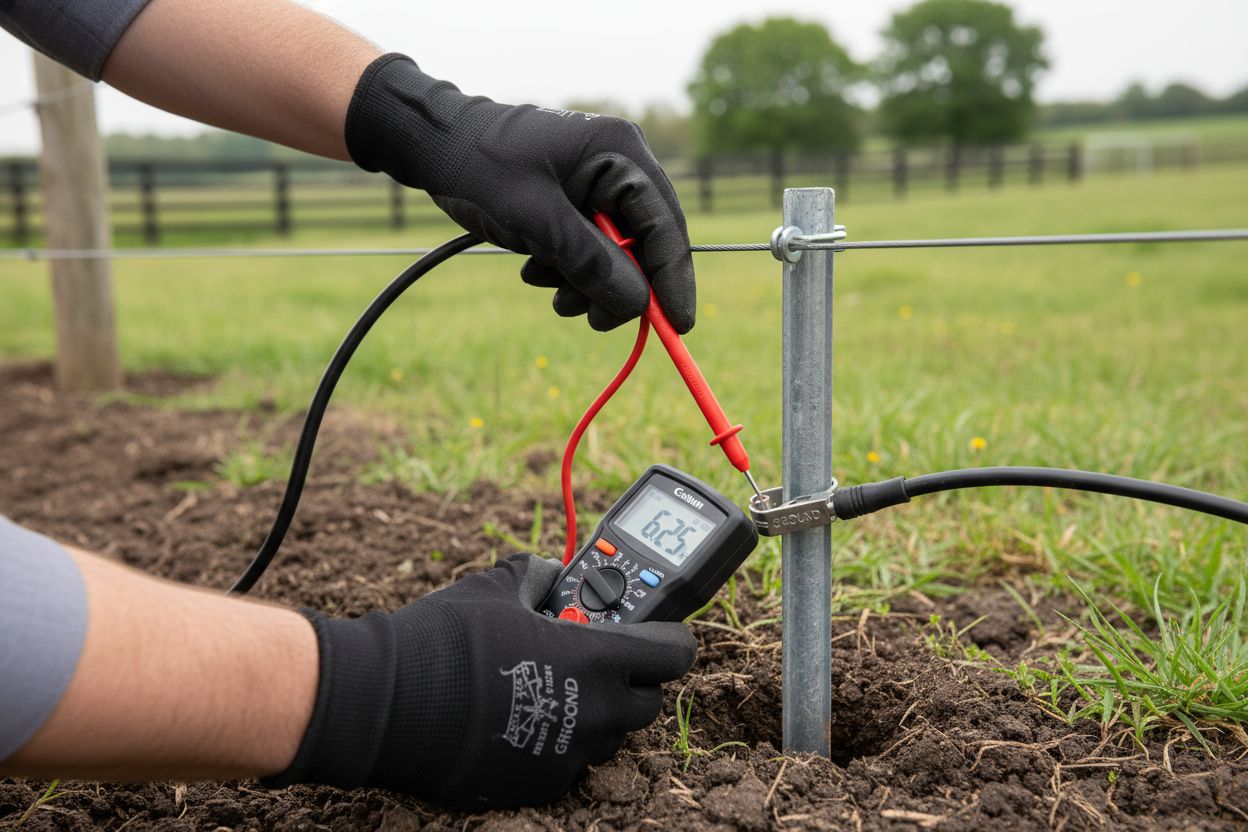
Your wire connections must be clean and secure. Take time to carefully strip and connect wires using proper techniques. A kilovolt meter can help you verify your system’s electrical integrity before final installation.
Once your tools and materials are ready, you’re prepared to move forward with confidence. The next step involves precise installation of your solar energizer system that will protect your property efficiently and effectively.
Step 3: Install and Secure the Solar Energizer Unit
Now it’s time to mount your solar energizer unit with precision and care. This step transforms your preparation into a functional electric fence system that will protect your property and livestock effectively. Gallagher Electric Fence Troubleshooting can provide additional insights if you encounter challenges.
According to instructions from Forcefield, mounting your solar energizer requires strategic positioning. Choose a sturdy post or wall with built‑in mounting slots and securely attach the unit using appropriate screws. The key is finding a location facing due south in the northern hemisphere to maximize solar charging potential.
Orientation matters significantly for solar performance. Ensure the unit receives direct sunlight without shade interference. Avoid areas with potential obstructions like tree branches or tall structures that might block sunlight during peak charging hours.
Pro Tip: Initial charging is critical. Place the unit in the ‘CHARGE’ position for 3 4 days before full operational use to ensure optimal battery performance.
Before final installation, carefully inspect all connections. Verify that your ground rods are properly connected and that wire connections are secure and insulated. Test the operation indicators to confirm the system is functioning correctly.
Your solar energizer is now ready for its primary mission. The next stage involves connecting and configuring your electric fence wire to create a comprehensive protective barrier for your property.
Step 4: Connect Fencing and Grounding Components
Connecting your electric fence components requires precision and careful planning. You’re about to create an electrical barrier that will protect your property with maximum efficiency. Understanding Electric Fence Basics can help you navigate this critical installation stage.
According to research from Virginia Tech, start by selecting the right wire. Use insulated galvanized lead‑out wire around 12.5 gauge for optimal performance. When connecting to the energizer terminals, ensure your connections are tight and secure. Use split‑bolt or electric fence clamps to guarantee a reliable electrical connection.
Grounding is the heart of your electric fence system. As GSM’s installation manual advises, drive three 4‑foot galvanized rods into moist soil. Space these rods some distance from buildings and utilities to prevent electrical interference. Connect the ground rods in series using 10 14 gauge wire for maximum conductivity.
Position your energizer strategically. Keep it within 75 feet of your ground system and mount it at eye level for easy monitoring and maintenance. Before finalizing connections, measure the voltage both before and after connecting your fence and ground leads.
Pro Tip: Avoid running your fence wires parallel to power or phone lines to prevent potential electrical complications.
Take your time to verify each connection. Loose or improperly installed components can significantly reduce your fence’s effectiveness. A well‑grounded system ensures consistent electrical flow and reliable property protection.
With your fencing and grounding components now connected, you’re ready for the final steps of testing and activation. Your electric fence is almost prepared to stand guard over your property.
Step 5: Test and Troubleshoot the Solar Fence System
You’ve installed your solar fence energizer system. Now comes the critical moment of testing and ensuring everything works perfectly. Gallagher Electric Fence Troubleshooting can provide additional guidance if you encounter unexpected challenges.
According to GSM’s installation guidelines, testing your grounding system requires precision. Start by shorting the fence to the load and measuring voltage drop. Your goal is to see the voltage drop below 2000 V. Next use a voltmeter to check voltage between ground rods. An optimal reading should register under 200 V.
If your ground rod measurements exceed 200 V don’t panic. This typically indicates you need to add more ground rods or relocate existing ones to areas with more moisture. Soil conditions dramatically impact electrical conductivity. Testing during both dry and wet seasons will give you a comprehensive understanding of your system’s performance.
Carefully inspect all wire connections. Look for any signs of corrosion loose connections or potential wear. Your solar fence energizer is only as strong as its weakest link. A single compromised connection can reduce the entire system’s effectiveness.
Pro Tip: Perform comprehensive testing across different times of day and weather conditions to ensure consistent performance.
Check your solar panel’s charging capability. Verify that the battery maintains proper charge levels and that the panel receives adequate sunlight. Some performance variations are normal but significant drops in voltage or charging efficiency warrant closer investigation.
With thorough testing complete your solar fence system is now ready to provide reliable protection. Stay vigilant and perform periodic checks to maintain optimal performance.
Take the Hassle Out of Solar Fence Energizer Installation—Experience Simplicity and Reliability
Frustrated by confusing instructions, mismatched equipment, or unreliable fence performance? If installing and maintaining your solar energizer system feels overwhelming, you are not alone. Many farmers and ranchers struggle with finding the right energy output, ensuring proper grounding, and selecting parts that actually perform as promised. When your property and livestock depend on solid protection, mistakes can be costly and time-consuming.

Stop second-guessing your setup. FenceFast.ca brings together all the fencing systems, solar kits, and accessories you need—handpicked for Canadian farmers and rural property owners. Explore FenceFast.ca to discover a curated selection designed for your acreage, livestock, and unique weather conditions. Want guidance tailored to your specific goals? Check our expert advice on essential tools for fence building and dive deeper into electric fence basics to ensure a flawless installation from the start. Act now to secure your land and animals with confidence—shop, learn, and succeed with FenceFast.ca today.
Frequently Asked Questions
How do I choose the right fence energizer solar kit for my property?
Selecting the right solar fence energizer requires knowing your total fence length and terrain. Measure your property and refer to output joule recommendations based on your acreage to ensure you pick a suitable energizer.
What tools do I need to install a solar fence energizer system?
To install a solar fence energizer, you’ll need a screwdriver, wire cutters, a post driver, and a digital volt meter. Gather these essential tools to make the installation process smoother and more efficient.
How should I prepare the site for my solar fence energizer installation?
Preparation involves ensuring a proper grounding system, which includes at least three galvanized ground rods placed deep in moist soil. Make sure to also maintain a minimum clearance from utility lines to prevent electrical interference during installation.
What steps should I follow to connect the fencing and grounding components?
Start by using insulated galvanized lead-out wire for optimal performance when connecting to your energizer. Make sure to securely connect the ground rods in series, spaced appropriately from utilities, to ensure reliable electrical conductivity.
How can I test and troubleshoot my solar fence energizer system?
Test your system by measuring the voltage across the grounding system and ensuring it registers under optimal levels. Inspect all wire connections for any corrosion or loose fittings regularly to maintain system efficiency.
What should I do if my solar energizer isn’t charging properly?
If your energizer isn’t charging well, check that it is installed in a location with direct sunlight and no obstructions. Adjust its position if necessary and verify that the battery is appropriately maintaining its charge levels.

