

TL;DR:
- Electric fence insulators prevent current leakage by separating fence wire from posts, ensuring system effectiveness. Choosing the right insulator material and proper mounting are crucial for durability and reliable livestock containment. Regular inspection and correct spacing improve fence performance and reduce maintenance costs.
Electric fence insulators are the components that physically separate your fence wire from the post, preventing the electrical current from bleeding into the ground and losing its charge. Without them, your fence is just a wire. For property owners and hobby farmers, building and installing DIY electric fence insulators is one of the most cost-effective ways to set up reliable livestock containment without paying commercial installation rates. This guide covers the right materials, proven installation steps, and the most common mistakes that kill fence performance before the first animal ever tests the wire.
What materials do you need for DIY electric fence insulators?
The three most common materials for homemade electric fence insulators are polyethylene, PVC, and porcelain. Each has a clear use case, and picking the wrong one creates problems fast.
Plastic insulators made from polyethylene, polycarbonate, and nylon are cost-effective and work well in most conditions. Porcelain insulators outlast plastic in harsh weather and high-UV environments, making them the right call for permanent installations in exposed locations. PVC pipe sits in the middle: cheap, easy to cut, and durable enough for most hobby farm setups.
| Material | Durability | Approx. Cost | Best Use |
|---|---|---|---|
| Polyethylene | Moderate | Low | Temporary and rotational fencing |
| PVC pipe | Moderate to high | Very low | Permanent DIY builds on wood posts |
| Porcelain | High | Higher | Permanent, high-UV, or harsh-weather installs |
| Polycarbonate | High | Moderate | High-impact areas, livestock pressure zones |
For tools, you need a drill with bits sized for your wire gauge, a handsaw or PVC cutter, a measuring tape, wood screws or staples, and optionally spray paint for UV protection on plastic. Post type matters too. Wood posts, T-posts, and steel posts each require different mounting hardware, so confirm your post type before buying fasteners.
Pro Tip: Buy screws slightly longer than the insulator shank. Short screws pull out under wire tension, especially on softwood posts.
How to make and install homemade electric fence insulators
Preparation is the step most hobby farmers skip, and it causes the most failures. Start with your posts before you touch any insulator material.
Preparing your posts
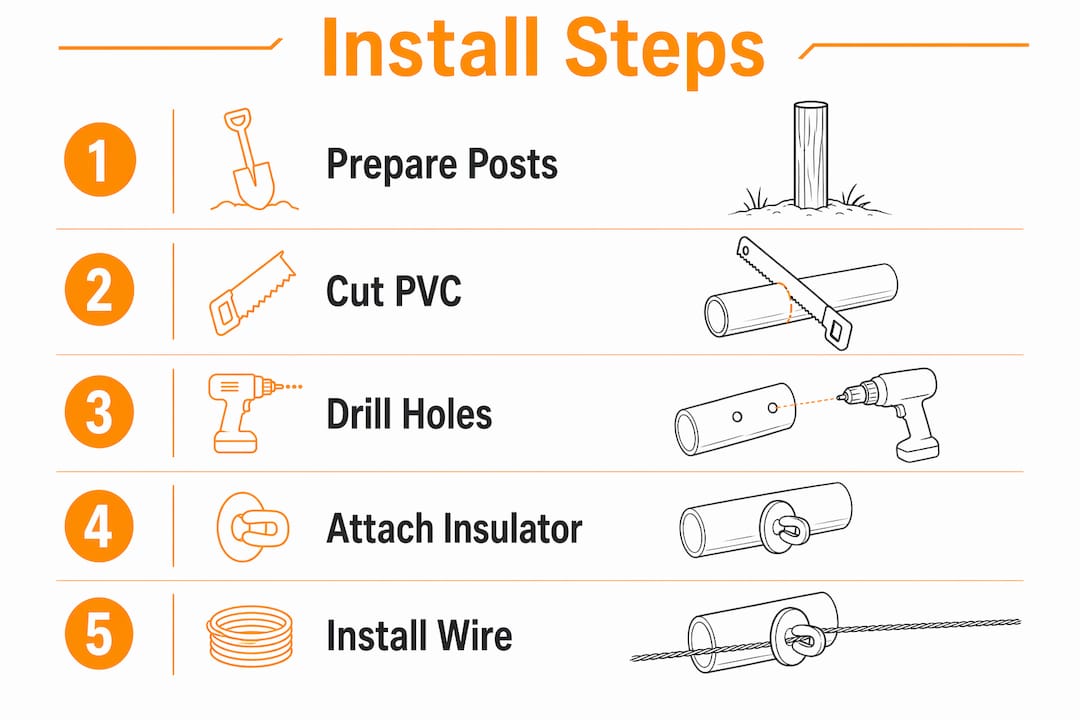
Wood posts conduct electricity when wet, which means an untreated, unprepared wood post can short your entire fence line after a rain. Apply a wood preservative to any untreated post before mounting insulators. Pre-drill pilot holes slightly smaller than the diameter of your screw-in insulator threads. This prevents the wood from splitting and keeps the insulator seated firmly under wire tension.
Building a simple PVC or plastic bottle insulator
Common PVC pipe creates effective insulators at a fraction of commercial prices. Cut PVC into 3-inch sections. Drill a hole through the center sized to your wire diameter. Mount each section horizontally on the post using a wood screw through the pipe’s wall. The wire threads through the hole and sits clear of the post by the pipe’s radius, which is typically enough offset for polywire setups.
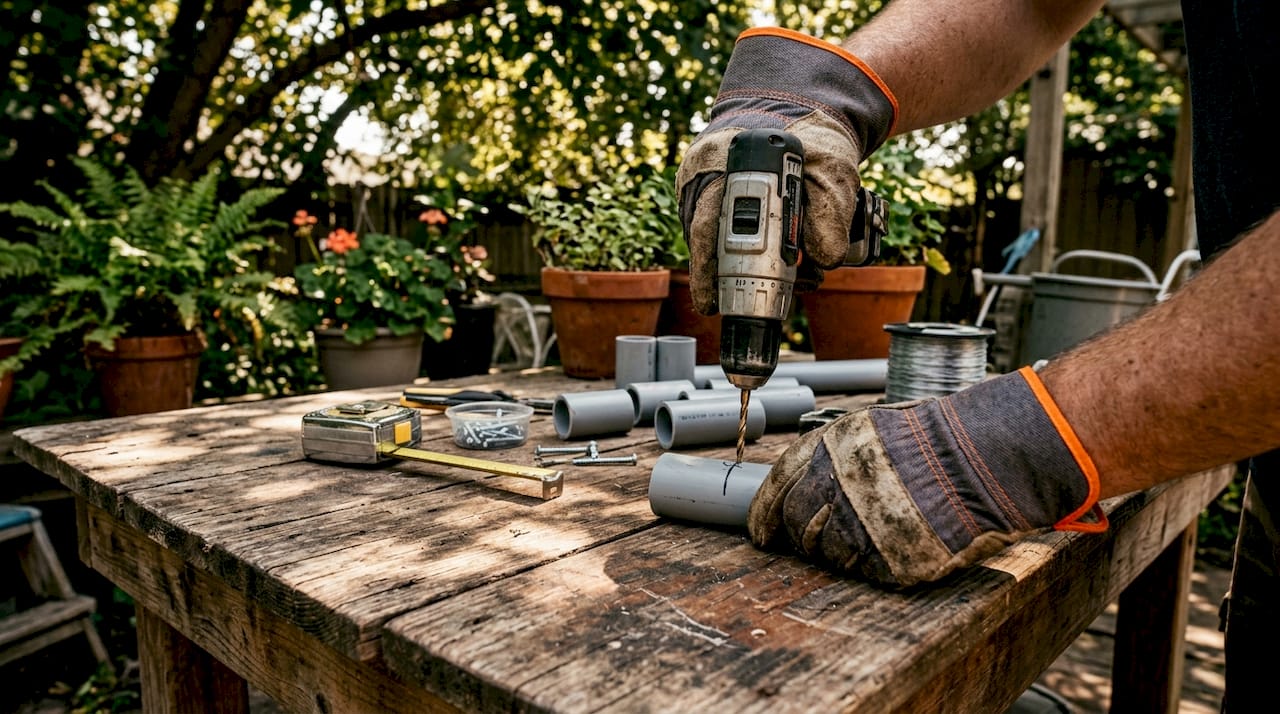
For plastic bottle insulators, use the lid from a thick-walled plastic bottle. Drill a hole through the center for the wire and a slit along one side for wire insertion. Screw the lid directly to the post. Spray paint protects plastic insulators made from cornstarch-based plastics that degrade under UV exposure. Two coats of exterior spray paint add meaningful lifespan to any homemade plastic insulator.
Step-by-step installation
- Mark insulator positions along the fence line at your target height for each wire strand.
- Pre-drill pilot holes at each marked position on wood posts.
- Thread the wire through or seat it in the insulator groove before mounting, when possible.
- Drive the screw-in insulator or screw the DIY insulator flush to the post face.
- Pull wire taut and seat it fully into the insulator groove or through the drilled hole.
- Check that the wire does not contact the post at any point along the run.
- Test voltage at multiple points with a fence tester before releasing livestock.
Insulators spaced every 3–6 feet work well for polywire and polytape. High-tensile wire holds tension better and allows spacing every 10–16 feet. Tighter spacing reduces sag and keeps wire off the ground in uneven terrain.
Pro Tip: On T-posts, use clip-style insulators that snap onto the post flange. They install in seconds and hold wire at a consistent height without drilling.
Common mistakes and how to troubleshoot them
Most DIY fence failures trace back to a short list of avoidable errors. Knowing what to look for saves hours of troubleshooting after the fence is already up.
Incorrect wire offset, cracked insulator material, and failing to pre-drill wood posts are the top causes of shorts and voltage loss in DIY setups. A cracked insulator lets the wire contact the post directly. Wet wood conducts that contact straight to ground. The result is a fence that reads low voltage even with a fully charged energizer.
Watch for these warning signs:
- Voltage drops more than 20% between the energizer and the far end of the fence line.
- Animals approach or cross the fence without reacting.
- The energizer clicks faster than normal, signaling a heavy load from a short.
- Insulators show visible cracking, yellowing, or brittleness from UV exposure.
- Wire sags between posts or contacts vegetation at ground level.
“The electric fence insulator is the most consequential component for system integrity and effectiveness, not merely a spacer. A fence with a strong energizer and poor insulators will underperform a fence with a modest energizer and quality insulators every time.”
Maintenance fixes most performance problems before they become failures. Walk the fence line monthly and press each insulator to check for looseness. Replace any cracked or discolored plastic immediately. Clean porcelain insulators with a damp cloth to remove mineral deposits that reduce their insulating properties. Proper treatment and inspection reduce wood splitting and premature insulator failure, which are the two most common causes of early fence degradation.
Pro Tip: Carry a spare bag of insulators and screws when you walk the fence line. Replacing a failed insulator on the spot takes two minutes. Coming back later means the fence runs compromised until you do.
How do you choose the right insulator type for your fence?
Insulator selection depends on three variables: wire type, post type, and the animal you are containing. Getting any one of these wrong reduces fence effectiveness and increases maintenance.
Most insulators fit wires up to 8mm in diameter and tapes up to 40mm wide. Polywire and polytape use lighter snap-on or ring insulators. High-tensile wire demands heavier, UV-resistant insulators, either porcelain or heavy-duty plastic, to handle the tension without cracking or pulling free.
Post compatibility shapes your insulator choice as much as wire type does. Wood posts accept screw-in, staple, or nail-on insulators. T-posts use clip-style insulators that snap onto the post flange. Steel posts require weld-on brackets or specialized clamp insulators. Mixing post types on a single fence line is common, so buy insulators for each post type separately rather than assuming one style fits all.
Offset distance is the most overlooked spec in insulator selection. A 5-inch offset is the recommended standard for cattle and predator deterrent fencing. That clearance keeps the wire far enough from the post that a large animal pressing against the fence does not ground the wire through the post. Smaller animals like poultry or pigs can use shorter offsets, but cattle and horses need the full 5 inches.
| Insulator type | Wire gauge / width | Post compatibility | Best livestock application |
|---|---|---|---|
| Snap-on ring | Polywire, up to 6mm | T-post | Sheep, pigs, poultry |
| Screw-in plastic | Polywire, polytape up to 40mm | Wood | Horses, cattle, general use |
| Porcelain knob | High-tensile, up to 8mm | Wood | Permanent cattle and predator fencing |
| Weld-on bracket | High-tensile, up to 8mm | Steel | Permanent perimeter fencing |
| DIY PVC tube | Polywire, up to 6mm | Wood | Hobby farm, temporary rotational |
For electric fencing for cattle, use porcelain or heavy-duty plastic insulators with a minimum 5-inch offset on all perimeter posts. Cattle lean into fences. The insulator needs to hold the wire clear of the post under lateral pressure, not just at rest.
Key Takeaways
Selecting the right insulator material and mounting it correctly determines whether your electric fence actually contains livestock or just looks like it does.
| Point | Details |
|---|---|
| Material selection matters | Use porcelain for permanent installs and PVC or polyethylene for rotational or budget setups. |
| Pre-drill wood posts | Pilot holes smaller than the screw thread prevent splitting and keep insulators seated under tension. |
| Use a 5-inch offset for cattle | This clearance stops large animals from grounding the wire through the post during fence contact. |
| Space insulators correctly | Polywire needs insulators every 3–6 feet; high-tensile wire holds at 10–16 feet between insulators. |
| Inspect and replace regularly | Cracked or UV-degraded insulators cause shorts that drop voltage across the entire fence line. |
Why insulators deserve more respect than they get
Most hobby farmers spend hours researching energizers and almost no time thinking about insulators. That is backwards. I have seen well-funded fence setups fail within a season because the owner bought the cheapest plastic insulators available and mounted them on untreated wood posts without pre-drilling. The energizer was fine. The wire was fine. The insulators cracked by midsummer, and the fence shorted every time it rained.
The insulator is the most consequential component for system integrity. That is not a marketing claim. It is a physics reality. Every point where the wire contacts the post is a point where current exits the system. One bad insulator on a 1,000-foot fence line can drop voltage enough to make the entire fence unreliable.
Robust mounting systems reduce maintenance dramatically. On steel posts, weld-on brackets that can withstand more than 100 pounds of lateral pull force are not overkill. They are the difference between a fence you check monthly and one you are repairing weekly. For DIY builds, spending an extra few cents per insulator on UV-resistant plastic or porcelain pays back in years of reduced maintenance.
The one thing I would tell every first-time fence builder: buy your insulator selection guide reading before you buy your insulators. Matching insulator type to post type and wire type takes ten minutes of research and saves a full season of troubleshooting.
— Juiced
Fencefast has the insulators your fence actually needs
Building a reliable electric fence starts with components that hold up to livestock pressure, UV exposure, and Canadian weather. Fencefast carries a full range of electric fence insulators built for real farm conditions, from snap-on T-post clips to heavy-duty screw-in insulators for wood posts and porcelain options for permanent perimeter fencing.

Every insulator in the Fencefast catalog is compatible with standard polywire, polytape, and high-tensile wire setups. Whether you are running a rotational grazing system for cattle or setting up a first fence for horses, the right insulator is in stock and ships across Canada. Visit Fencefast to browse the full selection and get your fence built right the first time.
FAQ
What is the best material for DIY electric fence insulators?
Polyethylene and PVC are the best materials for most DIY builds because they are affordable, easy to work with, and durable in moderate conditions. Porcelain is the better choice for permanent fences in high-UV or harsh-weather environments.
How far apart should electric fence insulators be spaced?
Polywire and polytape setups need insulators every 3–6 feet to prevent sag. High-tensile wire holds tension well enough to allow spacing every 10–16 feet between insulators.
What offset distance do I need for cattle fencing?
A 5-inch offset is the recommended standard for cattle and predator deterrent fencing. That clearance keeps the wire from grounding through the post when an animal presses against the fence.
Why does my electric fence lose voltage even with a working energizer?
Voltage loss almost always traces back to a shorted insulator, a cracked or missing insulator letting wire contact the post, or wet wood conducting current to ground. Walk the fence line with a voltage tester to locate the drop.
Can I use plastic bottle lids as electric fence insulators?
Yes. Thick-walled plastic bottle lids drilled for wire and screwed to posts work as functional insulators for light-duty polywire setups. Coat them with exterior spray paint to slow UV degradation and extend their usable life.

