
Most american landowners know that choosing the right temporary horse fencing is not just about convenience but also about animal safety and property security. In fact, a poorly installed fence increases the risk of escape and injury by over 30 percent, making careful planning vital. This guide breaks down each step to help you assess your property, gather the right tools, and confidently build a safe, effective enclosure for your horses.
Table of Contents
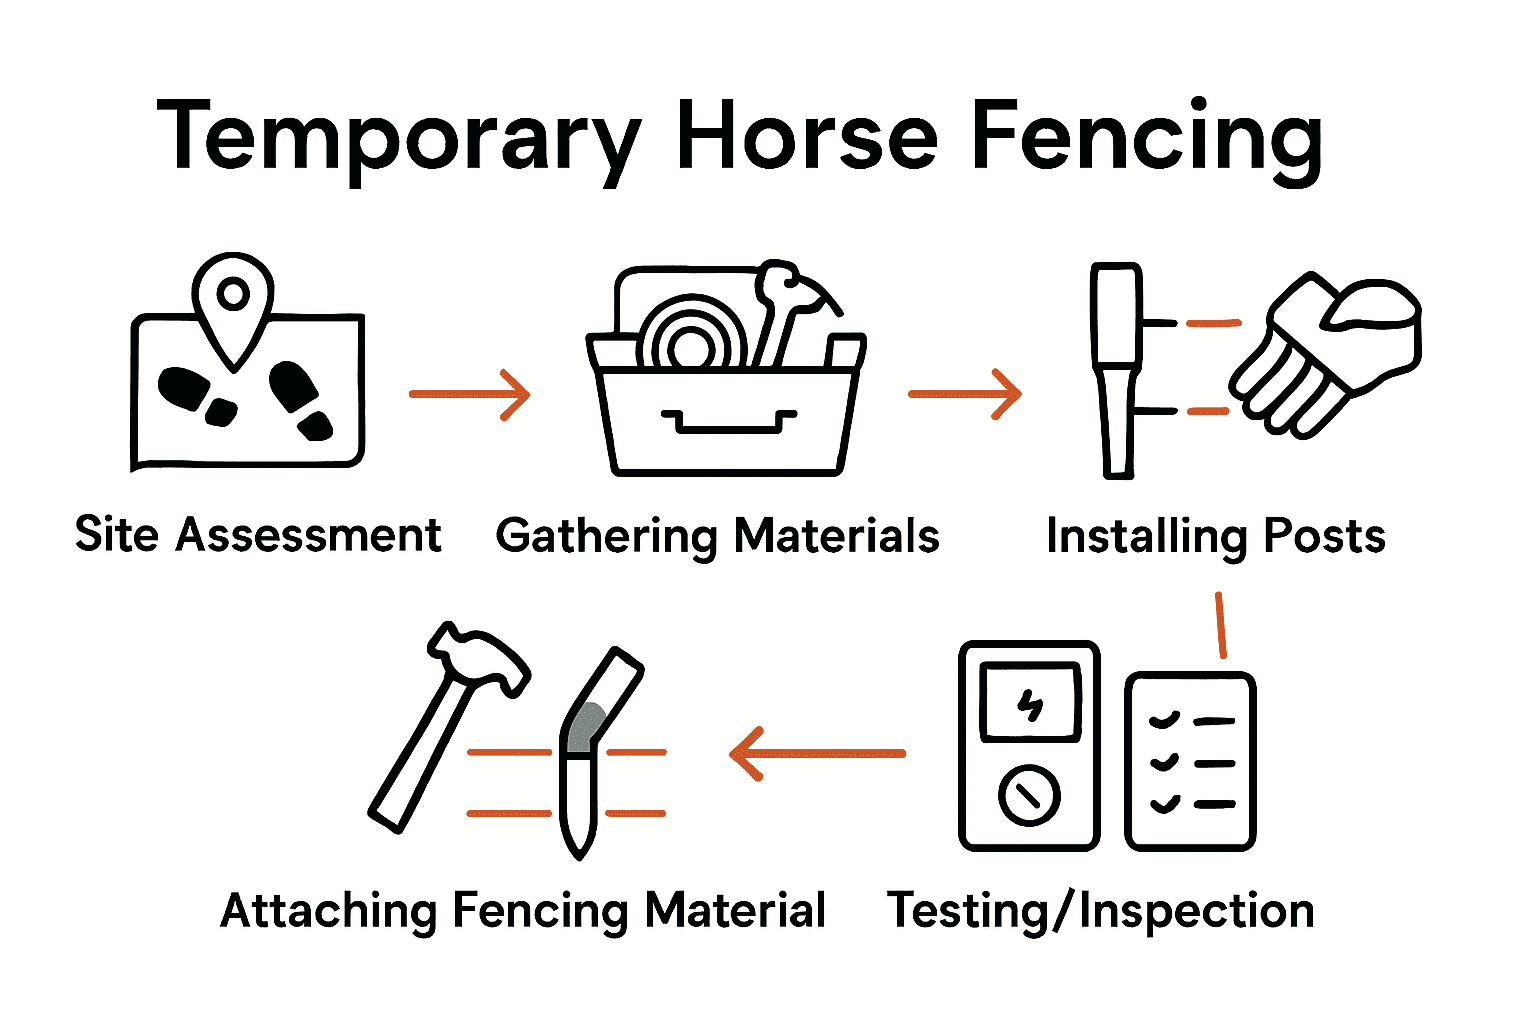
- Step 1: Assess Your Horse Fencing Needs And Site Layout
- Step 2: Gather Essential Temporary Fencing Tools And Materials
- Step 3: Install Fence Posts And Set Up Perimeter Boundaries
- Step 4: Attach And Secure Temporary Fencing Materials
- Step 5: Test The Fence For Strength And Horse Safety
Quick Summary
| Main Insight | Detailed Explanation |
|---|---|
| 1. Assess Site and Fence Needs | Evaluate terrain, pasture size, and horse breed to determine the optimal fencing setup for effective containment and management. |
| 2. Gather Necessary Fencing Tools | Collect essential materials like polywire, posts, and safety tools ahead of time to ensure a smooth installation process. |
| 3. Properly Install Fence Posts | Install posts at regular intervals, ensuring stability and correct post height for effective temporary enclosure creation. |
| 4. Secure Fencing Materials Correctly | Attach polywire or tape with consistent tension, following installation instructions to maximize fence integrity and safety. |
| 5. Test Fence for Structural Integrity | Conduct thorough testing for voltage and structural soundness post-installation to confirm the fence’s safety and effectiveness for livestock. |
 |
|
Step 1: Assess Your Horse Fencing Needs and Site Layout
Before installing temporary horse fencing, you must carefully analyze your specific site requirements and containment needs. According to the University of Minnesota Extension, perimeter fences should be approximately 5 feet high, with dividing fences ranging between 4.5 to 5 feet tall to ensure secure horse management.
Start by walking your property and mapping out the terrain. Pay close attention to landscape contours, existing vegetation, potential obstacles, and natural boundaries. The National Center for Appropriate Technology recommends considering terrain features to facilitate smooth livestock movement. Look for natural slopes, drainage patterns, and areas that provide both shelter and open space for your horses.
Key factors to evaluate include pasture size, horse breed and temperament, number of animals, and potential grazing rotation needs. Measure your intended fencing area precisely and note any unique characteristics that might impact fence installation. Remember that temporary fencing requires strategic placement and robust materials to withstand horse interactions while providing safe, flexible containment. By thoroughly assessing your site layout first, you will create a more effective and efficient fencing solution that meets your horses unique requirements.
Ready to select the right temporary fencing materials? The Complete Guide to Temporary Horse Fence Systems can help you make informed choices for your specific situation.
Step 2: Gather Essential Temporary Fencing Tools and Materials
Successfully setting up temporary horse fencing requires careful preparation and the right equipment. Virginia Tech Extension recommends gathering specific tools and materials in advance to streamline your fencing project and reduce overall labor.
For an effective temporary horse fence, you will need key components such as polywire or electric tape, step-in posts, fence energizers, voltage testers, and grounding rods. According to the Napa County Resource Conservation District, portable electric fencing or tape works exceptionally well for creating temporary paddocks and supporting rotational grazing strategies. Essential hand tools will include wire cutters, post drivers, measuring tape, gloves, safety glasses, and a hammer to ensure precise and secure installation.
Pro tip: Always purchase slightly more materials than you initially estimate to account for unexpected terrain challenges or replacement needs. If you want more detailed guidance on selecting the right tools, check out our Essential Tools for Fence Building guide to ensure you have everything needed for a successful temporary horse fence installation.
Step 3: Install Fence Posts and Set Up Perimeter Boundaries
Installing fence posts correctly is crucial for creating a secure temporary horse enclosure that will keep your animals safe and contained. Noble Research Institute provides valuable insights into using polywire and high-tensile wire for efficient temporary fencing installations.
According to Colorado State University Extension, you should plan to install one to three strands of wire with careful attention to post spacing and proper grounding. Begin by marking your perimeter with bright flags or stakes to establish clear boundaries. Use a post driver to set your step-in posts at consistent intervals, typically every 30 to 50 feet depending on terrain. Ensure posts are firmly seated and vertical, creating a stable foundation for your wire or electric tape.
Pro tip: Test the ground connectivity of your electric fence before completing installation to guarantee proper voltage and animal containment. Looking for more detailed guidance? Our How to Build Farm Fence guide offers comprehensive insights to help you create a reliable temporary horse enclosure.
Step 4: Attach and Secure Temporary Fencing Materials
With your posts in place, it is time to carefully attach and secure your temporary fencing materials. Scottish Government guidelines recommend using new materials such as single or multiple wires, electrified tape, or rope to create effective barriers for livestock containment.
Start by unrolling your polywire or electric tape carefully, ensuring no tangles or twists that could compromise fence integrity. USDA Natural Resources Conservation Service advises strictly following manufacturer installation recommendations to maximize material lifespan and functionality. Attach the wire or tape to your posts using appropriate insulators, maintaining consistent tension throughout the fence line. Space your wire strands at appropriate heights for horse containment typically between 36 to 54 inches, with the bottom strand lower to prevent horses from pushing underneath.
Pro tip: Always wear protective gloves when handling wire and electric fencing materials to prevent cuts or electrical shocks. If you want more comprehensive guidance on temporary electric fencing, check out our Complete Guide to Temporary Electric Fence for Horses to ensure a safe and effective installation.
Step 5: Test the Fence for Strength and Horse Safety
Kentucky Department of Fish and Wildlife Resources emphasizes the critical importance of rigorous fence testing to ensure horse safety. After installing your temporary fence, comprehensive testing becomes essential to verify the structural integrity and containment capabilities of your newly constructed barrier.
Begin by checking the voltage of electric fencing using a reliable voltage tester, ensuring consistent electrical charge across all wire strands. University of Alabama recommends systematic maintenance and thorough testing to guarantee fence effectiveness. Walk the entire fence line, inspecting each post for stability, examining wire tension, and looking for potential weak points or areas where horses might push through. Test the fence strength by applying moderate pressure at different points to confirm the overall structural soundness.
Pro tip: Perform multiple safety checks during the first few weeks after installation, as ground settling and animal interaction can create unexpected vulnerabilities. For more detailed guidance on ensuring livestock fence safety, explore our comprehensive 7 Essential Livestock Fence Safety Tips to protect your horses and property.
Secure Your Horses with Reliable Temporary Fencing Solutions Today
Setting up temporary horse fencing involves challenges like choosing durable materials, ensuring proper post installation, and maintaining safe electric fencing that keeps horses contained without harm. You want a strong and flexible fence that withstands your horses’ natural behavior while allowing easy adjustments for pasture rotation and site conditions. Key concerns such as wire tension, proper grounding, and fence strength all demand high-quality supplies and expert guidance.

At FenceFast.ca, we understand these needs and offer a wide selection of fencing components, electric fencing systems, and essential tools to make your temporary fencing project successful and stress-free. Benefit from our expert advice, robust electric fence energizers, step-in posts, and protective accessories specially tailored for horse containment. Don’t wait until fence failure puts your horses at risk. Visit FenceFast.ca now to explore practical solutions and get started on a secure, effective temporary horse fence. Check out our Complete Guide to Temporary Horse Fence Systems and How to Build Farm Fence guide for expert tips and trusted products designed with your equine safety in mind.
Frequently Asked Questions
What height should my temporary horse fencing be?
Temporary horse fencing should be around 5 feet high for perimeter fences and between 4.5 to 5 feet for dividing fences. Measure your intended fencing area accurately to ensure you meet these height requirements for safe containment.
How do I determine the amount of fencing material I need?
Start by assessing your site layout and measuring the area for your horse enclosure. It’s a good practice to purchase about 10-15% more materials than your estimate to accommodate for any unexpected challenges during installation.
What essential tools do I need for setting up temporary horse fencing?
Gather tools including step-in posts, polywire or electric tape, fence energizers, and hand tools like wire cutters and a post driver. For best results, have all your materials ready before starting the installation process.
How can I test the safety and strength of my temporary horse fence?
After installation, check the voltage of the electric fencing and inspect the stability of each post. Apply moderate pressure on various points of the fence to ensure its structural integrity and address any weak spots before introducing your horses.
How often should I conduct maintenance on my temporary horse fencing?
It’s advisable to perform thorough checks during the first few weeks after installation to monitor for changes or vulnerabilities. Schedule periodic inspections every month to ensure the fence remains secure and effective for your horses.
What factors should I consider when choosing the location for my temporary horse fence?
Evaluate terrain features, existing vegetation, and potential obstacles. Also, consider natural boundaries and shelter areas to provide your horses with a safe and comfortable grazing environment.

