
Over half of all DIY fence projects run into trouble before the first post gets set. Building a strong fence goes far beyond just picking up a hammer and a few boards. Every step from mapping boundaries to choosing the right tools impacts the final result and your peace of mind. This guide breaks down each important stage so you can move forward with confidence and avoid expensive mistakes that catch many homeowners off guard.
Table of Contents
- Step 1: Assess Fence Line And Site Conditions
- Step 2: Select Essential Fence Installation Tools
- Step 3: Prepare Tools And Materials For Use
- Step 4: Install Fence Components With Tools
- Step 5: Verify Installation Quality And Tool Performance
Quick Summary
| Essential Insight | Detailed Explanation |
|---|---|
| 1. Assess Site Conditions Thoroughly | Create a precise site plan mapping boundaries, structures, and obstacles to avoid costly errors and disputes during installation. |
| 2. Select the Right Tools for the Job | Assemble a tailored toolkit, including post hole diggers and wire strainers, suited to the specific fencing requirements and terrain challenges. |
| 3. Prepare Tools and Materials Efficiently | Organize and inventory all necessary tools and materials systematically to facilitate a smooth and productive installation process. |
| 4. Ensure Accurate Component Installation | Methodically install fence components, using proper tools and techniques to verify spacing and alignment for a professional finish. |
| 5. Conduct Rigorous Quality Checks | After installation, meticulously verify the integrity of each component, ensuring alignment, tension, and stability to guarantee long-term durability. |
Step 1: Assess Fence Line and Site Conditions
Successfully installing a reliable fence starts with meticulous site assessment. Your goal is to create a comprehensive understanding of the terrain, boundaries, and potential challenges before driving a single post into the ground.
Begin by creating a detailed site plan that carefully documents property boundaries, existing structures, proposed fence locations, and underground utility lines. According to FDL Wisconsin Inspection Services, this initial mapping process is critical to preventing costly mistakes and potential legal disputes. Walk your entire proposed fence line and use colored stakes or flags to mark key points. Pay special attention to potential obstacles like large rocks, tree roots, steep slopes, or drainage areas that could complicate installation.
Before breaking ground, contact your local utility location service to mark underground cables, water lines, and electrical conduits. This step prevents accidental damage and ensures worker safety. A quick phone call can save you thousands in repair costs and potential legal complications. By thoroughly assessing your site conditions upfront, you set the foundation for a sturdy, long lasting fence that meets both your property needs and local regulations. Check out our guide on fence installation equipment to prepare for the next steps in your fencing project.
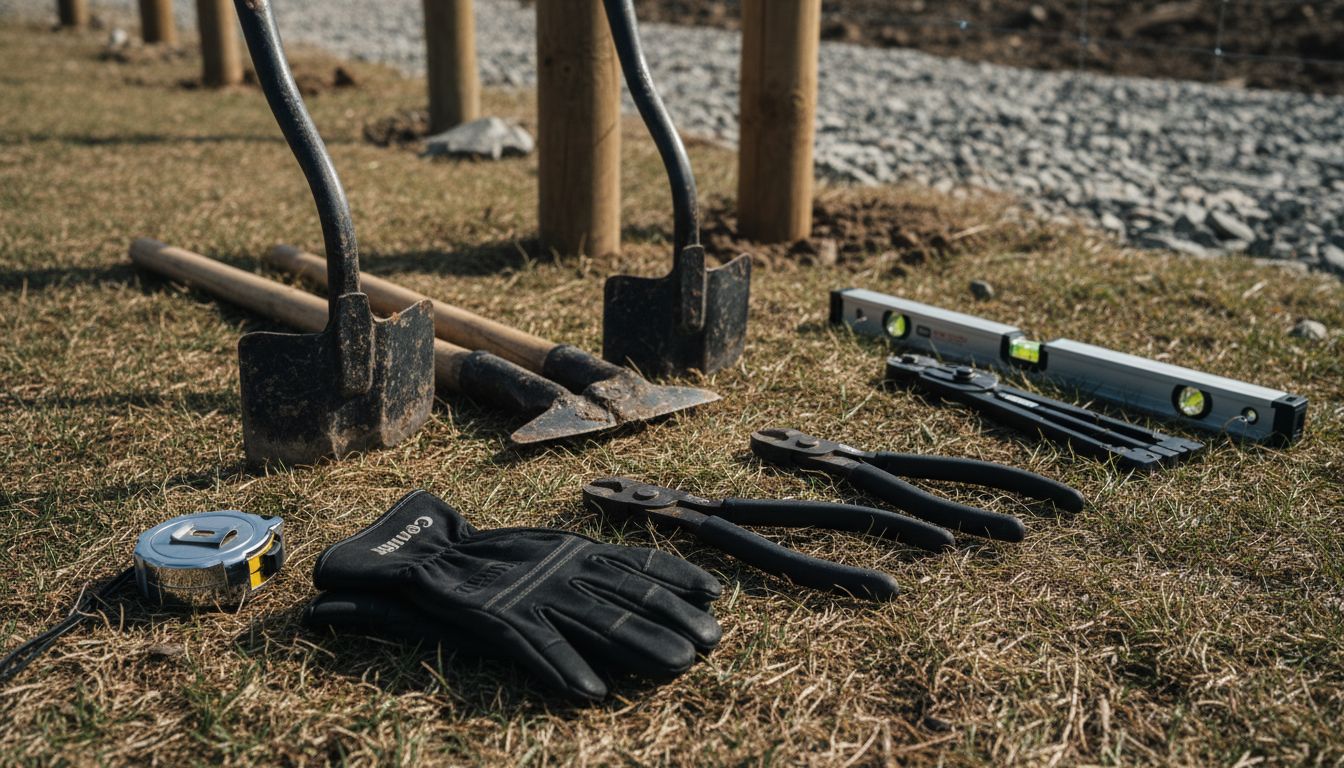
Step 2: Select Essential Fence Installation Tools
Choosing the right tools is critical for transforming your fence project from a potential headache to a smooth successful installation. Your goal is to assemble a comprehensive toolkit that matches your specific fencing requirements and terrain challenges.
According to LPELC, the fundamental tools for fence installation include post hole diggers, wire strainers, and crimping tools. Selecting these tools requires careful consideration of your specific fence type and project conditions. For agricultural or rural fencing, invest in sturdy manual or powered post hole diggers that can handle varied ground conditions. Wire strainers become essential for maintaining proper tension in wire fences, while crimping tools ensure secure connections between wire segments.
Precision matters when selecting your tools. From Fences for Fido, we learn the importance of additional tools like post levels and wire cutters to ensure accurate alignment and clean wire preparation. Pro tip warning zones always include checking ground hardness before selecting your digging tools.
 Learn more in our step by step guide on essential fence building tools to prepare for a successful installation.
Step 3: Prepare Tools and Materials for Use
Successful fence installation hinges on thorough preparation and organized setup. Your mission is to gather and arrange all necessary tools and materials before breaking ground ensuring a smooth and efficient project workflow.
According to Beyond Fences, comprehensive preparation involves creating an inventory of tools and materials for a typical fence project. This includes collecting essential items like post hole diggers, rebar for concrete mixing, various fasteners, measuring tape, string line, and marking flags. Lay out your tools in a systematic manner close to your work area to minimize unnecessary movement and maximize productivity.
Precision preparation is key. As Fenway Victory Gardens emphasizes, take time to verify dimensions and double check your material quantities before starting. Pro tip warning zone includes ensuring all safety equipment like work gloves, protective eyewear, and sturdy boots are readily available.
Check out our guide on essential tools for farm fencing to refine your preparation strategy and set yourself up for installation success.
Step 4: Install Fence Components with Tools
Fence installation transforms your careful planning into physical reality. Your goal now is to methodically install each fence component with precision and attention to detail using the tools you have prepared.
According to Fenway Victory Gardens, the installation process begins with setting fence posts using post hole diggers and ensuring absolute vertical alignment with a level. Start by digging holes to the recommended depth based on your fence height and ground conditions. Use a tamping tool to compact soil around each post creating a stable foundation. Pay close attention to maintaining consistent spacing between posts for a professional looking result.
Precision matters during component installation. Beyond Fences emphasizes the importance of using appropriate tools like hammers wire cutters and levels when attaching fencing materials. Pro tip warning zone includes checking each component for alignment and tension before final securing. Review our guide on fence insulators to understand critical details for connecting your fence components effectively and ensuring long term durability.
Step 5: Verify Installation Quality and Tool Performance
Your fence installation approaches its final stage where meticulous verification ensures long lasting durability and optimal performance. This critical step transforms your hard work into a reliable boundary that will stand up to environmental challenges.
According to LPELC, systematic verification involves carefully checking wire tension using specialized strainers and confirming that each post remains perfectly vertical and securely anchored. Use your level to double check alignment across multiple points ensuring no subtle shifts have occurred during installation. Pay special attention to wire connections checking that crimps are tight and uniform without any signs of weakness or potential future failure.
![]()
Precision during the verification process separates professional quality work from amateur efforts. Systematically test each section of your fence by applying gentle pressure and observing how components respond. Pro tip warning zone includes checking for any slight movements or wobbling in posts which could indicate inadequate soil compaction. Review our guide on electric fence installation to understand advanced techniques for ensuring your fence meets professional standards of reliability and performance.
Gear Up with the Right Tools for Your Next Fence Installation
Mastering fence installation requires more than just effort it demands precise tools and quality materials to solve common challenges like uneven terrain, wire tension, and secure post placement. The article highlights critical steps such as site assessment, selecting post hole diggers and wire strainers, and verifying installation quality — all essential to building a strong durable fence that lasts.
Avoid costly mistakes by equipping yourself with expert recommendations and professional-grade fencing products fit for Canadian agricultural conditions. At FenceFast.ca, we specialize in providing everything from fencing components to electric fence systems that simplify installation and boost reliability.

Ensure your project success starting today. Explore quality tools and supplies at FenceFast.ca and discover comprehensive guides like how to build farm fences step by step or learn more about fence installation equipment that match your exact needs. Don’t wait until fence issues slow you down get the right gear now and build with confidence.
Frequently Asked Questions
What are the essential tools for installing a reliable fence?
To install a reliable fence, essential tools include post hole diggers, wire strainers, crimping tools, and levels. Gather these tools to ensure your installation is precise and efficient.
How do I assess my site before installing a fence?
Start by creating a detailed site plan that outlines property boundaries, existing structures, and proposed fence locations. Walk the entire fence line to mark key points and identify any potential obstacles like rocks or slopes.
What steps should I follow to prepare my tools for fence installation?
Begin by creating an inventory of tools and materials you’ll need for the project, such as fasteners and marking flags. Organize and lay out your tools near the work area to streamline the installation process and minimize movement.
How can I ensure the posts are installed correctly?
To ensure posts are installed correctly, dig holes to the recommended depth and use a level to check vertical alignment. Regularly check the spacing between posts to achieve a professional finish.
What should I do after installing my fence to verify its quality?
After installation, systematically check wire tension and ensure each post is vertically aligned. Apply gentle pressure to each section to test for movement, addressing any wobbling early to enhance durability.
Recommended
- Fence Installation Equipment: Achieve Strong, Lasting Fences – FenceFast Ltd.
- Essential Tools for Fence Building: A Step-by-Step Guide – FenceFast Ltd.
- How to Build Farm Fence: Step-by-Step for Strong Results – FenceFast Ltd.
- 7 Essential Tips for Fencing Small Properties Effectively – FenceFast Ltd.

