
TL;DR:
- Most fence failures stem from avoidable issues like leaning posts and sagging rails, which can be prevented with proper installation. Preparing thoroughly by checking permits, utility lines, and choosing suitable materials ensures durability and cost savings. Patience during post setting and following curing times are crucial for long-lasting fences, while proper tools and expert advice help achieve professional results.
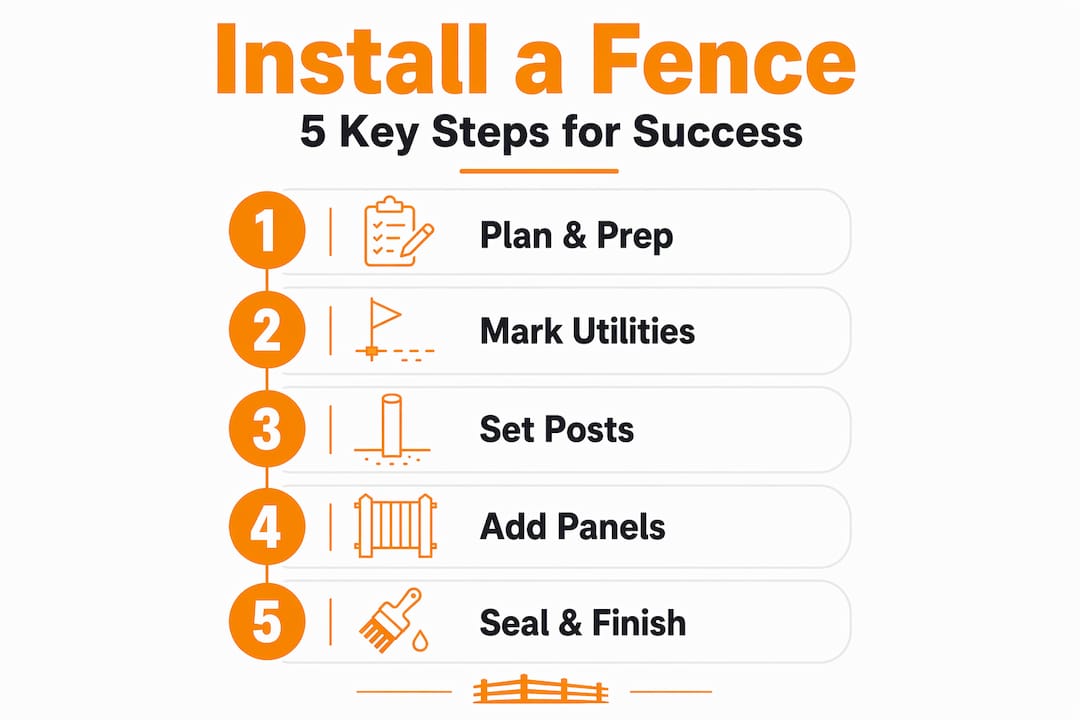
Most fence projects that end in frustration share the same root causes: leaning posts, sagging rails, and costs that balloon past the original budget. The good news is that these are almost always avoidable problems. With the right diy fence installation tips in your back pocket before you break ground, you can build a fence that looks professional, holds up for decades, and costs a fraction of hiring out the work. This guide covers every stage from planning and permits through post setting, rail attachment, and the mistakes that trip up first-timers.
Table of Contents
- Key Takeaways
- DIY fence installation tips start here: planning and prep
- Setting posts correctly: the foundation of every good fence
- Attaching rails, panels, and pickets
- Common mistakes and how to avoid them
- What I have learned from watching fences fail
- Get your fence built right with Fencefast
- FAQ
Key Takeaways
| Point | Details |
|---|---|
| Plan before you dig | Confirm property lines, permits, and utility locations before touching a shovel. |
| Post depth is non-negotiable | Bury posts at least one-third their length, going below the frost line to prevent heave. |
| Cure time matters | Wait at least 48 hours after setting posts in concrete before attaching rails or panels. |
| Use the right fasteners | Galvanized or stainless steel hardware prevents rust and extends fence life significantly. |
| Gates need extra support | Gate posts require 50% more depth than standard posts to carry the added weight and stress. |
DIY fence installation tips start here: planning and prep
You would not frame a house without a blueprint. The same logic applies when installing a fence yourself. The prep stage is where most DIY projects either get set up for success or quietly doomed to fail.
Check rules before you buy anything. HOA regulations typically cap residential fence heights at 4 to 6 feet and often require permits covering material type and placement. Skipping this step can mean tearing down a finished fence at your own expense. Call your municipality, pull the permit, and get written confirmation of your property lines before you spend a dollar on materials.
Call 811 (or your local dig-safe line) to have underground utilities marked. Gas lines, water mains, and electrical conduits run through yards more often than people expect. Digging through one is expensive and potentially life-threatening.
Choosing your materials
Your material choice shapes everything: cost, maintenance commitment, and appearance. Here is a quick comparison to help you decide:
| Material | Avg. DIY cost per linear foot | Maintenance level | Lifespan |
|---|---|---|---|
| Wood | $8 to $15 | High (stain/seal every 2-3 yrs) | 15 to 20 years |
| Vinyl | $18 to $30 | Very low | 25 to 30 years |
| Chain link | $6 to $12 | Low | 20+ years |
| Split rail | $5 to $10 | Low to moderate | 15 to 20 years |
For context, vinyl fence materials run $18 to $30 per linear foot on the DIY side, while professional installation jumps to $30 to $50 per foot. On a 150-foot fence, that gap is real money. If you want a deep breakdown of how these options compare on rural and larger properties, Fencefast has a useful fencing material comparison worth reading before you commit.
Tools you need on day one
Do not improvise here. Renting the right tools beats buying the wrong ones.
- Post hole digger or gas-powered auger (rent if possible)
- 4-foot level and a line level
- String line and wood stakes
- Measuring tape and spray paint for marking post locations
- Concrete mix, water, and a mixing tub or wheelbarrow
- Corded or cordless drill with appropriate bits
- 2x4 lumber for temporary bracing
Accurate layout using stakes and string lines prevents costly post relocation later. Stretch your string line along the intended fence run at the correct height, mark every post location with spray paint, and double-check measurements before you dig a single hole.
Pro Tip: Measure the actual panel or picket dimensions from your product specs, not the rounded nominal lengths printed on packaging. Panels that are 95.5 inches wide need post spacing to match, or they will either bow or leave gaps.
Setting posts correctly: the foundation of every good fence
Here is the honest truth about how to build a fence that lasts: the surface boards are cosmetic. The posts are structural. If the posts fail, everything attached to them fails too.
Hole depth and diameter
Posts should be buried at least one-third of their total length underground, and holes must go below the local frost line to prevent frost heave from pushing them up over winter. In colder climates, that often means 36 to 48 inches of depth for a 6-foot post.
Hole diameter should be three times the post width. A 4x4 post needs a 12-inch-wide hole. This ratio gives the concrete enough mass to resist lateral movement without wasting material.
Step-by-step post setting process
- Dig your holes with straight sides and a slightly wider bottom. Bell-shaped holes allow posts to move up under frost pressure. Straight-sided holes lock the concrete column in place.
- Pour 6 inches of crushed gravel into the bottom of each hole. Gravel drainage under posts reduces water contact with the wood or metal base and extends post life considerably.
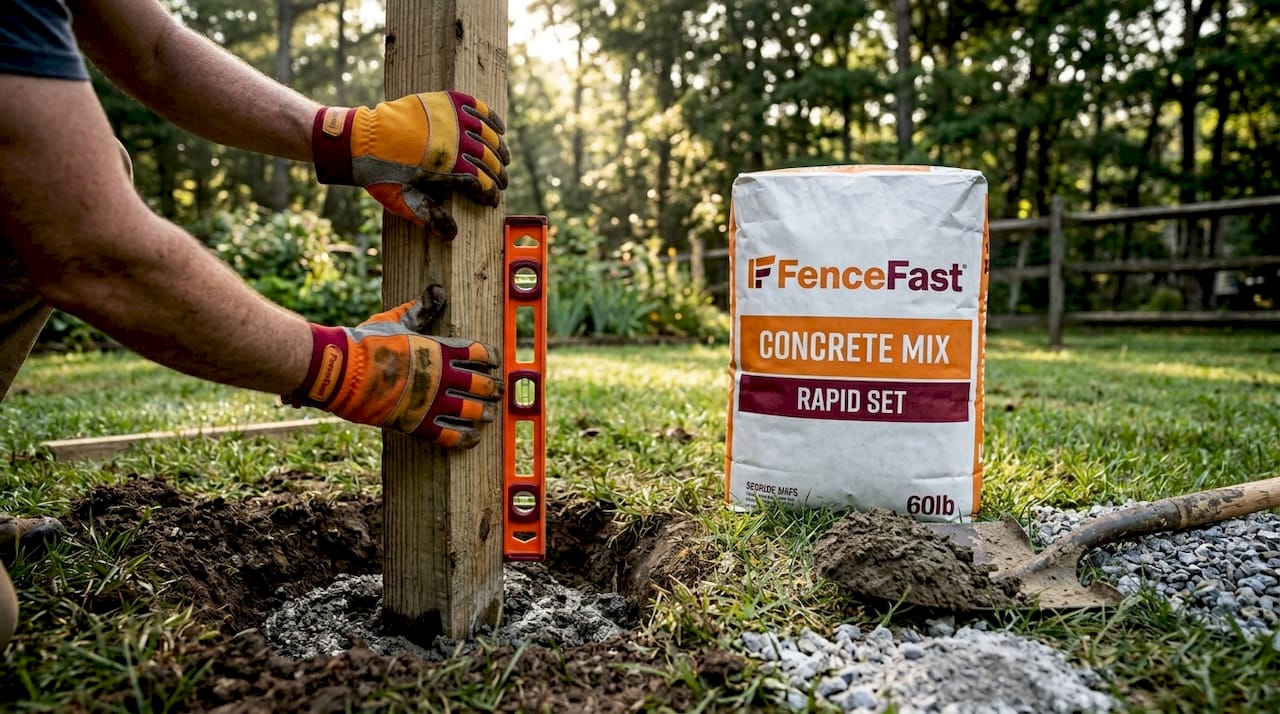
- Set the post in the center of the hole and have a helper hold it while you check plumb on two adjacent faces with a level.
- Mix and pour your concrete, rodding it with a stick to remove air pockets. Fill to about 2 inches below grade so you can cap it with soil later.
- Install temporary 2x4 braces staked diagonally from the post to the ground on two sides. Diagonal bracing keeps posts perfectly plumb until the concrete cures, preventing fence-line offset that is nearly impossible to fix after the fact.
- Check plumb one final time after bracing. Small adjustments are easy now. They are impossible in 48 hours.
Pro Tip: Use fast-set concrete for corner and gate posts where getting alignment perfect matters most. It grips in under an hour, which means less time babysitting the brace and faster progress on the rest of the run.
Resist the urge to move on too fast. Concrete reaches critical stability after 24 to 48 hours in good weather, but attaching panels before that window closes is one of the most common reasons fences shift out of alignment. Plan your pour days accordingly.
Attaching rails, panels, and pickets
With posts set and cured, the visible part of your diy backyard fence finally takes shape. This stage moves faster than post setting, but sloppy work here shows immediately.
Start with your top rail. Working from the top down gives you a consistent reference point and prevents lower rails from pulling posts slightly out of plumb under their own weight during assembly. Attach the top rail, confirm it runs level using a string line or long level, then work down to the bottom rail. On a three-rail fence, add the middle rail last.
For wood pickets, pre-drill each hole before driving fasteners. Wood splits at the end grain when you skip this step, which looks terrible and weakens the attachment. Galvanized or stainless steel fasteners are the right choice here, especially in treated lumber. Standard steel screws corrode against the chemicals in pressure-treated wood within a few years, leading to streaking and structural failure.
Use manufacturer panel dimensions rather than nominal lengths when spacing posts for pre-built panels. If panels bind or leave gaps, the post spacing is off.
Handling slopes
Two approaches work for sloped terrain, and the right one depends on how steep your grade is.
- Stepped method: Each fence section drops in a stair-step pattern. Clean, structured look. Works well with pre-built panels.
- Racked method: Rails and boards follow the slope continuously. More natural appearance. Requires individual board installation rather than pre-built panels.
Pro Tip: On wood fences, apply a penetrating end-grain sealer to every cut before installation, not after. End grain absorbs moisture far faster than face grain, and that is where rot starts. A two-dollar tube of sealer applied before assembly adds years to the fence.
Once complete, apply a quality exterior stain or sealant to all exposed wood surfaces. This step protects your investment and dramatically extends the life of the fence without adding much time or cost.
Common mistakes and how to avoid them
Even careful DIYers hit snags. These are the failures worth knowing about before you start, not after.
- Skipping utility checks. Digging into a gas line is not a recoverable mistake. Always call before you dig.
- Setting posts too shallow. Shallow posts heave, lean, and eventually fall. Follow the one-third rule and go below frost line.
- Bell-shaped holes. A hole that flares at the bottom creates a post that can pop upward under freeze-thaw pressure. Drill straight-sided holes consistently.
- Attaching panels too soon. Rushing concrete cure time is one of the most common fence failures. Wait the full 48 hours minimum.
- Uneven post spacing. Posts that are not evenly spaced cause rails to sag in the center and panels to bind at the edges.
Gate installation deserves specific attention. Gate posts need to be set 50% deeper than standard posts because gates apply constant lateral stress that regular fence sections do not. Use wood inserts or steel reinforcement where gate hardware mounts. A gate post set at the same depth as a line post will start to lean within one season under the weight of a heavy gate.
Before closing a project, check every post for plumb and every rail for level with a long straightedge. Catching a 2-degree lean now costs nothing. Fixing it after the panels are on costs hours.
Different materials also carry different maintenance demands. Vinyl needs only occasional washing. Wood requires resealing every two to three years. Thinking about long-term maintenance costs before you choose a material saves regret down the road.
What I have learned from watching fences fail
I have seen a lot of DIY fence projects over the years. The ones that hold up share one trait: the builder was patient. Not skilled, necessarily. Patient.
The fences that fail are almost always the ones where someone was trying to finish by Saturday. They poured concrete on Thursday, attached panels on Friday morning, and by Sunday the posts had shifted 3 inches because the concrete never had a chance to cure. Pulling those panels off and resetting is miserable work that could have been avoided with one extra day.
My honest take is that professional-quality results in DIY fence installation come down to post quality more than anything visible. I would rather have a slightly imperfect paint job on the boards than posts that lean after two winters. Nobody fixes a cosmetic flaw on a fence. They live with it. But a leaning fence gets worse every year until someone has to tear it out.
I also believe most homeowners underestimate the value of proper tools. Renting a power auger for a day costs around $80 to $120 in most areas. Digging 20 post holes by hand with a manual digger in rocky or clay soil takes two to three times longer and produces worse results. Rent the auger. You can find a solid overview of what tools actually matter at Fencefast’s fence building tools guide. It changed how I approach recommending tool lists.
The last thing I will say: know when to call a professional. Complex slopes, gates that need to carry serious weight, or projects close to property line disputes are all situations where a second set of experienced eyes pays for itself. Doing 80% yourself and hiring out the tricky 20% is still a major cost savings and often produces a better final result.
— Juiced
Get your fence built right with Fencefast
Whether you are tackling a backyard fence or a larger rural perimeter, having quality materials and reliable information makes all the difference.

Fencefast carries a broad selection of fencing components, from wire and connectors to posts and accessories, designed for DIY builders who want durable results without overpaying. Their team also provides practical guidance for projects of every scale, and their blog is packed with step-by-step resources including a detailed step-by-step fence guide for rural properties. If you are ready to source materials and find expert support in one place, visit Fencefast and see what they have available for your project.
FAQ
How deep should fence posts be set?
Posts should be buried at least one-third of their total length, with holes extending below the local frost line. In cold climates, that typically means 36 to 48 inches deep for a standard 6-foot post.
How long should I wait after pouring concrete before attaching fence panels?
Wait a minimum of 24 to 48 hours before attaching panels or rails. Fast-set mixes can allow light work after 4 hours in warm, dry conditions, but full concrete strength develops over several days.
What fasteners should I use for a wood fence?
Use galvanized or stainless steel screws or nails throughout. Standard steel corrodes quickly against pressure-treated lumber, causing staining and premature structural failure.
Do I need a permit to install a fence myself?
In most areas, yes. HOA rules and local building codes commonly require permits for fences over a certain height, and violations can result in mandatory removal or fines. Check with your municipality before starting.
Why does my gate sag after installation?
Gate sag almost always traces back to posts that were not set deep enough or reinforced properly. Gate posts need to be set 50% deeper than standard fence posts and should include hardware reinforcement to handle the continuous lateral load a swinging gate applies.

