
Over ninety percent of American livestock owners depend on electric fences for safe and effective herd management. Choosing the right grounding materials and installation methods can mean the difference between success and costly failures. If you want your American electric fence to provide consistent power and reliable protection, understanding every step from ground rod selection to system testing will give you the results you need. Learn what matters most for dependable performance and peace of mind.
Table of Contents
- Step 1: Select Appropriate Ground Rods and Materials
- Step 2: Choose and Prepare the Installation Site
- Step 3: Drive Ground Rods to the Correct Depth
- Step 4: Connect Ground Wire Securely to Rods
- Step 5: Test Grounding System for Effective Operation
Quick Summary
| Key Takeaway | Explanation |
|---|---|
| 1. Use Galvanized Steel Rods | Opt for galvanized steel rods at least 6 feet long for optimal conductivity in grounding. |
| 2. Choose the Right Installation Site | Select moist soil areas for ground rod installation to enhance electrical conductivity. |
| 3. Drive Rods to Recommended Depth | Ensure ground rods are driven at least 6 feet deep, with spacing based on energizer power output. |
| 4. Secure Ground Wire Properly | Connect ground wire with compatible clamps; avoid mixing metals to prevent corrosion. |
| 5. Regularly Test the System | Conduct routine voltage tests to ensure proper performance and identify grounding issues quickly. |
Step 1: Select Appropriate Ground Rods and Materials
Selecting the right ground rods is critical for creating an effective electric fence system that ensures reliable livestock containment and safety. Your goal is to choose materials that maximize electrical conductivity and minimize resistance in your grounding setup.
When selecting ground rods, prioritize galvanized steel rods at least 6 feet long. Professional agricultural experts recommend using ½ or ¾ inch diameter rods to ensure proper conductivity. If possible, opt for 10-foot long rods to maximize soil contact and improve overall grounding performance. Avoid painted rods or t-posts, as paint creates an electrical barrier that prevents proper grounding.
For connecting your ground rods, wire selection matters significantly. Energizers under 20 joules work well with 12½ gauge galvanized steel fence wire. However, for higher-powered systems exceeding 20 joules, upgrade to high-conductive lead-out cable or 6-gauge copper wire. Pro tip: When connecting different metals, use stainless steel or bronze ground rod clamps to prevent corrosion and maintain optimal electrical performance.
Here is a summary of recommended ground rod materials and their properties:
| Material Type | Corrosion Resistance | Electrical Conductivity | Typical Use Case |
|---|---|---|---|
| Galvanized Steel | High | Good | Standard agricultural fencing |
| Copper | Moderate (may corrode) | Excellent | Specialized/high-performance setups |
| Stainless Steel | Very high | Good | Long-term, corrosive environments |
| Painted Steel/T-Post | Poor | Very low | Not recommended for grounding |
Step 2: Choose and Prepare the Installation Site
Preparing the right location for your electric fence ground rod system is crucial for ensuring maximum electrical conductivity and long-term performance. You will want to select a site that provides optimal grounding conditions and supports consistent electrical transmission.
Ground rod placement requires strategic site selection to maximize electrical efficiency. Focus on areas with consistently moist soil, such as the north side of buildings or locations near water sources. These environments provide better electrical conductivity compared to dry or sandy terrain. When possible, position your ground rods in spots that remain damp even during periods of drought, like under roof eaves or near drainage areas.
Carefully evaluate the proposed site for potential obstacles such as underground utilities, rock formations, or areas with dense root systems that might interfere with rod installation. Ensure the location allows for multiple ground rods if your electric fence system requires enhanced grounding. Pro tip: Always contact local utility services to confirm no underground lines exist before digging to prevent potential damage or safety hazards.
Step 3: Drive Ground Rods to the Correct Depth
Driving ground rods to the correct depth is a critical step in creating an effective electric fence grounding system. Your goal is to ensure maximum electrical conductivity and reliable fence performance by properly installing ground rods in the optimal location.
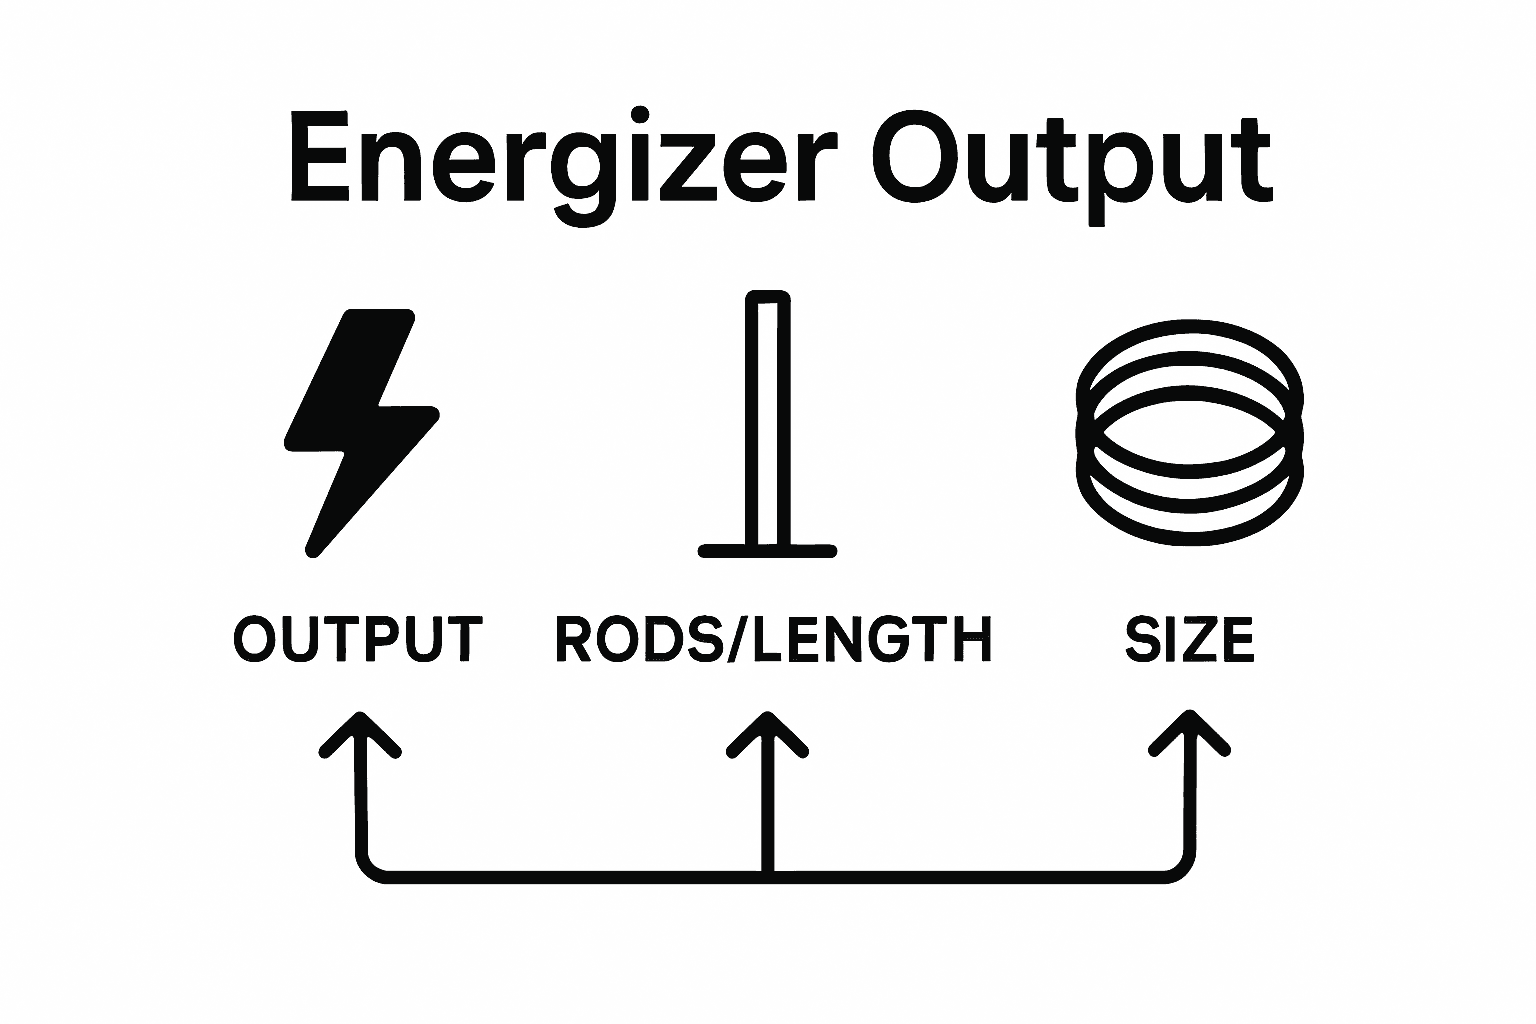
Industry guidelines recommend specific ground rod configurations based on your electric fence energizer’s power output. For energizers up to 15 Joules, install a minimum of 3 ground rods. If your system ranges up to 25 Joules, increase to 5 rods, and for systems up to 35 Joules, plan on using 7 ground rods. Each rod should be driven at least 6 feet deep into consistently moist soil to guarantee effective electrical transmission.
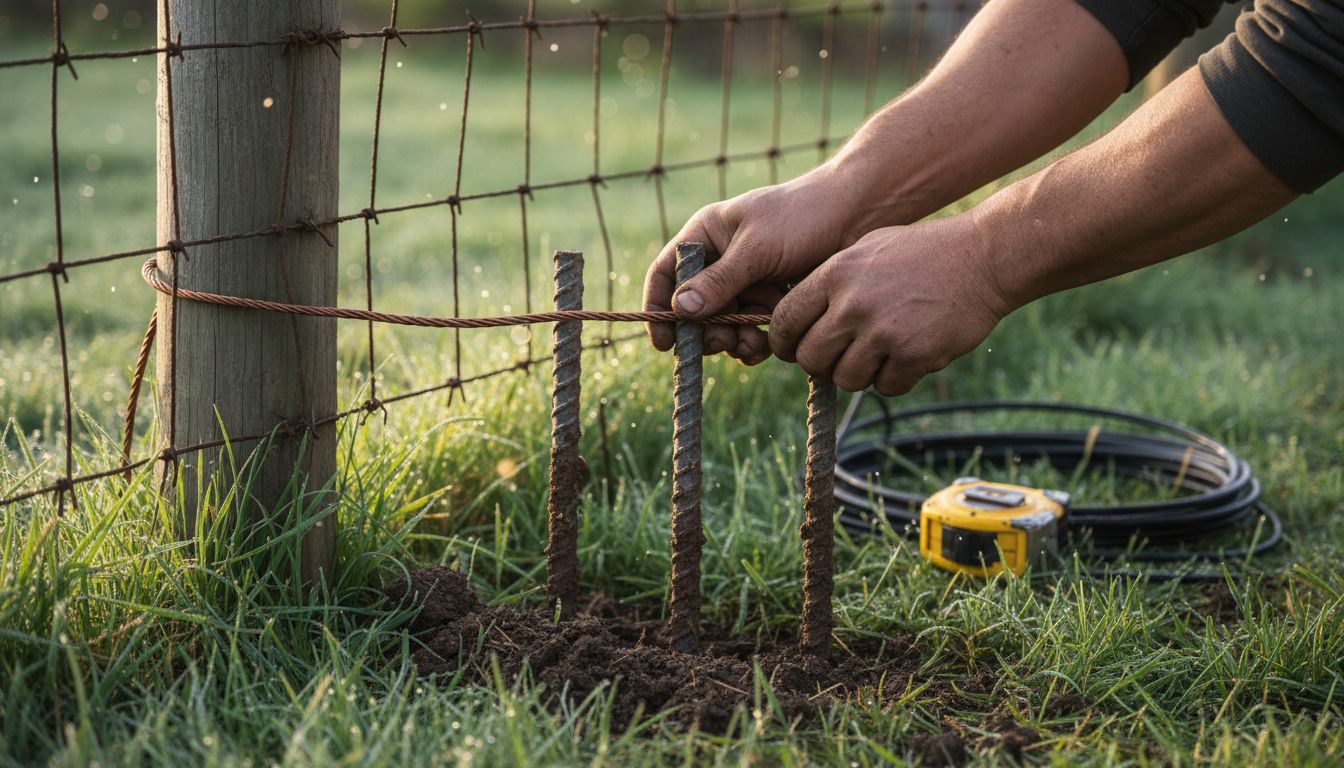
When driving the ground rods, use a post driver or sledgehammer to ensure they are vertically positioned and fully embedded. Space the rods approximately 10 feet apart in a straight line to maximize grounding efficiency. Avoid areas with rock formations or compacted soil that might prevent full rod insertion. Ensure each rod is securely connected with high-quality ground wire, maintaining tight connections to minimize electrical resistance. Pro tip: Periodically check ground rod connections and soil moisture to maintain optimal electric fence performance throughout the year.
The table below compares ground rod requirements based on energizer power output:
| Energizer Output (Joules) | Minimum Rods Required | Rod Length (feet) | Recommended Wire Size |
|---|---|---|---|
| Up to 15 | 3 | 6 | 12½ gauge galvanized steel |
| Up to 25 | 5 | 6–10 | High-conductive lead-out cable |
| Up to 35 | 7 | 10 | 6-gauge copper or equivalent |
Step 4: Connect Ground Wire Securely to Rods
Securing the ground wire to your electric fence ground rods is a critical step that directly impacts the overall performance and reliability of your fencing system. Your primary objective is to create a robust electrical connection that minimizes resistance and prevents potential system failures.
Use an unbroken wire to connect all ground rods and ensure each connection is made using proper ground rod clamps. High tensile galvanized fence wire pairs perfectly with galvanized ground rods, providing a consistent and corrosion resistant connection. When attaching the wire, avoid mixing different metal types to prevent galvanic corrosion that could compromise your electrical system’s integrity.
Begin by selecting a ground rod clamp that fits securely onto both the ground rod and your ground wire. Tighten the clamp completely to eliminate any potential air gaps that might reduce electrical conductivity. Ensure the connection point is clean and free from dirt, rust, or paint that could interfere with the electrical transmission. Test the connection by gently pulling on the wire to confirm it is firmly attached and will not come loose under tension. Pro tip: Apply a thin layer of dielectric grease to the connection point to help prevent corrosion and maintain optimal electrical contact over time.
Step 5: Test Grounding System for Effective Operation
Testing your electric fence grounding system is essential to ensure optimal performance and reliable livestock containment. Your goal is to verify that the electrical system functions correctly and delivers consistent shock protection across the entire fence perimeter.
An electric fence system with inadequate grounding will not perform to its full potential and may fail to protect your livestock effectively. To conduct a comprehensive ground system test, first turn off the energizer and place multiple metal posts against the fence wire approximately 300 feet from the energizer. Load down the fence until the voltage drops to 2,000 volts or less. Then use a voltmeter to measure the voltage on the last ground rod. A well-designed grounding system should register under 500 volts, indicating proper electrical conductivity and minimal resistance.
Pay close attention to the voltage readings during your test. Readings above 500 volts suggest potential grounding system issues that require immediate troubleshooting. Check for loose connections, corroded ground rod clamps, or insufficient soil moisture that might impede electrical transmission. Repeat the testing process periodically to maintain consistent fence performance. Pro tip: Conduct ground system tests during different seasonal conditions to ensure reliable operation throughout the year, as soil moisture and temperature can significantly impact electrical conductivity.
Ensure Reliable Electric Fence Grounding with Premium Supplies from FenceFast.ca
The article highlights the importance of selecting the right ground rods and wiring, driving rods to the proper depth, and securing connections to maintain a dependable electric fence system. If you are facing challenges such as poor conductivity or inconsistent fence performance due to inadequate grounding, you are not alone. Choosing galvanized steel ground rods, quality connectors, and corrosion-resistant clamps can make all the difference to your fence’s effectiveness and your livestock’s safety.

Take control of your electric fence installation today by exploring the specialized electric fencing systems and components available at FenceFast.ca. We offer everything you need from grounding rods, high-quality fence wire, to connectors and energizers suited for Canadian soil and weather conditions. Do not compromise on your fence’s grounding performance now when reliable products and expert support are just a click away. Visit FenceFast.ca to shop with confidence and secure your livestock with a professional-grade fence system built to last.
Frequently Asked Questions
What materials should I use for electric fence ground rods?
Selecting galvanized steel rods that are at least 6 feet long is essential for effective electric fence grounding. Ensure the diameter is ½ or ¾ inch for optimal conductivity, and avoid painted rods, as paint can hinder electrical performance.
How do I prepare the site for installing ground rods?
Choose a location with consistently moist soil, such as near water sources or the north side of structures, to enhance electrical conductivity. Clear the area of any underground utilities or obstructions before installation to ensure a smooth process.
How deep should I drive the ground rods into the soil?
Drive the ground rods at least 6 feet deep into the soil to ensure effective grounding. For energizers with higher power outputs, adjust the number of rods based on the guidelines—up to 15 Joules requires 3 rods, while systems up to 35 Joules may need 7 rods.
How do I connect the ground wire to the ground rods?
Securely attach the ground wire to each rod using the appropriate ground rod clamps, ensuring the connections are tight to eliminate air gaps. Avoid mixing different metal types to prevent corrosion that can degrade performance.
How can I test the electric fence grounding system?
To test your system, turn off the energizer, load down the fence, and use a voltmeter to measure voltage at the last ground rod. Ideally, it should register under 500 volts, indicating proper conductivity; address any readings above this threshold by examining connections and soil moisture.
How often should I check the grounding system?
Regularly assess your grounding system, especially after heavy rain or drought conditions, to ensure optimal performance. Aim to test the system at least every few months, adjusting your approach based on soil conditions and weather changes.
Recommended
- Grounding a Electric Fence for Maximum Safety and Performance – FenceFast Ltd.
- Complete Guide to the Best Ground Wire for Electric Fence – FenceFast Ltd.
- Install and Maintain a Fence Energizer Solar System Easily – FenceFast Ltd.
- Portable Electric Fence for Horses: Safe, Flexible Control – FenceFast Ltd.

