
TL;DR:
- Poor fence layout planning can lead to boundary disputes, expensive rework, and weak fencing structures. Confirming legal boundaries, marking control points, and accounting for terrain and utilities are crucial steps before installation. Proper planning saves time, money, and future operational headaches on Canadian farms and ranches.
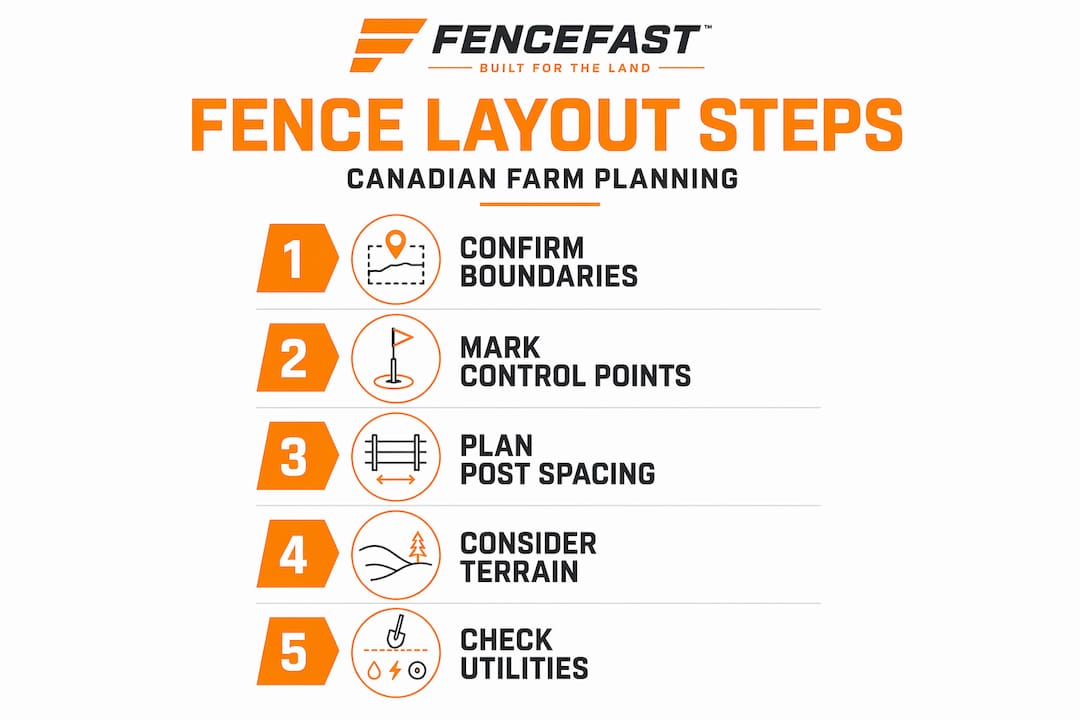
A poorly planned fence layout costs more than you think. It can trigger boundary disputes with neighbors, force expensive relocations mid-project, and leave you with gaps, weak posts, or gates in all the wrong places. For Canadian farmers and ranchers managing cattle, horses, or mixed livestock, knowing how to plan fence layout before the first post goes in the ground is one of the most valuable things you can do. This guide walks you through every critical step, from confirming legal boundaries to finalizing a staked field plan your crew can actually follow.
Table of Contents
- How to plan fence layout: start with confirmed legal boundaries
- Lay out control points and plan post spacing for efficiency
- Account for terrain and plan gate locations for functionality
- Verify utility locations and finalize your detailed fence plan
- Why thorough fence layout planning saves money and future headaches
- Get expert fence planning and installation support from FenceFast
- Frequently asked questions
Key Takeaways
| Point | Details |
|---|---|
| Verify property boundaries | Confirm legal boundaries using surveys or licensed surveyors to avoid costly disputes. |
| Calculate accurate post spacing | Determine post locations based on total fence length and panel sizes for efficient installation. |
| Adapt fencing to terrain | Choose racked or stepped fence installation methods to handle slopes effectively. |
| Plan strategic gate placement | Place gates for convenient access and equipment clearance to improve farm operations. |
| Check for underground utilities | Locate utilities before digging to ensure safety and prevent service disruptions. |
How to plan fence layout: start with confirmed legal boundaries
Before you stretch a single string line, you need to know exactly where your property ends and your neighbor’s begins. This sounds obvious. It is not obvious in practice, especially on older agricultural properties in Canada where survey monuments may be decades old, buried, or missing entirely.
Boundary establishment involves identifying legal property corners using recorded plat documents or licensed land surveyors to prevent encroachment. Your first step is to pull your legal survey documents and walk the perimeter looking for iron pins or concrete monuments at corner points. If those pins are missing or you are working on a parcel that was subdivided years ago, do not guess. Hire a licensed surveyor. The cost is a fraction of what you will pay to tear out and reinstall a fence built on the wrong line.
Beyond the property line itself, you need to understand setback requirements for your municipality or regional district. Setbacks typically range from 0 to 6 inches from property lines and vary by jurisdiction. Some rural areas have different rules along road allowances or near utility easements. Contact your local municipality or land titles office to confirm before you stake anything.
Key steps for boundary and setback verification:
- Pull your Certificate of Title and any survey plan documents on file
- Walk the property line and locate all corner monuments physically
- Flag each confirmed monument with a visible stake or paint
- Determine setback distance required by your local authority
- Mark your actual fence line inset from the confirmed boundary
- Review for any registered easements or right-of-ways that may affect placement
Pro Tip: In Canada, utility right-of-ways are often registered on title but not physically marked on the ground. Read your title document carefully before assuming open land is unencumbered.
Check out these fence installation steps for Canadian farms to see how boundary prep fits into the full build sequence.
Lay out control points and plan post spacing for efficiency
With your legal fence line confirmed and marked, the next job is establishing your control points and calculating how many posts you need. This is where your fence layout guide moves from paperwork to physical planning on the ground.
Control points are the fixed anchors of your entire fence run: corners, gate posts, and end posts. Every post in between is calculated relative to these points. Fence layout includes establishing control points and computing post spacing based on total run length and chosen bay size. Getting these right first prevents you from ending up with awkward partial bays or a gate post that falls one foot short of where you need it.
Step-by-step process for marking control points and spacing:
- Stake all corner posts and end posts first, confirming each is on the verified fence line
- Mark all planned gate locations as fixed control points before calculating in-between spacing
- Measure the total run length between each pair of control points in feet
- Choose your target bay width (the distance between line posts) based on your fence type
- Divide total run length by your target bay width to get the number of bays
- Round to the nearest whole number, then recalculate actual bay width for even spacing
- Mark each line post location with a stake or flag before any digging begins
Standard post spacings vary between 8 to 12 feet for agricultural fences depending on materials and design. The table below shows common combinations for livestock fencing:
| Fence type | Typical post spacing | Notes |
|---|---|---|
| Woven wire (field fence) | 8 to 10 feet | Closer spacing improves livestock pressure resistance |
| Barbed wire (cattle) | 10 to 12 feet | Wider spacing acceptable for open range cattle |
| High-tensile electric wire | 10 to 15 feet | Tensioned wire allows wider bays |
| Wood rail (horse fence) | 8 to 10 feet | Rail sag increases with wider spacing |
| Stock panel or pipe | 8 feet (panel width) | Panel length determines bay size |
For a detailed breakdown of spacing calculations by region and livestock type, the fence post spacing guide at FenceFast is worth bookmarking.
Pro Tip: Always calculate post spacing after you fix gate locations, not before. A gate dropped into the middle of an already-calculated run will throw every spacing interval off and force you to rework the math from scratch.
See the building a field fence guide for how post spacing integrates with wire tensioning and bracing design.
Account for terrain and plan gate locations for functionality
Flat quarter sections are easy. Most Canadian farms are not flat. Rolling foothills in Alberta, creek crossings in Saskatchewan, rocky terrain in British Columbia. Terrain directly affects how you install fence panels and how well your finished fence contains livestock at grade level.
Fence installation on slopes can use racked or stepped panels, affecting gaps and fence appearance. Understanding the difference between these two methods helps you choose the right approach for each section of your fence run.
Racked vs. stepped installation: key differences
- Racked installation: The fence follows the ground slope continuously, with wires or panels angling to match the terrain. Minimal bottom gap. Best for livestock containment on moderate slopes.
- Stepped installation: Panels remain level but drop in increments at each post, creating a staircase appearance. Small triangular gaps appear at each step. Acceptable for decorative or perimeter fences, but gaps can be a problem with small livestock or young animals.
- Racked works better for woven wire and barbed wire on hills since the material is flexible enough to angle.
- Stepped is common with rigid panels or wood rail sections that cannot be angled.
| Method | Bottom gap | Appearance | Best for |
|---|---|---|---|
| Racked | Minimal | Follows slope naturally | Woven wire, barbed wire, livestock containment |
| Stepped | Gaps at each step | Level, structured look | Rigid panels, horses, perimeter boundaries |
Gate placement deserves as much thought as your fence line itself. Gate placement should consider convenience, equipment access, and security to avoid operational hassles. On working farms, a gate in the wrong location means hundreds of extra steps every single day moving animals, feed, or equipment.
Gate planning checklist:
- Place at least one gate wide enough for your largest piece of equipment (16 to 20 feet for tractors with attachments)
- Position main livestock gates near water sources or feeding areas to reduce handling labor
- Avoid placing gates at the bottom of slopes where water collects and mud forms
- Use double-hinge swing gates on corners with natural animal pressure
- Plan for walk-through gates in high-traffic sections to avoid constantly opening the main gate
Review the perimeter fence installation guide for more on how terrain and gate planning integrate with perimeter design.
Verify utility locations and finalize your detailed fence plan
You have confirmed your boundaries, marked your control points, and planned your terrain approach. Now, before any machinery moves and before any post holes are dug, you need to make one non-negotiable call: locate all underground utilities.
Checking for underground utilities is essential to avoid dangerous accidents and costly repairs during fence post installation. In Canada, call your provincial one-call utility locating service (Alberta One-Call, Ontario One Call, BC 1 Call, etc.) at least 3 business days before digging. This is free, legally required in most provinces, and takes minutes. Hitting a buried gas line or electrical conduit with a post driver is not a recoverable situation.
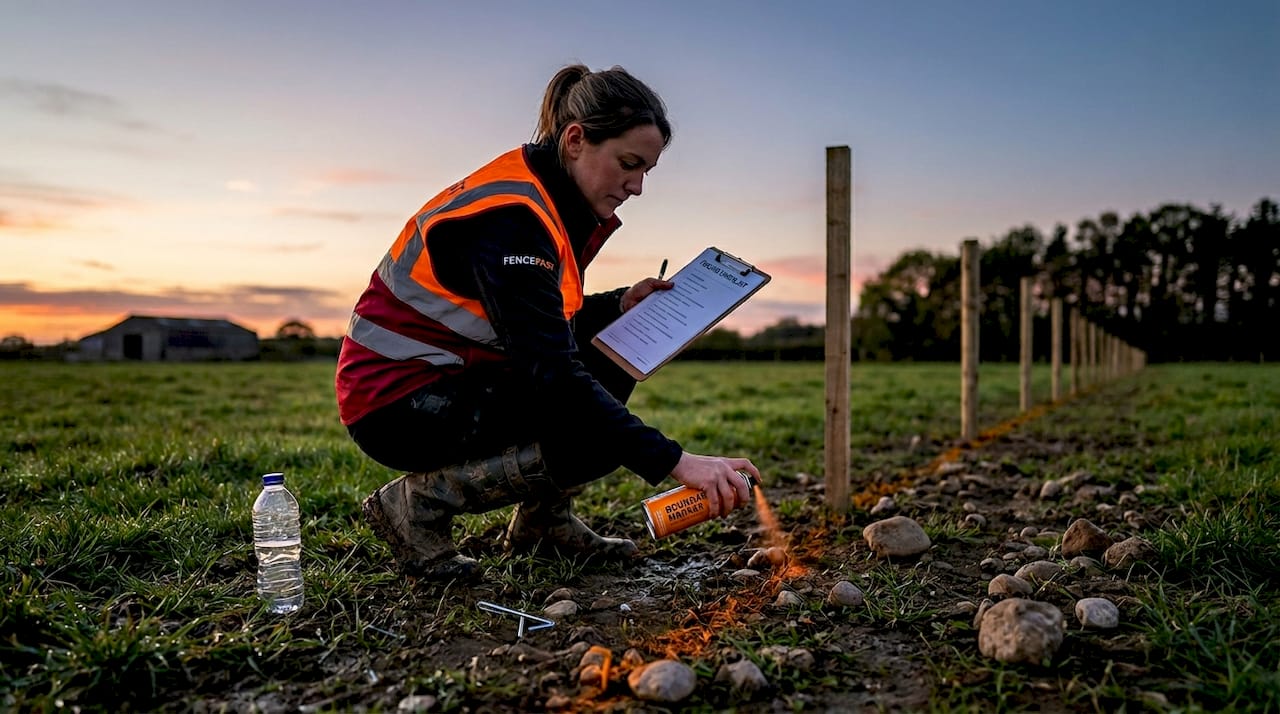
Steps to finalize your staked fence plan:
- Call your provincial utility locating service and request a locate on your full fence corridor
- Wait for all utilities to be physically marked on the ground (flags and paint)
- Adjust any planned post locations that fall within the marked utility zones
- Document all adjustments on your paper or digital site plan
- Drive permanent stakes at every confirmed post location with color coding for post type (corner, gate, line)
- Note elevations or grade changes at each stake that will affect installation depth or panel adjustment
“A complete fence layout produces a staked field plan used by crews for excavation, post setting, and panel hanging to specification.” National Fencing Authority
That staked field plan is not just a formality. It is what separates a smooth two-day installation from a three-week ordeal full of rework and extra material orders. Hand a complete plan to your installation crew and they can work independently without stopping to ask questions or make assumptions that cost you.
The fence installation steps for Canadian farms article shows how the staked field plan hands off directly to the construction phase.
Why thorough fence layout planning saves money and future headaches
Here is something most fencing guides will not tell you plainly: most layout mistakes happen before digging, notably from working off assumed lines instead of verified boundaries, causing legal and operational problems. That single fact should change how you budget your pre-construction time.
We have seen ranchers spend two weeks on a fence line only to discover three posts are over the property line. That fence does not just have to move. It triggers a formal dispute process, potential surveying costs, and sometimes legal fees if the neighbor is not cooperative. The original layout took one afternoon of guesswork. The fix took months.
The same logic applies to post spacing. Ranchers who skip the calculation and just “eyeball” consistent spacing almost always end up with a weak bay somewhere in the run, usually right where a bull or a spooked horse decides to test it. Inconsistent spacing also makes panel installation harder because your prefabricated panels rarely align cleanly with irregular post intervals.
Terrain and utility planning are the two areas where cutting corners creates the most expensive surprises. A fence that gaps at the bottom because stepped installation was used carelessly will let small calves through within a week. A post hole drilled through a buried irrigation line can cost thousands to repair and disrupt your operation for days.
Investing three to five hours in a proper field plan before any physical work begins consistently produces fences that perform longer, require less maintenance, and never create the kind of boundary headaches that can damage neighbor relationships on land you intend to farm for decades. Check out the step-by-step farm fence building guide for how this planning work translates directly into a faster, cleaner build.
Get expert fence planning and installation support from FenceFast
You now have a solid framework for designing a fence layout that works legally, operationally, and structurally. The next question is whether you want to tackle it solo or bring in experienced support.

At FenceFast, we work with Canadian farmers and ranchers every day on exactly these challenges, from boundary-aware layout planning to material selection for specific livestock species and terrain types. Our team understands the regional differences across Alberta, Saskatchewan, British Columbia, Ontario, and beyond. We stock quality fencing components, electric fencing systems, and complete Gallagher virtual fencing solutions for operations ready to move beyond wire. Whether you need materials shipped nationwide or guidance on getting your layout right before you break ground, we are here to help you build a fence that lasts.
Frequently asked questions
How do I find my farm’s legal property boundaries before fencing?
Locate your plat survey documents and physical survey pins on your property. If monuments are missing or disputed, hire a licensed land surveyor, since boundary establishment requires confirmed legal corners to prevent encroachment.
What is the typical post spacing for a farm fence in Canada?
Post spacing generally falls between 8 to 12 feet depending on fence type and livestock. Standard agricultural post spacings vary based on fence design and the pressure load your animals will place on the line.
How should I place gates to ensure farm accessibility and security?
Position gates near driveways and high-traffic pathways, include at least one wide enough for your largest equipment, and choose security hardware suited to livestock. Gate placement should always factor in convenience, access, and containment security together.
Why is checking for underground utilities important before fencing?
Striking a buried gas, water, or electrical line during post installation creates immediate hazards and expensive service repairs. Checking for underground utilities before digging is a legal requirement in most Canadian provinces and takes only a few days to arrange.
What are the benefits of creating a staked field plan for fence installation?
A staked field plan gives installation crews precise locations for every post, gate, and panel, eliminating guesswork and protecting you legally. A complete fence layout staked in the field is what separates a clean one-pass installation from a project full of costly mid-build corrections.

