
Getting farm fencing right in Canada is harder than most guides let on. You’re balancing freeze-thaw soil cycles, predator pressure, and livestock that will test every weak point you leave behind. Whether you’re running cattle across Alberta or managing sheep in Ontario, the fence you install today shapes your workload and your losses for the next decade. This guide walks you through every step, from reading your land to selecting materials and setting posts that actually hold through a Canadian winter. You’ll leave with a clear plan and the confidence to build fencing that works for your operation.
Table of Contents
- Assessing your land, livestock, and fencing needs
- Step-by-step guide to fence installation
- Fence types and material selection for Canadian farms
- Electric fencing: Best practices and Canadian considerations
- Installation challenges, maintenance, and cost realities
- Veteran insights: What most farm fence guides miss
- FenceFast solutions: Take your next step with expert products
- Frequently asked questions
Key Takeaways
| Point | Details |
|---|---|
| Site assessment is crucial | Thorough evaluation of land and livestock needs ensures optimal fence placement and design. |
| Follow installation steps | Mark boundaries, clear site, set posts, and maintain tension for a strong, durable fence. |
| Choose materials wisely | Select fence type and material based on livestock species, climate, and predator risks for longevity. |
| Maintain regularly | Bi-annual inspections and rapid repairs prevent costly livestock escapes and prolong fence life. |
| Consider electric fencing | Electric options add security, predator protection, and flexibility for rotational grazing. |
Assessing your land, livestock, and fencing needs
Before you order a single post, you need to understand what you’re working with. Terrain, soil type, livestock species, and local regulations all shape the right fencing decision. A fence that works perfectly for cattle on flat prairie land will fail fast on rocky hillside sheep pasture.
Start with these key evaluation factors:
- Terrain and slope: Steep grades require shorter post spacing and stronger bracing to maintain tension.
- Soil quality: Sandy or loose soils need deeper posts and concrete footings for stability.
- Livestock species: Selection criteria vary by animal. Cattle do well with high-tensile wire, while sheep need woven wire to prevent leg entanglement.
- Predator pressure: Coyotes and wolves are active across most Canadian provinces, so predator deterrence must factor into your design.
- Climate exposure: Wind, ice loading, and frost heave all degrade posts and wire faster than in milder climates.
For regulatory compliance, check your provincial fence act before you break ground. In Ontario, for example, fence line obligations between neighbors are governed by the Line Fences Act, which outlines cost-sharing rules and dispute processes. Getting this wrong can mean tearing out work you’ve already paid for.
A solid farm perimeter fencing guide will also help you map out boundary priorities before you start purchasing materials. And when it comes to material longevity in Canadian conditions, choosing durable fencing upfront saves you from constant repairs down the road.
“Regular maintenance prevents 80% of failures.” Investing in the right materials at the start, combined with consistent upkeep, is the single most effective strategy for long-term fence performance.
Pro Tip: For Canadian farms, prioritize high-tensile or electric fencing systems. They handle freeze-thaw movement better than rigid alternatives and require less annual maintenance.
Step-by-step guide to fence installation
Once you understand what your site demands, you can move into the actual installation process. Follow these steps in order to avoid costly rework.
- Mark boundary lines. Use stakes and string lines to define your fence route. Walk the full perimeter and flag any obstacles like drainage ditches, rock outcroppings, or utility lines.
- Clear the site. Remove vegetation, rocks, and debris along the fence line. A clean corridor makes post placement faster and prevents future vegetation from pushing against wire.
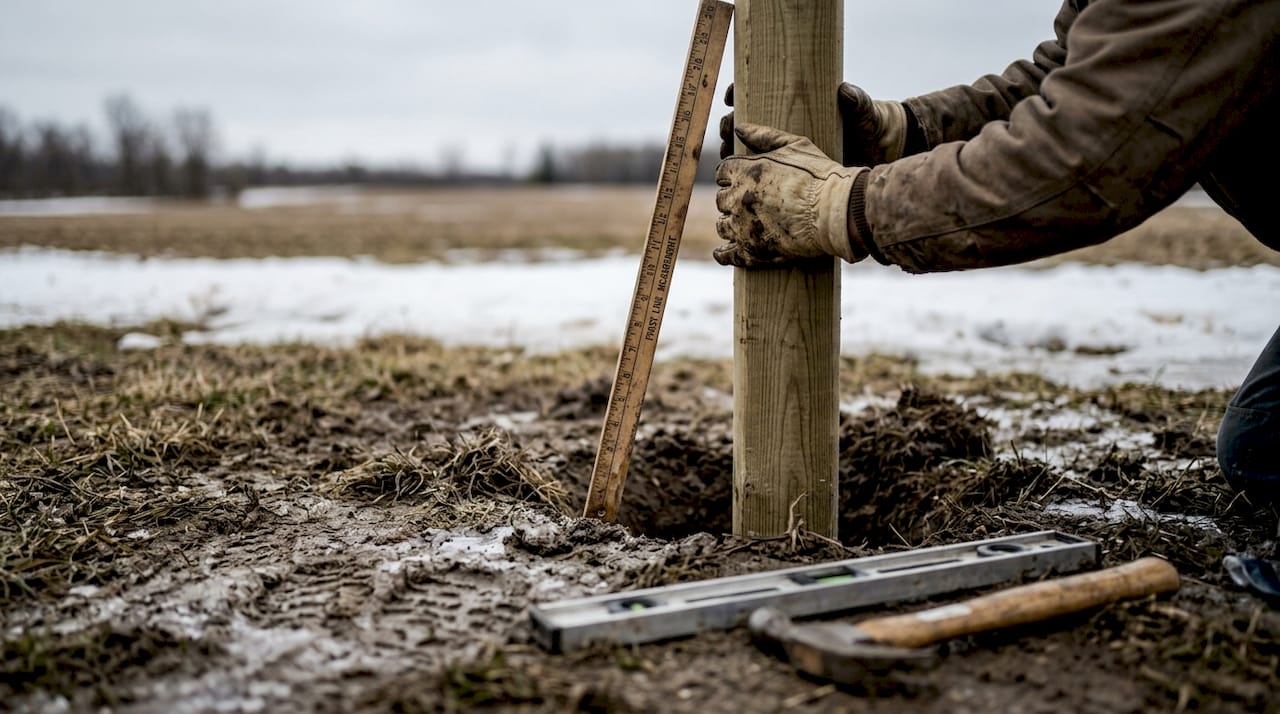
- Set corner and end posts. These carry all the tension in your fence. Dig holes 24 to 36 inches deep and fill with concrete. Use H-braces (two posts connected by a horizontal rail and diagonal wire) to distribute load. This is the most critical step in the whole project.
- Install line posts. Space them 8 to 12 feet apart depending on terrain and livestock pressure. Each post should be plumb (perfectly vertical) and tamped firmly.
- Attach fencing material. Start from the bottom wire and work upward. Use a wire stretcher to maintain consistent tension. Loose wire sags and invites livestock to push through.
- Add gates and electrical components. Gates should swing freely and latch securely. If you’re adding electric strands, install the energizer, ground rods, and insulators at this stage.
- Final inspection. Walk the entire fence line, check tension, alignment, and gate function. Test electric fences with a voltage meter before introducing livestock.
For a deeper look at each phase, the detailed farm fence guide and the field fence step-by-step resource both cover species-specific variations worth reviewing.
Pro Tip: In Canada, always set posts below the frost line. Frost heave can push a shallow post completely out of the ground by spring, destroying your alignment and tension overnight.
Fence types and material selection for Canadian farms
With installation steps in mind, selecting the best materials and types for your livestock and environment is crucial. Not all wire is equal, and the wrong choice costs you in repairs, escapes, and animal injuries.
Here’s a comparison of the four main fence types used on Canadian farms:
| Fence type | Best for | Lifespan | Relative cost | Maintenance |
|---|---|---|---|---|
| High-tensile wire | Cattle, horses | 20-30 years | Moderate | Low |
| Woven wire | Sheep, pigs | 15-20 years | Moderate-high | Medium |
| Electric | All species, predators | 10-15 years | Low-moderate | Medium |
| Barbed wire | Cattle perimeters | 15-20 years | Low | Medium |
For livestock-specific recommendations, species-matched fencing matters more than most producers realize. Cattle work well with 5-strand high-tensile. Sheep need woven wire plus an electric offset wire to deter predators. Horses do best with coated wire or smooth high-tensile to reduce injury risk. Pigs require woven wire with electric at the base to prevent rooting under the fence.
For predator control, offset wires placed 6 to 8 inches outside the main fence at ground level create a barrier that coyotes and foxes won’t cross easily. Maintain at least 12 inches of clearance at the bottom for wildlife-friendly fencing that lets smaller animals pass without getting trapped.
Electric fencing is worth serious consideration for any operation. Electric fences reduce escapes by up to 90% compared to passive wire alone. That’s not a minor improvement. That’s the difference between a calm morning and chasing cattle down a county road.
For a side-by-side breakdown of wire gauges and tensile ratings, the fence material comparison resource is worth bookmarking. If you run rotational grazing, portable fencing options can dramatically cut your labor costs between paddock moves.
Electric fencing: Best practices and Canadian considerations
For those managing predators or rotational grazing, electric fencing offers additional versatility and protection. But it only works when it’s set up correctly.
Here are the key setup requirements:
- Strand configuration: Use 3 to 5 strands for cattle, 5 to 7 for sheep and predator exclusion. Space strands closer together at the bottom where predators probe.
- Charger output: A minimum of 4,000 to 5,000 volts at the fence line is needed for effective deterrence. Low voltage means animals learn to ignore it.
- Grounding: Install at least 3 ground rods, each 6 feet long, spaced 10 feet apart. Poor grounding is the number one reason electric fences underperform.
- Power source: Mains power is most reliable. For remote paddocks, solar or 12V battery options work well from spring through fall.
Here’s a quick reference table for electric fence specs by use case:
| Application | Strands | Minimum voltage | Power source |
|---|---|---|---|
| Cattle | 3-5 | 4,000V | Mains or solar |
| Sheep | 5-7 | 5,000V | Mains or 12V |
| Horses | 3-4 | 3,500V | Mains |
| Predator control | 5-7 | 5,000V | Mains or solar |
According to Alberta’s electric fencing guidance, fences should be powered April through November in most Canadian climates, with voltage tested regularly using a fence tester. Don’t guess. A fence that looks intact can be carrying zero charge due to a single grounded wire.
For more on keeping your setup safe for animals and people, the electric fence safety resource covers warning signs, signage requirements, and safe maintenance practices. And if predators are your primary concern, the predator control fencing guide goes deeper on strand placement and offset configurations.
Pro Tip: Use a smooth bottom wire with 12 inches of clearance at ground level. This lets deer and small wildlife pass under without getting shocked and tangled, which reduces fence damage and supports local wildlife.
Installation challenges, maintenance, and cost realities
Even the most carefully installed fence can run into difficulties. Here’s how to stay ahead of the problems that catch most producers off guard.
Frost heave is the biggest physical threat to Canadian fences. Posts set above the frost line will shift, tilt, and eventually pull wire out of alignment. In most Canadian provinces, that means digging to at least 36 inches in clay-heavy or wet soils. Concrete footings on corner posts are not optional in these conditions.
On the cost side, four-strand barbed wire runs over $7,000 per mile when you factor in labor, posts, and hardware. That’s a significant capital investment. Budget roughly 2% of your total fence value per year for ongoing maintenance. That sounds small, but on a large operation it adds up fast.
Key maintenance tasks to schedule:
- Spring inspection: Check for frost heave, post lean, broken wires, and gate alignment after winter.
- Fall inspection: Tighten tension, clear vegetation from fence lines, and test electric components before winter.
- After storms: Walk any section exposed to heavy wind, ice, or fallen trees immediately.
- Gate hardware: Lubricate hinges and latches twice a year to prevent seizing.
Improper installation causes over $1,000 per year in losses on average, from livestock escapes, predator access, and emergency repairs. Getting it right the first time is always cheaper.
For farms that use seasonal paddocks, the temporary fencing maintenance guide covers storage, inspection, and redeployment best practices. And for operations near wildlife corridors, wildlife friendly maintenance practices protect both your fence investment and local animal populations.
Pro Tip: Don’t wait for a visible problem to inspect. Most fence failures start small and invisible. A loose staple or a corroded connector becomes a $500 repair if you catch it in October, and a $5,000 problem if you find it after a winter.
Veteran insights: What most farm fence guides miss
Most fencing guides focus on the mechanics and stop there. What they skip is the mindset that separates a fence that lasts 25 years from one that needs constant attention.
The biggest mistake we see Canadian producers make is buying cheap materials to save money upfront. A lower-grade wire that costs 20% less will fail in 8 years instead of 20. When you factor in labor to replace it, you’ve spent three times more than if you’d bought quality the first time. Prioritizing high-tensile or electric systems from the start is not a luxury. It’s basic math.
Portable and temporary fencing is another area most guides undervalue. For rotational grazing operations, a well-designed temporary system can replace permanent fencing in paddocks you move seasonally. That cuts installation time dramatically and lets you adapt your grazing plan without tearing out fixed infrastructure.
Wildlife-friendly designs are also worth building into your plan from day one. A fence that traps deer or injures foxes creates ongoing problems. Smooth bottom wires, adequate ground clearance, and visible top markers protect your livestock and reduce fence damage from wildlife pushing through.
Schedule your inspections every spring and fall, not just after storms. Proactive maintenance is the single habit that separates low-maintenance operations from ones that are always fixing something.
FenceFast solutions: Take your next step with expert products
You’ve seen the steps and options. Now it’s time to put that plan into action with the right products behind you. FenceFast carries a full range of fencing components, electric systems, and livestock management tools built for Canadian farm conditions. Whether you’re sourcing high-tensile wire, energizers, or complete electric fence kits, the product catalog is organized to help you find what you need fast.

For operations that rely on livestock tracking alongside fencing, the Gallagher HR5 EID tag reader integrates seamlessly with your animal management workflow. If you’re setting up a new electric perimeter, the electric fence accessory kit gives you the connectors, insulators, and hardware to complete the job without multiple orders. FenceFast ships nationwide across Canada, so your supplies arrive ready when your crew is.
Frequently asked questions
How deep should fence posts be set for Canadian farms?
Fence posts should be set below the frost line, typically 24 to 36 inches deep, to prevent shifting caused by freeze-thaw cycles. In wet or clay-heavy soils, err toward the deeper end and use concrete on corner posts.
What is the best type of fencing for cattle versus sheep?
High-tensile wire with 5 strands works best for cattle, while sheep need woven wire plus electric offset to keep predators out and prevent leg entanglement.
How do you maintain farm fencing to prevent costly failures?
Inspect fences bi-annually, check tension and gate integrity, and address small issues before they grow. Annual maintenance costs run about 2% of total fence value, far less than emergency repairs from livestock escapes.
Should electric fences be used year-round in Canada?
Most Canadian operations power electric fences April through November, with solar or 12V battery systems used for remote paddocks where mains power isn’t available.
Recommended
- Agricultural fencing in Canada: choosing durable solutions – FenceFast Ltd.
- Portable outdoor fencing guide for Canadian farmers 2026 – FenceFast Ltd.
- 7 Practical Moveable Fence Ideas for Small Canadian Farms – FenceFast Ltd.
- Perimeter Fence Installation Guide for Farms and Rural Sites 2025 – FenceFast Ltd.

