

Yes — with the right battery, charge controller, and energizer, a properly sized solar panel kit will reliably run an electric fence energizer off grid. The two factors that actually determine reliability are battery autonomy (how many days of stored power you have when the sun disappears) and matching the panel output to your energizer’s real daily energy draw. Raw panel wattage is almost irrelevant if the battery bank is too small to carry the system through a cloudy stretch.
Here are typical kit sizes recommended for different farm needs, ranging from temporary small paddocks to multi-kilometer perimeters, with panel wattage and battery capacity scaling accordingly.
Gallagher energizers, a brand supplied by Fencefast, provide exact mA and Wh consumption specifications for each model, which should be consulted before making purchase decisions.
Pro Tip: Size the battery first. The panel only restores charge; the battery is what keeps pulses firing at 2 AM or on day three of overcast skies.
Table of Contents
- What does a solar-powered fence system actually include?
- How do you size a solar panel and battery for your energizer?
- AGM, flooded, or lithium — and PWM vs MPPT?
- Step-by-step installation checklist
- Seasonal care and winterizing your solar fence system
- Diagnosing common problems fast
- What does a solar fence kit cost, and how long does installation take?
- Safety and U.S. compliance basics
- DIY or hire a pro?
- Key Takeaways
- What most guides get wrong about solar fence sizing
- Fencefast can size and supply your solar fence kit
- Useful sources for deeper reading
What does a solar-powered fence system actually include?
A solar-powered electric fence runs on four components: solar panel, charge controller, battery, and fence energizer. The flow is straightforward: the panel generates DC current, the controller regulates that current to protect the battery, the battery stores it, and the energizer draws from the battery to fire timed high-voltage pulses down the fence wire.
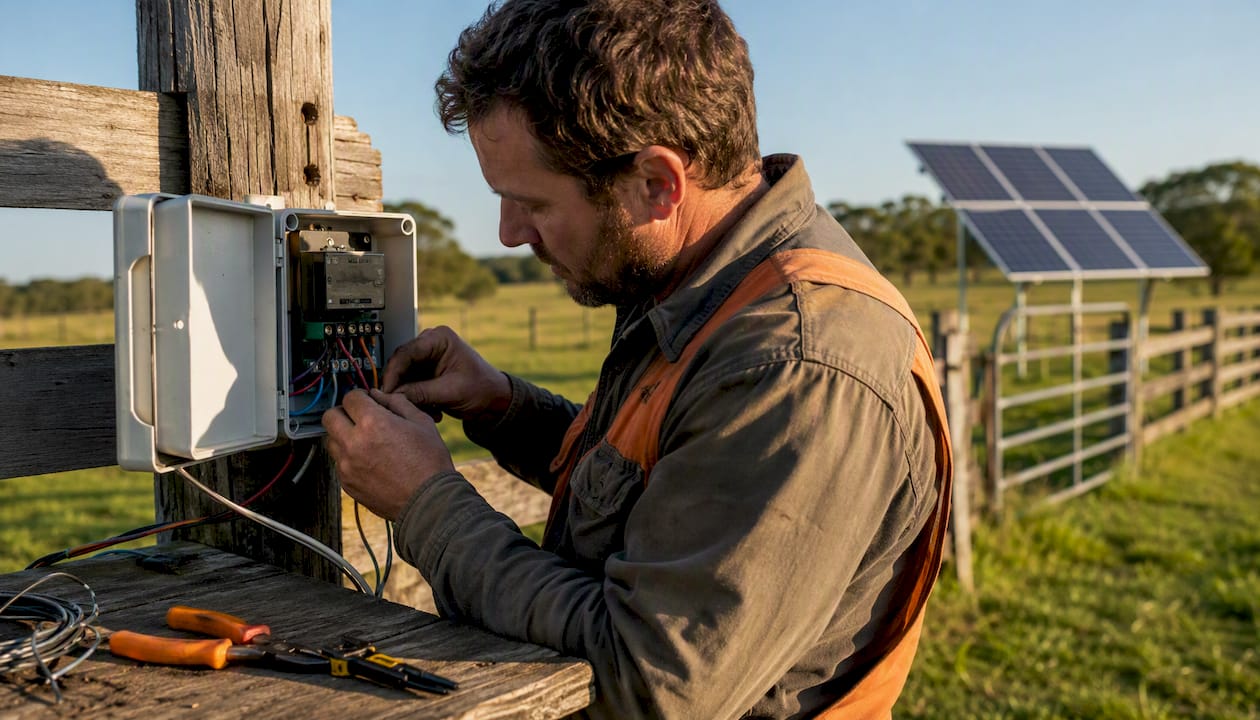
The energizer always runs from the battery, never directly from the panel. That single design choice is what makes night operation and cloudy-day autonomy possible. Without it, your fence would go dead every sunset.
Wiring, fuses, grounding rods, and lightning arrestors complete the circuit. Grounding is where most DIY installs fail. The energizer needs at least three 6-foot galvanized ground rods driven into moist soil, spaced 10 feet apart, connected with 12.5-gauge wire. Lightning arrestors go between the energizer and the fence line. Skip either and you risk both livestock escapes and fried equipment.
Component flow: panel → controller → battery → energizer → fence wire → earth stakes → back to energizer.
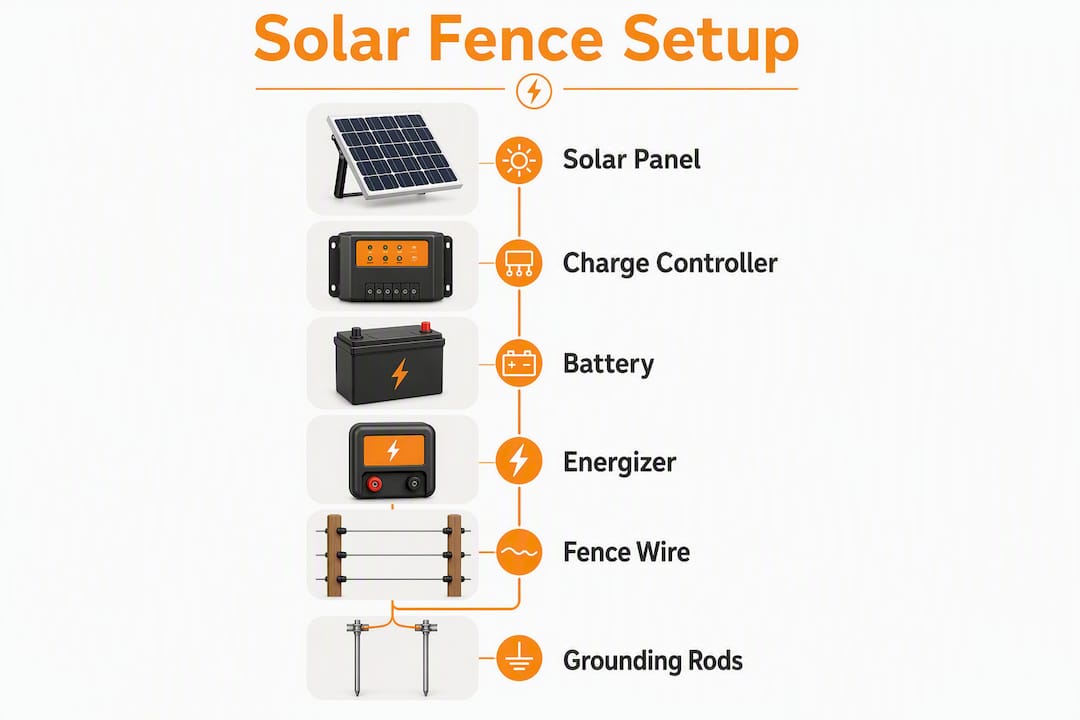
Fence voltage targets vary by animal: 2,000–3,000 V for beef cattle, higher for predator deterrence. Keep that target in mind when you select an energizer — it sets your daily energy draw.
How do you size a solar panel and battery for your energizer?
Start with the energizer’s documented consumption — the mA or Wh/day figure in its manual. Never assume a generic draw. A Gallagher S20 and a Gallagher M10000i pull vastly different current.
The calculation sequence:
- Find daily Ah draw. Divide the energizer’s Wh/day by 12 (battery voltage). A 10 Wh/day energizer draws 0.83 Ah/day.
- Add a 25–50% safety margin. Multiply by 1.35 as a midpoint. That 0.83 Ah becomes ~1.12 Ah/day.
- Multiply by days of autonomy. Target 3–5 days for most U.S. farm sites. At 5 days: 1.12 × 5 = 5.6 Ah minimum usable capacity.
- Adjust for depth of discharge (DoD). AGM batteries should not go below 50% DoD. Divide by 0.5: 5.6 ÷ 0.5 = 11.2 Ah rated battery capacity.
- Size the panel. Divide daily Ah draw (with margin) by your location’s average peak sun-hours, then add 25% for controller losses. In Kansas (5 peak sun-hours): 1.12 ÷ 5 × 1.25 = ~0.28 A charging current needed. A 10 W panel at 12V delivers roughly 0.83 A — more than enough for this small energizer.
Three worked examples:
| System | Energizer draw | Battery (AGM, 50% DoD) | Panel |
|---|---|---|---|
| Small (temp gate) | ~5 Wh/day | 12V 20 Ah | 20 W |
| Medium (1–3 km pasture) | ~30 Wh/day | 12V 100 Ah | 50–80 W |
| Large (multi-km perimeter) | ~100 Wh/day | 12V 200–300 Ah | 200 W+ |
Pro Tip: Before finalizing your order, run your energizer on a short test fence for 24 hours and measure actual Ah draw with a clamp meter. Manufacturer specs are conservative; real-world draw can differ by 20%.
AGM, flooded, or lithium — and PWM vs MPPT?
For most U.S. farm fence systems, sealed AGM deep-cycle batteries are the practical default. They require no watering, handle partial states of charge better than flooded lead-acid, and tolerate the neglect that farm life sometimes demands. Flooded batteries cost less upfront but need monthly water checks and vented enclosures — workable if you’re disciplined, a liability if you’re not.
Lithium (LiFePO4) batteries retain usable capacity better in sub-freezing temperatures and deliver a true 80–100% DoD, so a 100 Ah lithium bank gives you nearly twice the usable energy of a 100 Ah AGM. The upfront cost is two to three times higher, but for cold northern states or remote sites where battery replacement is a major hassle, the math often works out.
| Category | Cycle life | Cold performance | DoD | Maintenance | Relative cost |
|---|---|---|---|---|---|
| Flooded lead-acid | 300–500 cycles | Poor below freezing | 50% | High | Low |
| Sealed AGM | 400 cycles | Moderate | 50% | Low | Medium |
| Lithium (LiFePO4) | 2,000+ cycles | Good | 80–100% | Very low | High |
On controllers: MPPT (Maximum Power Point Tracking) extracts 10–30% more energy from the panel, especially in low-light morning and evening conditions, and handles higher panel voltages efficiently. Use MPPT for any system with a 50 W or larger panel. PWM (Pulse Width Modulation) is simpler and cheaper — fine for small 20–40 W kits where panel voltage closely matches battery voltage and every dollar counts.
Step-by-step installation checklist
Follow these steps in order. Skipping grounding or fusing to save time is the single most common cause of system failure and livestock escapes.
- Choose the site. Orient the panel south-facing at a tilt angle equal to your latitude (roughly 30–45° for most U.S. states). Avoid shade from trees, buildings, or fence posts between 9 AM and 3 PM.
- Mount the panel securely. Use a ground-mount stake or T-post bracket rated for wind loads in your area. Bolt it — don’t clip it. Loose panels are a theft and damage risk.
- Place the battery and energizer. Keep the battery as close to the energizer as possible to minimize voltage drop. Use a weatherproof lockbox for both.
- Wire the controller first. Connect battery to controller before connecting the panel. Use the correct wire gauge: 10 AWG for runs up to 10 feet at typical farm currents; 8 AWG for longer runs.
- Add inline fuses. Fuse the positive wire between the battery and controller, and between the battery and energizer. A 15 A fuse covers most small-to-medium systems.
- Drive ground rods. Minimum three 6-foot galvanized rods, 10 feet apart, in moist soil. Connect with 12.5-gauge wire to the energizer’s ground terminal.
- Install lightning arrestors. Mount one between the energizer output and the fence line. Bond the arrestor ground to the fence ground system.
- Test before livestock. Measure fence voltage with a digital voltmeter. Confirm battery charging voltage (should read 13.5–14.5 V on a 12V AGM system under charge).
Pro Tip: Locate the battery box in shade. Direct sun on a battery enclosure raises internal temperature and accelerates degradation, especially in southern states.
Seasonal care and winterizing your solar fence system
Monthly and seasonal actions keep a solar fence dependable year-round. Clean panels monthly — in dusty or pollen-heavy environments, every 10–15 days. Dirty or shaded panels can reduce charging efficiency by 20–30%, which compounds fast during short winter days.
Every three months: check battery resting voltage (12.6 V or above for a healthy AGM at rest), clean terminals, inspect wiring for rodent damage, and verify earth stake connections. Trim any vegetation touching the fence line — wet grass is a slow current leak that drains your battery.
Before winter: adjust panel tilt steeper (closer to 60°) to shed snow and capture low-angle sun. Insulate the battery enclosure or switch to lithium if your site regularly drops below 20°F. Add battery capacity or panel wattage before the first hard freeze if your site is snow-prone — winter sun-hours in Minnesota or Montana can drop to 2–3 hours per day, which changes your sizing math significantly.
Diagnosing common problems fast
When the fence goes weak or dead, work through this sequence before assuming the energizer failed:
- Check panel output first. Measure voltage at the controller input. A clean, unshaded panel should read 17–21 V (for a 12V nominal panel) in direct sun.
- Test battery resting voltage. Below 12.0 V on a 12V AGM means it’s deeply discharged or failing. Below 11.5 V and it may not recover.
- Inspect earth stakes. In dry soils, earthing rods lose conductivity; pour several gallons of water around each stake and retest fence voltage immediately. If voltage jumps, poor earthing was the cause.
- Isolate fence sections. Disconnect the fence at mid-point and test each half. A short (wire touching a post, wet vegetation, a broken insulator) will drag voltage down across the whole line.
- Check connections. Corroded terminals at the battery or controller are a common culprit. Clean with a wire brush and apply dielectric grease.
When watering earth stakes solves the problem temporarily, the permanent fix is driving additional rods or relocating them to naturally moister ground.
What does a solar fence kit cost, and how long does installation take?
Typical off-grid solar fence kit costs range from a few hundred dollars for small temporary setups to several thousand for heavy-duty multi-km systems. See solar fencing system price breakdowns for current market ranges.
- Small kit (20–40 W, 20 Ah AGM, basic energizer): $150–$400 in components; 1–4 hours DIY install
- Medium kit (50–100 W, 100 Ah AGM, mid-range energizer): $500–$1,200; 1–2 days including post-setting
- Large kit (200 W+, 200–300 Ah battery bank, commercial energizer): $2,000–$5,000+; several days to a week with earthworks and new posts
Major cost drivers: battery chemistry (lithium adds $400–$1,000+ over AGM), energizer capacity, and labor for remote or rough terrain. Budget separately for lightning arrestors ($30–$80), upgraded grounding hardware, lockboxes for theft deterrence, and freight to remote locations.
Systems sized and installed correctly can run 15–20 years with routine care, which changes the cost-per-year math considerably compared to a cheap kit replaced every three seasons.
Safety and U.S. compliance basics
Switch off the energizer before touching any fence wire, and keep that habit even when you’re sure the system is dead. Energizers store charge.
- Post warning signs at all road crossings, public access points, and gate entries — required in most states and a basic liability protection.
- Use insulated fence-handling tools and rubber-soled boots when working near live lines.
- Fuse every positive conductor between the battery and load. An unfused short can start a fire in dry grass.
- Keep energizer output terminals away from standing water and animal reach.
- For roadway or utility crossing rules, check your county agricultural extension office or state department of agriculture. The Virginia Tech extension guide on energizer selection and installation is a solid starting reference for U.S. compliance context.
This article is general information, not legal or electrical advice. Confirm local ordinances and utility crossing requirements with your county extension office or a licensed electrician.
DIY or hire a pro?
DIY is reasonable for small kits (under 100 W, single-battery, straightforward terrain) if you’re comfortable with basic 12V DC wiring. Most farmers who’ve wired a trailer or installed a battery charger can handle it.
Hire a professional when:
- The perimeter exceeds 3 km or crosses multiple paddocks with complex wiring runs
- Your site has significant lightning exposure (open plains, hilltops)
- You need robust surge protection and bonded grounding systems
- Livestock are high-value and a fence failure carries serious financial risk
- You want a warranty that covers both parts and labor
Questions to ask any contractor:
- Can you show me a worked sizing example for my energizer and sun-hours?
- What battery brand do you use, and is it locally serviceable?
- How do you handle grounding and lightning protection on this site?
- Do you provide a parts list and wiring diagram after install?
- What’s your maintenance plan or service agreement?
Red flags: a contractor who skips the sizing calculation, cannot explain their grounding method, or won’t provide a parts list is guessing. Walk away.
Key Takeaways
A properly sized solar fence system runs reliably when battery autonomy, not panel wattage, drives the design — size for 3–5 days of stored power before choosing your panel.
| Point | Details |
|---|---|
| Battery sizing comes first | Calculate energizer daily Ah draw, then build 3–5 days of autonomy before selecting panel wattage. |
| Grounding determines fence voltage | At least three 6-foot galvanized rods in moist soil; poor earthing is the most common cause of weak shock. |
| AGM vs lithium by climate | AGM works for most U.S. farms; lithium pays off in cold northern states where sub-freezing temps cut battery capacity. |
| Clean panels, reliable fence | Dirty or shaded panels reduce charging efficiency by 20–30%; monthly cleaning is the cheapest reliability upgrade. |
| Fencefast for sizing support | Fencefast’s 26-year Gallagher dealer relationship means pre-sized kits and design support matched to your energizer. |
What most guides get wrong about solar fence sizing
The conventional advice is to buy a bigger panel. More watts, more sun, more safety margin. It sounds logical, and it’s almost always the wrong lever to pull.
A panel only charges during daylight. Your fence fires pulses every second, all night, through every cloudy day in November. The battery is the system’s actual workhorse, and undersizing it is the single most common reason a well-intentioned solar fence install fails its first hard winter. Fencefast’s field experience bears this out: the installs that need emergency service calls in January are almost never panel failures. They’re dead batteries that were sized for a sunny July in Arizona, not a cloudy February in Iowa.
The second thing most guides underplay is earthing. A 10,000-volt energizer connected to two shallow ground rods in dry clay will deliver a fraction of its rated output. Livestock learn fast that the fence doesn’t hurt, and then you have a containment problem, not a solar problem. Three deep rods in moist soil, properly bonded, will outperform a panel upgrade every time.
Fencefast has supplied Gallagher systems for 26 years. That relationship means access to the full Gallagher energizer lineup, accurate consumption specs, and design support that starts from your actual fence perimeter and local sun-hours, not a generic kit size., and.
Fencefast can size and supply your solar fence kit
Sizing a solar fence system correctly takes about 20 minutes with the right numbers in front of you. Getting those numbers wrong costs you a dead fence in February and a battery replacement you didn’t budget for.

Fencefast carries pre-sized solar fence kits matched to Gallagher energizer models, from small portable paddock units to heavy-duty perimeter systems. As an authorized Gallagher dealer with 26 years of field experience, Fencefast offers design support that accounts for your energizer’s actual draw, your location’s peak sun-hours, and the battery chemistry that fits your climate. No guesswork, no generic kit that may or may not cover your fence line.
Browse kits, get a design consult, or ask a sizing question directly at fencefast.ca.
Useful sources for deeper reading
- Electric Fencing: How to Select and Install an Energizer — Virginia Tech Extension (Matt Booher); the most thorough U.S.-specific guide on energizer sizing and installation
- Considerations for Selecting & Installing an Electric Fence Charger — Michigan State University Extension; practical comparison of plug-in, solar, and battery charger options
- Solar Panel Electric Fence: Complete Power & Installation Guide — Bright Solar; component architecture, battery autonomy principles, and sizing methodology
- How to Manage Solar-Powered Fencing — American Cattlemen; voltage targets by livestock type and management tips
- Solar Fencing Maintenance: Common Problems & Easy Fixes — Agrianic; troubleshooting flow, earthing fixes, and cleaning schedules
- USDA — general farm infrastructure guidance and rural energy program references
Recommended
- Solar fencing: sustainable control for Canadian farms 2026 – FenceFast Ltd.
- Solar powered fences explained: smart solutions for Canadian farms – FenceFast Ltd.
- Solar Fencing System Price: Smart Savings for Farms – FenceFast Ltd.
- Solar powered electric fence guide for Canadian farmers 2026 – FenceFast Ltd.

