

Check soil type, drainage and frost risk, and wind or gate loads — those three checks decide post material and footing before you buy a single board or driver bit. Run the short checklist below, note the numbers your contractor or supplier will ask for, and you can price out a fence line correctly the first time. Everything past this point covers the tools, the scenarios, and the field record that make those three checks stick.
TL;DR:
- Soil type and drainage tests should be performed at each post location because conditions can vary every 50 feet along the fence line.
- Standing water after a 24-hour drainage test indicates high frost risk soils like clay or silt, which require bell-shaped footings with gravel bases.
- For high wind or heavy gate loads, posts should be anchored at least three to four feet deep with wider or bell-shaped footings, depending on soil conditions.
- Always verify frost depth with local authorities and record slope, drainage, and soil type at each site to ensure proper footing depth and material choice.
- Recheck soil conditions after major grading, drainage installation, or drought-wet cycles, especially when extending or modifying existing fence lines.
Table of Contents
- Soil Testing Checklist for Pastures: The Step-by-Step Version
- Tools to Bring and How to Run Quick Field Tests
- Common Soil Scenarios: Post Material, Depth, and Footing
- How to Measure Frost Depth and Build a Site Record
- Recommended Soil Sample Depth and Spacing for Testing
- Key Soil Factors That Affect Post Stability
- Reading Ground Conditions for Fencing and Anchor Decisions
- How Often to Recheck Ground Conditions
- Field Perspective: Common Mistakes and Quick Wins
- Let FenceFast Match Your Site Record to the Right Hardware
- Sources
- FAQ
Soil Testing Checklist for Pastures: The Step-by-Step Version
A soil test guide for grazing land does not need a lab. It needs a shovel, twenty minutes per problem area, and a system for writing down what you find. Here is the order that works in the field.
- Identify soil type by feel. Grab a handful from 12 to 18 inches down. Sand falls apart and won’t hold a shape. Loam forms a loose ball that crumbles under light pressure. Clay rolls into a ribbon and stays slick when wet. Silt feels soapy and holds moisture without draining. Gravel and rock announce themselves the moment your shovel hits resistance.
- Push a probe or rebar rod into the hole location. Steady, even resistance the whole way down usually means loam or firm clay. A rod that suddenly stops or deflects sideways means you have hit rock, hardpan, or buried debris, and that changes your footing plan.
- Run a 24-hour drainage test. Dig a hole roughly 12 inches wide and 24 inches deep, fill it with water, and check it the next day. Water still standing signals a high water table or clay-heavy soil that needs a gravel base under any concrete footing.
- Walk the fence line for wind exposure and gate locations. Open pasture with no windbreak, or any gate wider than 12 feet, means the terminal posts need to be upsized regardless of what the rest of the soil test shows.
- Record everything per post location, not just once for the whole property. Soil conditions can change every 50 feet along a pasture edge, especially near creek bottoms or old field boundaries.
That last step is where most DIY installs fall apart. People run one soil check near the gate, assume it applies to the whole line, and then wonder why three posts along the back fence are leaning by spring.
| Soil type | Drainage result | Frost risk | Minimum depth | Recommended footing |
|---|---|---|---|---|
| Sand/loose | Drains fast, no standing water | Low | Standard +17% deeper | Concrete collar, wider diameter |
| Loam | Drains within hours | Low to moderate | One-third rule, at least 24 inches minimum depth | Gravel or concrete |
| Clay | Standing water after 24 hrs | High | Below local frost line | Bell-shaped footing with gravel base |
| Silt | Slow drain, soapy feel | High | Below local frost line | Bell-shaped footing with gravel base |
| Gravel/rock | Drains immediately | Low | Varies, often shallower | Drilled and grouted anchor |
Keep a running list of what each test told you:
- Post location and GPS pin or landmark reference
- Soil type by feel and probe resistance
- Drainage test result (drained, partial, standing)
- Estimated frost risk based on soil type
- Recommended footing and depth for that spot
Tools to Bring and How to Run Quick Field Tests
You do not need survey equipment for a fence-line soil check. A round-point shovel, a 3/8 inch steel rod or dedicated soil probe, a pocket penetrometer if you have one, a tape measure, a torpedo level, and your phone camera cover nearly every pasture scenario.
The probe test tells you the most for the least effort. Push the rod down with steady hand pressure. Smooth, even resistance to 18 or 24 inches usually means loam or workable clay. A rod that glides too easily the whole way often means sand or loose fill, which needs deeper posts. A hard stop within the first foot means rock or hardpan, and that changes your footing method entirely, often to a drilled and grouted anchor instead of a dug hole.
The 24 hour drainage hole test is the single best predictor of frost heave risk. Dig it, fill it, walk away, and check it the next morning. Standing water is your clearest warning sign for expansive clay behavior.
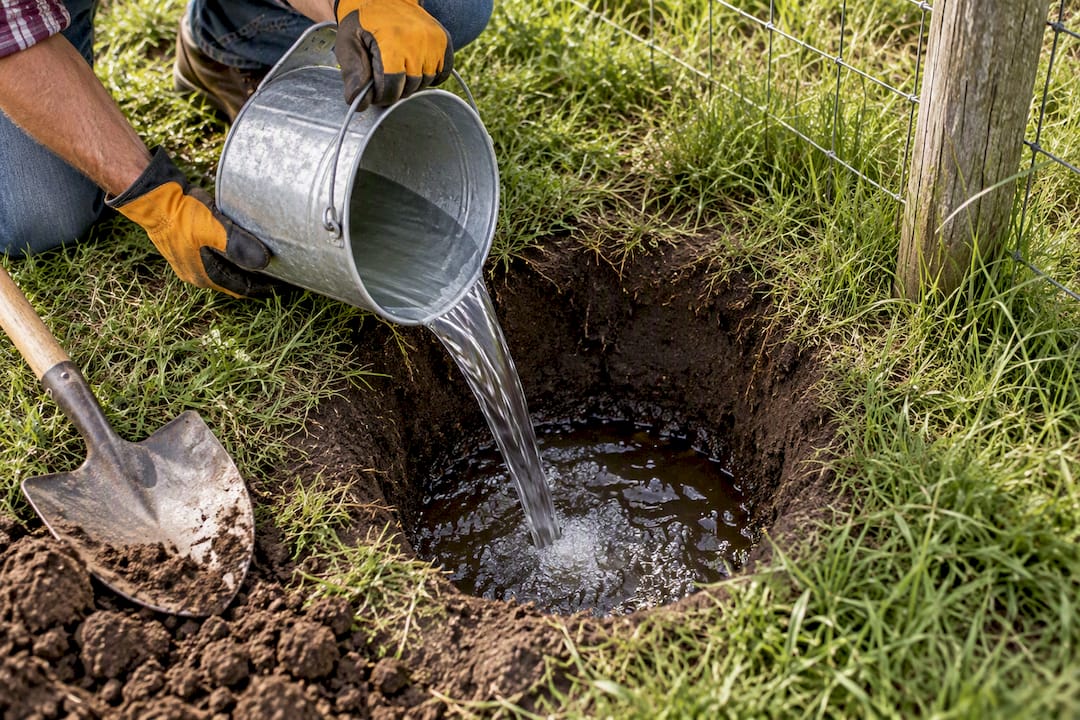
Pro Tip: Do your drainage test the week before you plan to dig, not the day of. Soil moisture swings fast after rain, and a test run in dry conditions will underestimate your real drainage risk.
A few conditions are worth a phone call to a geotechnical engineer instead of guessing: visible peat or organic muck, soft silty layers that squish underfoot, or bedrock sitting less than a foot below grade. Simple probe and auger checks are sufficient for most pasture installations, but compressible fill or peat pockets are outside what a field test can safely tell you.
Common Soil Scenarios: Post Material, Depth, and Footing
Pasture soil rarely behaves the same way twice, even on one property. Matching post material and footing geometry to the specific soil you found is what separates a fence that lasts fifteen years from one that needs re-setting after two winters.
Sandy or loose soils drain fast but offer poor lateral holding strength, which means posts can rock loose under tension.
Loam is the forgiving middle ground. The one-third burial rule works as a baseline here: bury one-third of the total post length, with a 24 inch minimum regardless of post height. Gravel or concrete both work fine for line posts in loam.
Certain clay and silt soils prone to frost heave are the soils that ruin fence lines over time through frost heave. A bell-bottom footing, wider at the base than the top, resists the upward push of frozen soil far better than a straight cylindrical hole. Pair it with a 4 to 6 inch a gravel base for drainage and specify UC4B retention-grade wood or steel posts rated for ground contact in wet conditions, per American Wood Protection Association standards.
Rocky ground or hardpan calls for a different approach entirely. Rather than fighting to dig a full-depth hole, use a wider collar with a shallower footing, or switch to a drilled and grouted anchor system, or a bracketed surface-mounted post base where drilling is not practical.
| Scenario | Post material | Minimum depth | Footing |
|---|---|---|---|
| High wind in exposed pastures | Galvanized steel | approximately three feet | footing diameter about three times the post width, concrete collar |
| Heavy gates with wide openings | 6x6 nominal size or filled steel | about four feet | Concrete, pinned with rebar |
| Standard loam soil under light tension | Wood or steel | at least 24 inches minimum depth | Gravel or concrete |
| Certain expansive clay soils | UC4B wood or steel | footings below the frost line | Bell-shaped footing with gravel base |
For gates and corners under real tension, terminal posts should step up to UC4C-grade wood or concrete-filled steel, pinned with rebar through the footing. Skimping here is the single most common reason gate posts lean within the first two years.
- Sandy soil: deepen by roughly 17%, widen the collar
- Loam: one-third rule, 24 inch minimum, gravel acceptable
- Clay and silt: bell-bottom footing, gravel base, retention-grade material
- Rock and hardpan: wider collar or drilled anchor, skip the standard hole
How to Measure Frost Depth and Build a Site Record
Guessing at frost depth is how fence posts end up heaving out of the ground by their third winter. Confirm the actual frost line through your local building department rather than relying on a nationwide chart, since frost depth can shift meaningfully even between neighboring counties depending on soil moisture and elevation.
- Call or check your building department’s website for the official frost depth and minimum footing diameter for structural posts in your area.
- Ask whether a permit applies to fence posts over a certain height or to gate structures, since rules vary by municipality.
- Check slope with a stake-and-string line or a smartphone clinometer app, noting any spot where water visibly channels toward a post location during rain.
- Photograph every planned post location, labeling gate openings, drainage paths, and any rock or fill visible at the surface.
- Compile a simple three-line field report for each section: soil type observed, drainage test result, and recommended footing depth.
That field report is what turns a vague “the ground seemed pretty solid” into something a supplier or installer can actually quote against. Bring it with you, whether you’re calling for a consultation or placing a materials order.
- Frost depth confirmed with building department
- Slope and drainage direction noted per post location
- Photos labeled by post number and gate opening
- Soil type, drainage result, and footing recommendation written down for each section
Recommended Soil Sample Depth and Spacing for Testing
For fence and anchor purposes, sampling depth should match your planned footing depth, not a fixed agronomic standard. If you’re setting posts at 24 to 36 inches, your probe and auger checks need to reach that same depth at minimum, since a soil layer that looks fine at 12 inches can turn to wet clay or loose fill six inches further down.
Spacing matters just as much as depth. Test every 50 to 75 feet along a straight run, and always test individually at every corner, gate, and any spot where the terrain visibly changes, whether that’s a dip, a rise, or a shift from open field to tree line. Pasture edges near creeks, old building sites, or filled-in low spots are notorious for hiding soil conditions that differ sharply from the rest of the field.
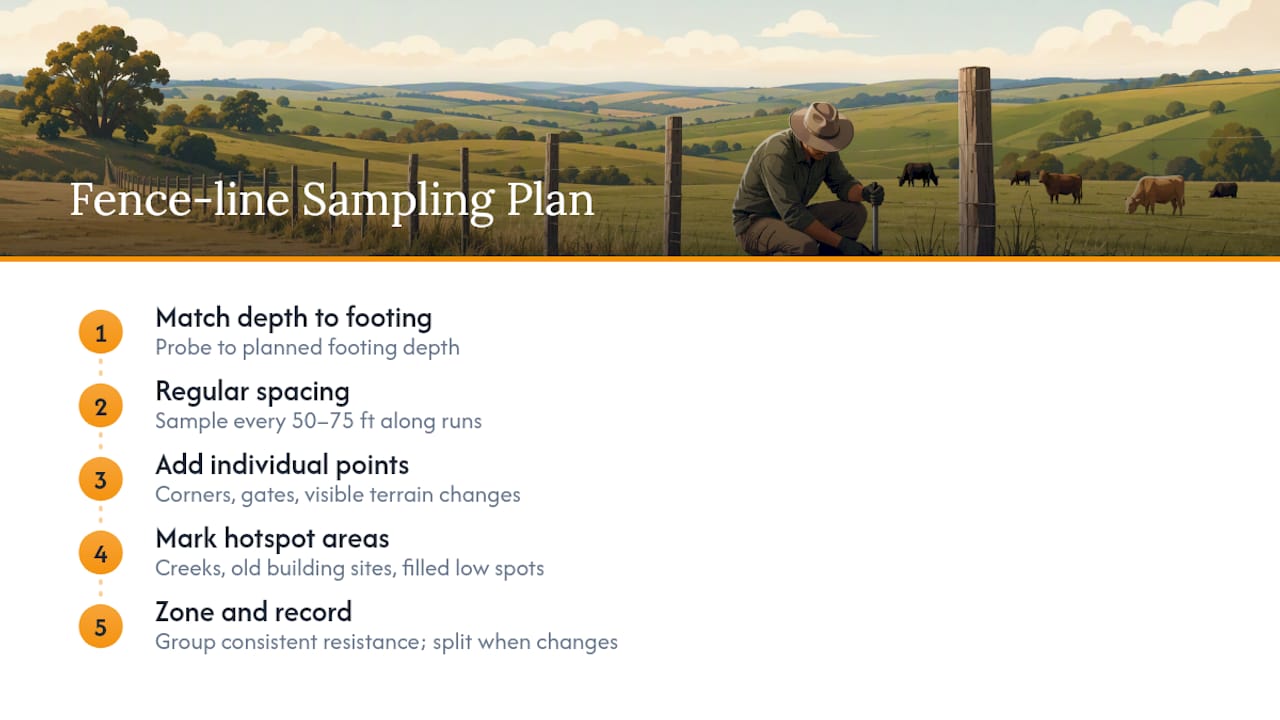
A single soil test near the gate and calling it done is the most common shortcut that costs money later. Three posts spaced 60 feet apart on the same fence line can sit in three different soil conditions, especially on properties with rolling terrain or a history of grading work. If your probe test shows consistent resistance across several adjacent points, you can reasonably treat that stretch as one zone. The moment resistance changes, treat it as a new sample point and record it separately in your checklist table.
Key Soil Factors That Affect Post Stability
Fence posts don’t care about nitrogen or organic matter the way pasture grass does. What matters for a post is bearing capacity, moisture behavior, and how much the soil expands or contracts through freeze and thaw cycles. Three physical characteristics drive nearly every footing decision you’ll make.
Soil texture determines lateral holding strength. Fine-grained soils like clay and silt hold a post tightly when dry but lose grip fast when saturated, which is exactly when wind load on a gate post is highest. Coarse sand holds less initial grip but drains so fast that moisture-driven movement is rarely the problem, loose packing is.
Moisture retention decides your frost heave exposure more than any other single factor. Soils that hold water near the surface freeze and expand repeatedly through winter, gradually walking a post upward a fraction of an inch at a time until it’s visibly loose. That’s the mechanism bell-bottom footings are designed to resist.
Compaction and fill history matter more on older properties than people expect. A pasture that was graded, filled, or had a structure removed decades ago often has inconsistent density underground that a visual soil check won’t reveal. That’s exactly what the probe test is built to catch, since a rod will tell you about buried variation that a handful of topsoil never will.
Reading Ground Conditions for Fencing and Anchor Decisions
Interpreting what your checklist turned up comes down to matching the worst condition you found to the footing method built for it, not the average condition across the whole property. If four out of five test points along a line show solid loam but one shows standing water after 24 hours, that one section gets the bell-bottom footing and gravel base treatment, not the rest of the fence.
Wind and gate load results should override softer soil findings when the two conflict. A gate on firm loam still needs the deeper, pinned footing recommended for heavy loads, because gate posts face torque and repeated stress that line posts on the same soil never experience. Soil type tells you what the ground can support; load tells you what the post has to survive.
For virtual fencing installations using GPS collar systems, the same ground checks apply to base station mounting posts and any physical boundary markers, even though there’s no wire tension to account for. A base station that leans or sinks over one winter can throw off signal range at the worst possible time, so the drainage and frost checks matter just as much for that hardware as they do for a traditional line post.
When your results land solidly in one category, the scenario table earlier in this checklist gives you a direct answer. When results are mixed or borderline, especially between loam and clay, insight from FenceAdvisors suggests defaulting to the more conservative footing rather than the cheaper one, since correcting a heaved post later costs far more than the extra bag of concrete would have.
How Often to Recheck Ground Conditions
A one-time soil check at installation is usually enough for the posts themselves, since soil type and general drainage patterns don’t shift year to year the way pasture nutrients do. But there are specific triggers that call for a fresh check, even on a fence line that’s already standing.
Re-run your drainage and probe tests after any major grading work, new drainage tile installation, or a multi-year drought followed by a wet season, since all three can change how a section of ground handles moisture. If you’re extending an existing fence line or adding a new gate, treat that new section as its own project and run the full checklist rather than assuming it matches the rest of the line.
For properties running Gallagher eShepherd or similar virtual fencing systems, base station and anchor points are worth a quick visual recheck each spring, mainly to catch any settling or heave from the winter before it becomes a signal or mounting problem. That’s a five-minute walk, not a full re-test, but it catches small issues before they become expensive ones.
Field Perspective: Common Mistakes and Quick Wins
The mistakes we see most often aren’t complicated. Skipping the gravel base under a concrete footing because it “seems like overkill” is the top one, and it’s the difference between a post that drains and one that traps water against the wood every winter. Undersized gate posts come in second, usually because someone matched the gate post to the line posts instead of the load it actually carries.
The fixes are cheap relative to the payoff: slope the top of every footing collar so water runs away from the post, add the extra bag of gravel, use stainless or hot-dipped fasteners near ground level. If your probe test hits inconsistent resistance across a short stretch, or you’re staring down a commercial-grade gate on questionable ground, a paid consultation costs far less than redoing a footing after the fact.
— Juiced
Let FenceFast Match Your Site Record to the Right Hardware
Once you’ve got soil type, drainage results, and load requirements written down for every post location, the next step is matching that data to actual hardware, and that’s where a general contractor’s hardware store selection starts to fall short. Some specialized agricultural fencing suppliers offer fencing supplies, virtual fencing hardware, and design consultation sized for the exact soil and load conditions your checklist just uncovered, not generic residential fence stock.

If your site record shows heavy gate loads or high-wind exposure, browse the electric fencing collection for components rated to match, or check fence tools and fasteners for the stainless hardware your clay and silt sections will need. Considering GPS-based herd control instead of a traditional line? The Gallagher eShepherd virtual fencing collection covers base stations and collars built for Canadian pasture conditions. And if your results came back mixed or you’re not confident matching scenario to spec, Fencefast’s design and consultation service can review your field report directly. Bring your photos, your probe results, and your drainage test notes. That record is what turns a quoting call into an accurate order the first time.
Sources
Verify local frost depth and permit rules with your building department before finalizing any footing plan. The scenario recommendations and depth calculations above draw on the following references:
- Matching Fence Posts to Soil, Wind, and Gate Load Scenarios | BuildMat Insight
- Fence Post Depth Calculator — Free Online | HardHatCalc
- Understanding Frost Line Depth for Post Holes: Physics not Preference | ProGrade Calculators
For pasture layout planning once your fence line is confirmed, see Fencefast’s pasture management tips and sheep pasture setup checklist.
FAQ
What Is the Minimum Fence Post Depth for Pastures?
The one-third burial rule applies as a baseline, with a 24 inch minimum regardless of post height.
Do I Need Concrete or Can I Use Gravel Footings?
Gravel drains better and resists frost damage in wet climates, but it has lower lateral holding strength than concrete. Skip gravel for heavy-tension applications like chain link or long tensioned runs, and use concrete for gate posts and corners carrying real load.
How Do I Know if My Soil Has Frost Heave Risk?
Run the 24 hour drainage hole test described in the checklist section. Standing water after a day usually means clay or silt, both high-risk soils that call for a bell-bottom footing with a a gravel base for drainage.
When Should I Call a Geotechnical Engineer Instead of DIY Testing?
Probe and auger checks handle most pasture fence installations without outside help. Call in professional testing if you find peat, soft compressible fill, or shallow bedrock that a simple field test can’t safely characterize.
Can Fencefast Help Me Interpret My Soil Test Results?
Yes. Fencefast offers design and consultation services where you can bring your field report, photos, and test results for a direct review against product and footing options. Current product pricing is listed on each collection page at fencefast.ca.

