
TL;DR:
- Proper fence post anchoring involves setting posts below the frost line, using gravel bases, and ensuring correct concrete shaping to prevent leaning and movement. Soil type, moisture, and drainage significantly influence post stability, requiring tailored installation and regular maintenance to avoid failure. Effective electric fence grounding demands multiple deep galvanized rods spaced appropriately to maintain consistent livestock containment.
Keeping fences grounded means anchoring fence posts securely into stable subsurface soil so the entire fence structure resists lateral forces, soil movement, and weather stress. The industry term for this process is fence post anchoring, and it covers everything from post hole depth and concrete footings to drainage management and electric fence earthing systems. Poor anchoring causes leaning posts, sagging wire, and livestock escapes that cost far more to fix than they cost to prevent. This guide covers the practical, soil-specific techniques that keep your fence standing straight through freeze-thaw cycles, wet springs, and dry summers.
What are the essential steps for grounding fence posts?
Proper fence post installation is the foundation of every stable fence line. Get this step wrong and no amount of maintenance will save you later.
Follow these steps to anchor posts correctly from the start:
-
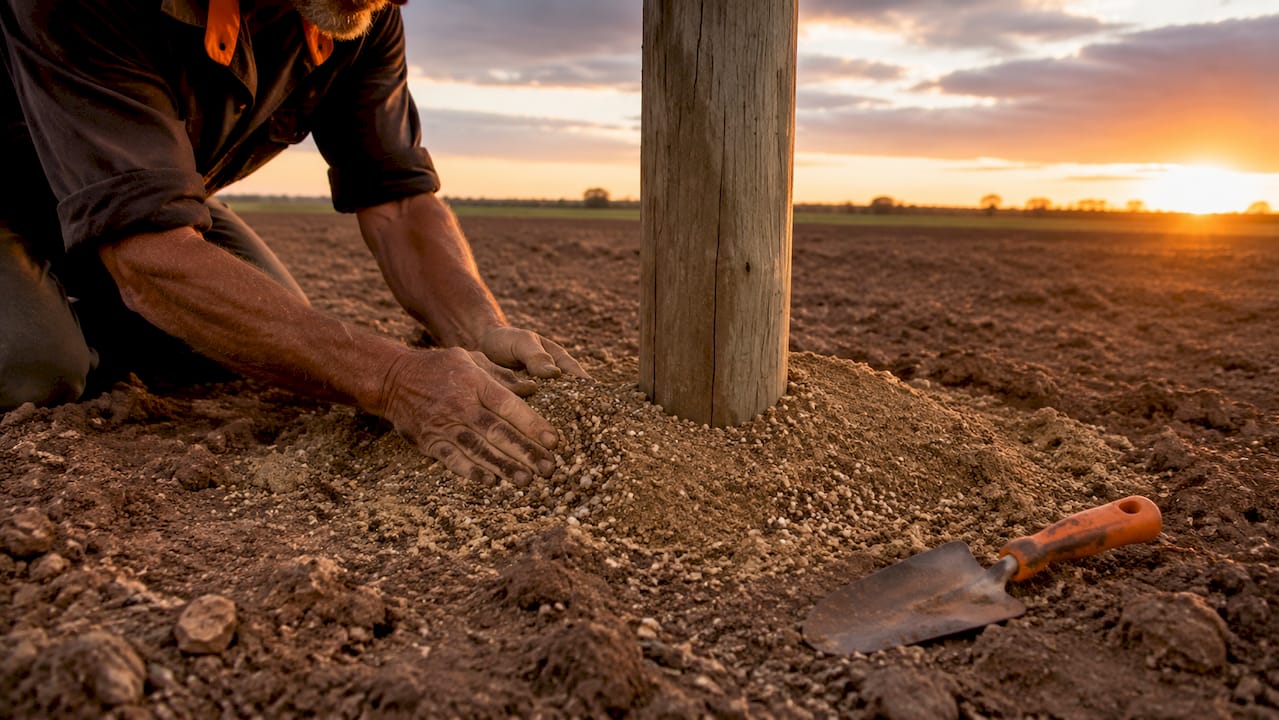
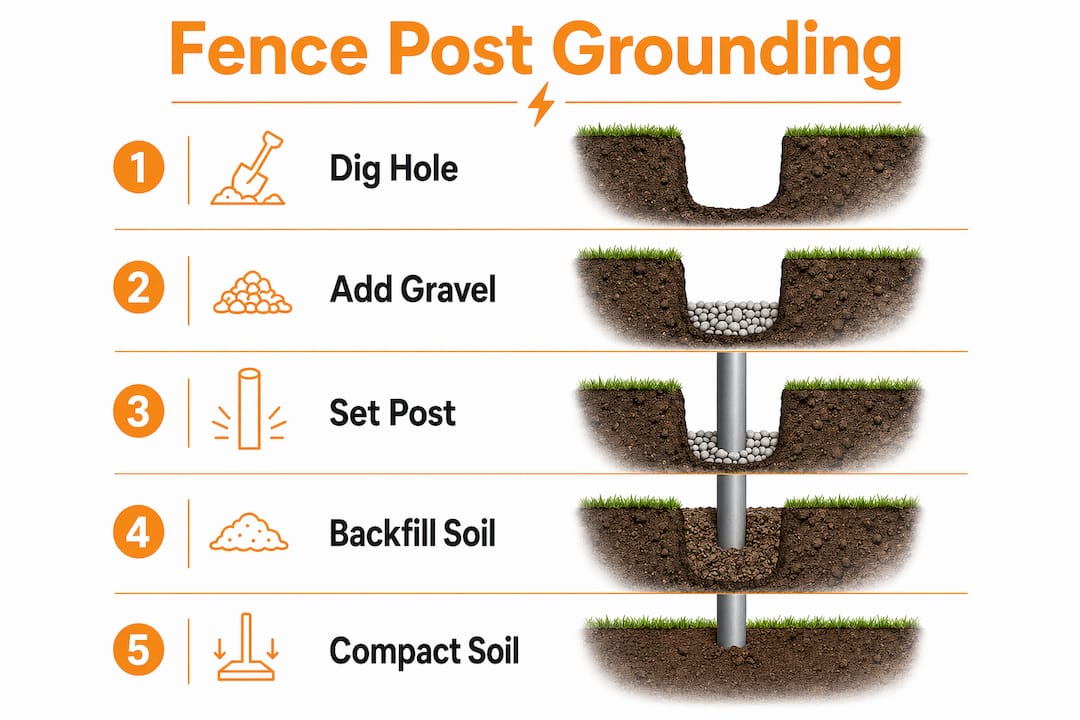
Dig to the right depth. Post depth standards range from 30–42 inches depending on your regional frost line. Shallow posts heave out of the ground in northern climates. Check your local frost data map before you dig a single hole.
-
Prepare the base layer. Place a 4–6 inch gravel base at the bottom of each hole before setting the post. Gravel drains water away from the post base, which is the zone most vulnerable to rot and soil softening.
-
Compact the soil beneath the post. Loose soil at the bottom of the hole allows the post to sink under load. Tamp the base firmly before adding gravel.
-
Set the post plumb and brace it. Use a level on two sides of the post and brace it with scrap lumber before pouring concrete. A post that shifts during the pour will cure crooked.
-
Pour concrete and crown it correctly. Concrete increases bearing surface area against lateral forces but does not add structural strength to the post itself. Shape the concrete crown so it slopes away from the post on all sides. This directs rainwater away from the wood and prevents pooling at the base.
-
Wait before loading the fence. Posts loaded before concrete cures tend to lean. Wait 48–72 hours before attaching rails, wire, or boards. Rushing this step is the single most common cause of leaning fences on new installations.
Pro Tip: In clay-heavy soils, avoid backfilling with the native clay you dug out. Use a sand-gravel mixture instead. Clay backfill traps moisture and accelerates post decay far faster than aggregate-backed fill.
Posts embedded only in the active shrink-swell zone of clay soil are highly prone to movement. Footings anchored below this layer contact stable soil that resists lateral pressure year-round. In North Texas and similar clay-heavy regions, that stable layer can sit 24 inches or deeper below the surface.
How does soil and moisture affect post stability?
Soil type is the variable most farmers underestimate when planning a fence line. The same post installation that works perfectly in loam soil can fail within two seasons in clay or saturated sand.
Here is how each soil type behaves around fence posts:
- Clay soil shrinks when dry and swells when wet. This shrink-swell cycle exerts lateral pressure on posts and gradually pushes them out of alignment. Clay also drains slowly, keeping moisture in contact with wood posts longer than any other soil type.
- Sandy soil drains fast but provides poor lateral support. Posts in sand require wider footings or larger concrete collars to resist tipping under wire tension.
- Loam soil offers the best balance of drainage and lateral support. Even loam, however, requires proper grading to prevent water from pooling at post bases.
Water pooling at post bases is the leading cause of premature post failure. Grading soil away from posts at a slope of 1–2 inches per foot for at least 10 feet redirects runoff before it saturates the footing zone. This is one of the most cost-effective steps you can take on any fence installation.
Pro Tip: In low-lying or flood-prone paddocks, install a French drain or a gravel border 12 inches wide around each post base. This keeps the footing zone dry even after heavy rain.
Frost heave is a separate but equally damaging problem. When soil freezes, it expands upward and can push posts several inches out of the ground over a single winter. Embedding posts below the frost line is the only reliable fix. Insulating the soil surface with mulch or straw near posts can reduce the freeze depth slightly, but it does not replace proper installation depth.
Moisture also accelerates rot in wood posts. Wet soil around a post base keeps the wood saturated, and saturated wood decays fast. Pressure-treated posts rated for ground contact (UC4B or UC4C rating) resist rot significantly longer than standard lumber. Pair treated posts with gravel backfill and proper grading, and you extend post life by years.
What are best practices for electric fence grounding?
Electric fence grounding, also called earthing, is a separate discipline from mechanical post anchoring. A poorly grounded electric fence delivers weak or inconsistent shocks, which livestock learn to ignore. The fix is almost always in the ground rod system.
The table below compares common grounding rod materials and their performance:
| Material | Corrosion Resistance | Conductivity | Recommended? |
|---|---|---|---|
| Galvanized steel | High | Good | Yes |
| Copper | Very high | Excellent | Less effective in series |
| Rebar | Low | Poor | No |
| Stainless steel | Very high | Good | Yes (premium use) |
Rebar corrodes quickly and is not recommended for electric fence grounding. Galvanized steel rods at least 4 feet long, spaced 10 feet apart, and connected in series with heavy-duty cable are the standard for reliable performance.
Follow these steps to build a solid electric fence earthing system:
- Use at least three ground rods for most farm installations. Single electrode grounding fails in dry soils because surface soil loses conductivity during dry spells or freezing temperatures.
- Drive rods deep enough to reach moist soil. Shallow rods fail intermittently in resistive or dry soils. The goal is to reach a soil layer that stays moist year-round.
- Connect rods in series using 12.5-gauge or heavier galvanized wire or insulated cable. Multi-rod arrays connected with heavy gauge cable create a low-resistance return path that maintains consistent fence power under varying soil conditions.
- Keep ground rods away from utility lines. Proximity to buried utilities causes interference and can create safety hazards.
- Test voltage at the fence and at the last ground rod. A reading below 300 volts at the last rod indicates a grounding problem, not a power supply problem.
For a detailed walkthrough of electric fence grounding steps, Fencefast has a practical 2025 guide covering rod placement, connection methods, and testing procedures.
How can farmers prevent fence movement over time?
Preventing fence movement after installation requires a consistent maintenance schedule. A fence that looks solid in spring can shift significantly by fall if you ignore a few key indicators.
Build these habits into your seasonal farm routine:
- Inspect twice a year. Biannual inspections after winter thaw and before freeze catch problems before they become failures. Check for leaning posts, loose wire connections, soil erosion at post bases, and signs of rot.
- Check electric fence grounding components. Biannual voltage tests detect grounding performance issues before livestock notice the fence has lost its punch. Remove soil near rod tops to check for corrosion at connection points.
- Control vegetation at post bases. Grass and weeds growing against posts retain moisture and encourage rot. Roots from woody plants can physically displace posts over time. Keep a 6-inch clear zone around every post base.
- Reinforce aging posts before they fail. A post that leans 5 degrees is easier to fix than one that has snapped at the base. Drive a steel T-post alongside a leaning wood post and tie them together as a temporary brace while you plan a permanent repair.
- Clear debris after storms. Fallen branches resting on fence wire add weight and lateral stress. Remove them promptly to prevent wire stretching or post displacement.
Pro Tip: After every hard freeze, walk your fence line before turning livestock back into a paddock. Frost heave can lift a post 2–3 inches in a single winter, and a post that high is no longer anchored effectively.
Seasonal soil movement is predictable. You can adapt your maintenance schedule to it. Farms in northern Canada and the northern United States should treat the spring thaw inspection as non-negotiable. That is when frost heave damage becomes visible and when soil around posts is at its softest and most vulnerable to further movement.
Key takeaways
Stable fences require proper post depth, drainage control, and a maintained grounding system working together from installation through every seasonal cycle.
| Point | Details |
|---|---|
| Post depth is non-negotiable | Embed posts below the regional frost line, typically 30–42 inches, to prevent heave. |
| Concrete crowns must drain away | Slope concrete away from each post to stop water pooling at the base. |
| Gravel backfill beats clay | Use sand-gravel mix in post holes to improve drainage and slow post decay. |
| Electric grounding needs multiple rods | Use at least three galvanized steel rods spaced 10 feet apart for consistent fence power. |
| Biannual inspections protect your investment | Check for leaning posts, corrosion, and voltage loss every spring and fall. |
What i’ve learned after years of watching fences fail
Most fence failures I have seen come down to two mistakes: rushing the concrete cure and ignoring drainage. Farmers set posts on a Monday and string wire on Tuesday because the schedule demands it. The fence looks fine for a year, then starts leaning, and nobody connects it back to that 24-hour shortcut.
The other thing I have noticed is that soil variability gets treated as a constant. A farmer will use the same installation method across an entire property without accounting for the wet corner near the creek or the clay shelf on the north slope. Those spots need a different approach, whether that means deeper posts, gravel borders, or French drains. One-size-fits-all fence installation is how you end up with one section that lasts 20 years and another that needs repairs every spring.
For electric fences specifically, the grounding system is almost always the last thing anyone thinks about and the first thing that causes problems. A fence that shocks inconsistently trains livestock to test it. Once cattle or horses learn the fence is unreliable, you have a containment problem that no amount of voltage will fix. Invest in the ground rod system upfront. It costs less than one escaped animal.
Moisture control is the most underrated fence stability tip I can offer. Simple grading and a gravel border around post bases cost almost nothing compared to replacing rotted posts or resetting heaved footings. The farms with the longest-lasting fences are not the ones with the most expensive materials. They are the ones where someone paid attention to where the water goes.
— Juiced
Build a more stable fence with Fencefast
Fencefast carries the full range of components you need to install and maintain grounded, reliable fencing across any Canadian farm or ranch.

From galvanized electric fence ground rods and heavy-duty connecting cable to gravel-compatible post hardware and Gallagher electric fence energizers, Fencefast stocks what you need to do the job right the first time. The team also provides design consulting and installation guidance for both traditional and virtual fencing projects. Whether you are setting new posts on a fresh paddock or reinforcing an aging fence line, browse the full catalog at Fencefast to find the right products for your operation.
FAQ
What does keeping fences grounded mean for farmers?
Keeping fences grounded means anchoring fence posts securely into stable subsurface soil and, for electric fences, installing a proper earthing system with ground rods. Both practices prevent fence movement and maintain livestock containment.
How deep should fence posts be set to prevent heaving?
Post depth should reach below the regional frost line, with standard depths ranging from 30–42 inches depending on location. Posts set above the frost line are pushed upward by soil expansion during freezing temperatures.
How many ground rods does an electric fence need?
Most farm electric fence installations require at least three galvanized steel ground rods, each at least 4 feet long and spaced 10 feet apart. Single-rod systems fail in dry or frozen soil conditions.
How often should i inspect fence grounding components?
Inspect fence posts and electric fence grounding connections twice a year, once after the winter thaw and once before the ground freezes. Annual voltage tests confirm whether the earthing system is still performing correctly.
Why does my electric fence lose power in dry weather?
Dry soil loses electrical conductivity, which weakens the earth-return path that completes the circuit in an electric fence. Adding more ground rods driven deeper into moist soil layers restores consistent fence performance.

