

TL;DR:
- Proper grounding of an electric fence involves installing at least three galvanized steel ground rods deep into moist soil and connecting them with continuous wire to ensure reliable electrical return paths. Soil moisture and proper maintenance significantly impact grounding effectiveness, with dry or rocky conditions requiring more rods and regular testing to prevent fence failures. Using the correct materials and following installation best practices helps property owners maintain optimal fence performance year-round.
The best way to ground an electric fence is to drive at least three galvanized steel ground rods deep into moist soil and connect them with continuous bare wire back to your energizer. This method, often called earthing in industry literature, is the single most important factor in fence performance. A fence that delivers 6,000 volts at the energizer but has a weak ground system will barely register on an animal. Property owners managing cattle, horses, or pigs need a grounding system that completes the electrical circuit reliably every time an animal touches the wire. Get the ground right, and everything else follows.
What is the best way to ground an electric fence?
Proper grounding is the most sensitive and commonly underbuilt element affecting fence performance. The energizer pushes a pulse through the fence wire. When an animal touches the wire, that pulse travels through the animal, into the ground, and back to the energizer through the ground rods. If the return path is weak, the shock is weak. No amount of extra fence wire or a more powerful energizer fixes a bad ground.
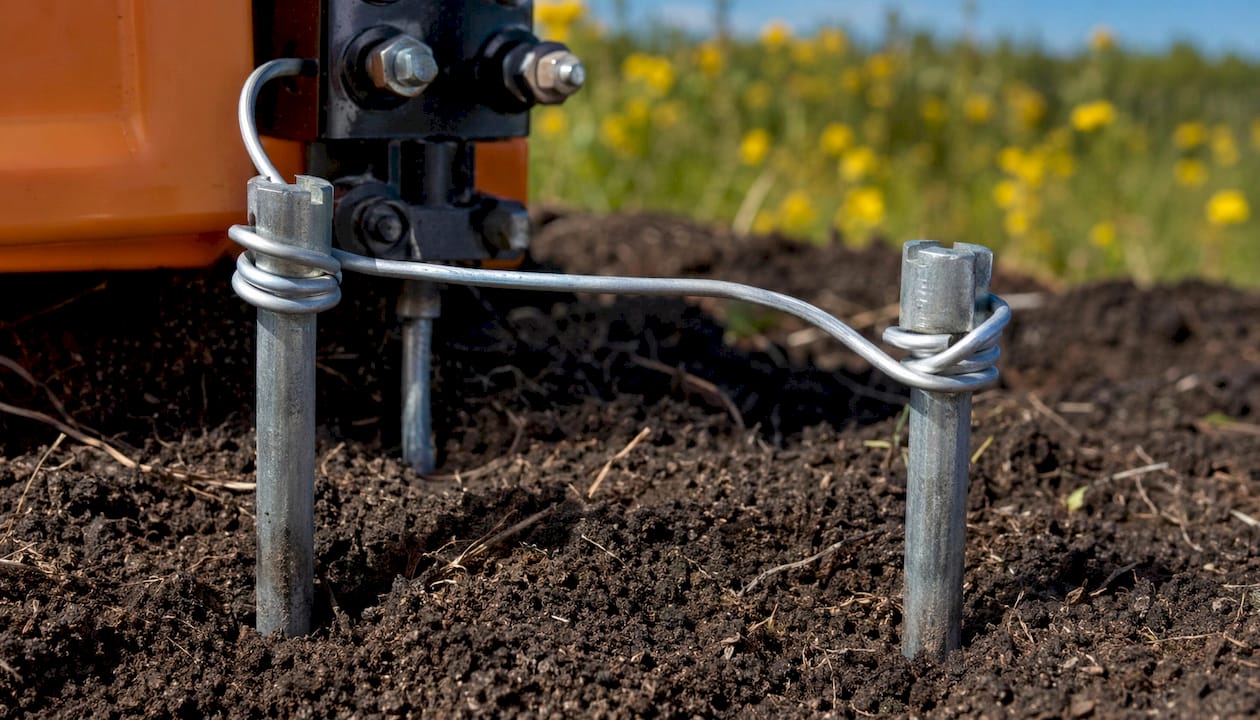
The standard that most installation guides follow comes from NEC Article 250 and guidance from the Fence Installation Authority. Both point to the same core requirement: multiple rods, deep placement, and moist soil. Three rods is the minimum for most livestock operations. High-powered energizers need more. The goal is to create a low-resistance return path that handles the full pulse load without voltage loss.
Galvanized steel is the material of choice for ground rod installation. Copper conducts electricity better, but galvanized steel rods balance cost and conductivity for most farm applications. Most manufacturers recommend minimum 6-foot rods spaced 10 feet apart, connected with 12.5-gauge galvanized wire. That specification gives you a reliable baseline for most soil conditions across Canada and the northern United States.
Essential materials for grounding an electric fence
Getting the right materials before you start saves time and prevents weak connections. Here is what you need for a proper grounding system:
Ground rods and wire:
- Galvanized steel rods, at least 4 to 6 feet in length (6-foot rods preferred)
- 12.5-gauge galvanized steel wire for connecting rods in series
- Grounding clamps rated for outdoor use and galvanized wire
Tools:
- Sledgehammer or T-post driver for driving rods
- Wire cutters and crimping pliers
- Digital voltmeter or fence tester for post-installation testing
Safety gear:
- Heavy work gloves when driving rods
- Safety glasses during rod installation
| Material | Specification | Purpose |
|---|---|---|
| Ground rod | Galvanized steel, 6 ft minimum | Electrical return path into soil |
| Connecting wire | 12.5-gauge galvanized | Links rods and energizer terminal |
| Grounding clamp | Outdoor-rated, corrosion-resistant | Secures wire to rod without voltage loss |
| Voltmeter | Digital, fence-rated | Tests grounding performance after install |
Pro Tip: Never mix metals in your grounding system. Connecting copper clamps to galvanized rods creates galvanic corrosion over time, which degrades the connection and raises resistance. Stick to galvanized throughout.
How to install ground rods step by step
Follow this sequence for a grounding system that holds up through wet springs and dry summers.
-
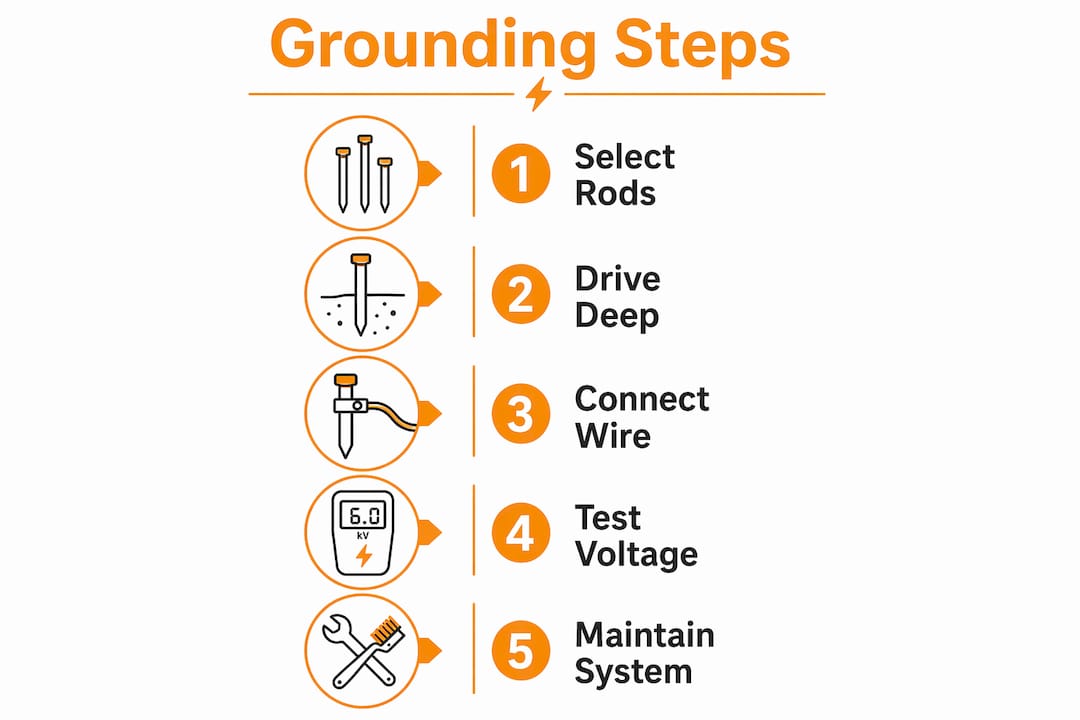
Choose your location. Pick a spot within 20 feet of your energizer where the soil stays naturally moist. Avoid areas near phone lines, buried electrical cables, or metal water pipes. Ground rods placed near utilities cause electromagnetic interference that degrades fence performance and can disrupt phone service.
-
Drive the first rod. Use a sledgehammer or T-post driver to push the rod straight down. The rod must go at least 6 feet deep. If you hit rock before that depth, angle the rod at no more than 45 degrees and continue driving. Depth matters more than angle.
-
Space additional rods 10 feet apart. Spacing rods 10 feet apart and connecting them with continuous wire is the key to effective grounding. Drive each subsequent rod the same depth as the first. Three rods is the standard minimum. Add a fourth or fifth rod if your soil is sandy, rocky, or dry for most of the year.
-
Connect rods with continuous wire. Run 12.5-gauge galvanized wire from the first rod to the second, then from the second to the third. Use grounding clamps at each rod. Do not cut and restart the wire between rods. A single continuous run reduces connection points and lowers resistance.
-
Connect the grounding wire to your energizer. Attach the wire from your rod system to the negative or ground terminal on the energizer. Tighten the connection firmly. A loose terminal connection is one of the most common causes of poor grounding performance.
-
Test the system under load. Lean several iron bars or rebar pieces against the fence wire to simulate heavy animal contact. Check the voltage at the ground rods with a voltmeter. If the earthing system reads above 300 volts, your grounding is insufficient and you need to add more rods. A reading at or below 300 volts confirms the system is working correctly.
Pro Tip: Test your grounding system in late summer when soil is driest. If it passes then, it will perform well year-round. If it fails, add rods before the season ends.
How does soil type affect grounding performance?
Soil moisture is the single biggest variable in grounding effectiveness. Voltage return can drop 50 to 70% in dry soil compared to moist soil without additional rods. That drop means an animal that gets a solid deterrent shock in april may barely feel the fence in august.
Different soil types require different approaches:
- Clay soil: Holds moisture well and conducts electricity effectively. Three rods at standard depth usually perform well year-round.
- Loam soil: Good conductivity when moist. May need a fourth rod in dry summers.
- Sandy or gravelly soil: Drains quickly and conducts poorly. Plan for five or more rods, and consider placing them in a low-lying area where moisture collects.
- Rocky soil: The hardest to work with. Drive rods at an angle where possible, and add extra rods to compensate for shallow depth.
Grounding is not a one-time installation decision. Soil moisture changes with every season, and your grounding system needs to handle the worst-case scenario, which is peak summer dryness, not the easiest case of spring saturation. Property owners who test only once at installation are measuring their best-case performance, not their real-world reliability.
Seasonal maintenance matters as much as the initial install. Check your ground system voltage at least twice a year: once in spring after frost leaves the ground, and once in late summer at peak dryness. This two-point check catches problems before they cost you a containment failure. For more on grounding for livestock safety, the approach stays consistent regardless of species.
Common grounding problems and how to fix them
Weak fence performance almost always traces back to the ground system. Here is how to diagnose and fix the most common issues.
-
Weak or inconsistent shock. The fence reads high voltage at the energizer but animals push through it. Test the voltage at the far end of the fence under load. A large drop between the energizer and the fence end points to a grounding problem, not a wire problem.
-
Loose or corroded connections. Loose wire connections at the rods or energizer terminal are the most common grounding failure. Check every clamp and terminal connection annually. Corroded clamps add resistance. Replace them rather than cleaning them.
-
Rods driven too shallow. A rod that sits only 2 or 3 feet deep loses contact with moist subsoil quickly. Pull shallow rods and re-drive them to full depth. If the ground is too hard, wet the soil around the rod location and try again the next day.
-
Ground rods too close to utilities. Phone lines and buried electrical cables create interference when ground rods are placed nearby. Move rods at least 50 feet from any utility line if possible.
-
Too few rods for the energizer output. High-powered fencers stress grounding systems more than low-output units. If you upgraded your energizer but kept the original three rods, you likely need to add two or three more. Match your rod count to your energizer’s joule output.
Pro Tip: Use a digital voltmeter, not a neon tester, for accurate grounding diagnostics. Neon testers only tell you the fence is live. A digital meter tells you exactly how much voltage is returning through the ground, which is the number that matters.
Key Takeaways
Proper electric fence grounding requires multiple galvanized steel rods driven deep into moist soil, connected with continuous wire, and tested under load to confirm a ground voltage reading at or below 300 volts.
| Point | Details |
|---|---|
| Use at least three rods | Drive galvanized steel rods a minimum of 6 feet deep, spaced 10 feet apart. |
| Soil moisture drives performance | Voltage return drops 50 to 70% in dry soil; add rods for sandy or rocky ground. |
| Test under load, not at rest | Lean iron bars against the fence wire and check ground voltage with a digital voltmeter. |
| Match rods to energizer output | High-powered energizers need more rods to handle increased pulse load without voltage loss. |
| Inspect twice a year | Check connections and ground voltage in spring and late summer to catch seasonal failures early. |
What I’ve learned from watching grounding systems fail
Most fence failures I’ve seen come down to one decision made at installation: the property owner drove two rods, called it done, and moved on. Two rods might pass a visual inspection. They will not hold up through a dry July with a 10-joule energizer running 2 miles of fence wire.
The code minimum is not the performance minimum. NEC Article 250 sets a floor, not a target. Soil conditions, energizer output, and fence length all push the real requirement higher than what any code document specifies. Property owners who treat the code as the finish line end up troubleshooting containment failures instead of managing livestock.
The other pattern I’ve seen repeatedly is grounding systems that worked fine for years and then quietly degraded. Clamps corrode. Rods shift in freeze-thaw cycles. Connections loosen. A fence that held cattle reliably for three seasons can fail in the fourth without any obvious change. Regular testing, specifically the iron-bar load test with a digital voltmeter, catches this before an animal finds the weak spot first. For a deeper look at grounding techniques for livestock, the principles are consistent regardless of herd size.
Build your ground system for your worst soil condition, your highest energizer output, and your driest month. Everything else is easier from there.
— Juiced
Fencefast has the grounding supplies you need
Getting your grounding system right starts with the right materials. Fencefast carries galvanized steel ground rods, 12.5-gauge connecting wire, outdoor-rated grounding clamps, and digital fence testers built for farm conditions across Canada.

Whether you are installing a new system or adding rods to an underperforming setup, the Fencefast product catalog has what you need to build a grounding system that holds up through every season. The team at Fencefast also offers design consulting for property owners who want to match their grounding setup to their specific soil type, energizer output, and fence length. Reach out directly for personalized advice before you drive the first rod.
FAQ
How many ground rods does an electric fence need?
Most livestock electric fences need at least three ground rods as a minimum. High-powered energizers or long fence runs require additional rods, particularly in dry or sandy soil.
How deep should electric fence ground rods be driven?
Ground rods should be driven at least 6 feet deep to reach consistently moist subsoil. Shallow rods lose contact with moisture quickly and reduce grounding effectiveness.
What wire connects electric fence ground rods?
Use 12.5-gauge galvanized steel wire to connect ground rods in a continuous daisy chain back to the energizer’s ground terminal. Avoid mixing wire metals to prevent corrosion.
How do you test if an electric fence is properly grounded?
Lean several iron bars against the fence wire to create a heavy load, then measure voltage at the ground rods with a digital voltmeter. A reading above 300 volts means the grounding system needs more rods.
Can you put electric fence ground rods near utility lines?
Ground rods placed near phone lines or buried electrical cables cause electromagnetic interference that degrades fence performance. Place rods at least 50 feet from any utility line when possible.

