

TL;DR:
- Proper corner bracing is crucial because it converts tension into downward compression to prevent fence failure. Using deep-set posts with appropriate materials and correct wire routing on slopes ensures long-lasting stability. Neglecting these principles risks sagging fences, livestock escapes, and costly rebuilds.
A sagging fence corner doesn’t just look bad. It triggers a chain reaction: wire loses tension, posts lean further, livestock push through, and suddenly you’re chasing cattle at midnight while calculating what a rebuild will cost. Corner bracing is the single most important structural decision you’ll make when building any farm fence, yet it’s also the most commonly skipped or undersized. This guide walks you through every proven technique, from standard H-braces to deadman anchors, so your corners stay locked in place for decades, not seasons.
Table of Contents
- Understanding the role of corner bracing
- Tools and materials for effective bracing
- Step-by-step standard H-brace installation
- Advanced options: Floating braces and deadman anchors
- Corner bracing on sloped ground: Key adjustments
- Our perspective: The corner is where a fence earns its reputation
- Build with confidence using the right supplies
- Frequently asked questions
Key Takeaways
| Point | Details |
|---|---|
| Set posts deep | A third of the post length must be buried for your corners to stay secure over time. |
| H-brace wire direction | Correct wire routing is critical—always go from the top brace post to the bottom corner post. |
| Adapt for challenging soils | Use floating braces or deadman anchors in rocky, sandy, or wet ground conditions. |
| Mind the slope | Adjust angle and geometry of your bracing to align with slopes and minimize lifting forces. |
| Do it right the first time | Proper preparation and attention to detail save money, time, and future repairs. |
Understanding the role of corner bracing
Most fence failures don’t start in the middle of a run. They start at the corners. That’s because corners don’t just hold wire, they absorb and redirect the entire tension load of every wire strand attached to them. On a 40-strand barbed or high-tensile fence run, that tension accumulates fast. A corner post experiences constant outward pull, and without proper bracing, it simply leans over time until the whole line goes slack.
The physics are straightforward. When you tension wire, you’re essentially creating a long spring that’s trying to pull both ends toward the middle. The corner post is one of those ends. If it has nothing to push against, it will move. Shallow posts, undersized bracing, or improper wire routing all give that tension a free pass to slowly win.
Here are the core forces your corner assembly must handle:
- Outward pull from tensioned line wires
- Uplift caused by wire angles and frost heave in Canadian winters
- Lateral pressure from livestock pushing or rubbing against corners
- Soil displacement from wet conditions or freeze-thaw cycles
Building farm fence basics covers the broader context of fence construction, but it always comes back to corner strength as the foundation. Understanding animal fencing basics also shows how different livestock species apply different pressures to fencing structures, which affects how robustly you should brace.
A properly built corner brace doesn’t just hold the corner post in place. It converts outward tension into downward compression, which the earth absorbs. That’s the mechanical goal of every bracing system discussed in this guide.
According to established fencing practice, posts must be buried at least one-third of their total length underground to resist the uplift and outward lean caused by wire tension. For an 8-foot post, that means a minimum of 32 inches in the ground, and more is always better in loose or sandy soils.
Tools and materials for effective bracing
Good bracing starts before you dig the first hole. Walking onto a job site without the right gear wastes time and often leads to shortcuts that cost you down the road. Here’s what you’ll need.
Essential tools:
- Post hole digger or tractor-mounted auger
- Tamping bar for packing backfill tight
- Level (both post-level and line level)
- Wire tensioner or come-along
- Staple gun and fencing staples
- Linesman pliers and bolt cutters
- Tape measure and marking paint
Core materials:
- Corner and brace posts (see table below)
- Horizontal brace rail (wood or steel pipe)
- Brace wire or cable, typically 9-gauge galvanized
- Wire tensioner clips or brace bands
- Concrete mix for corner post setting (optional but recommended in frost-prone areas)
| Post type | Minimum diameter | Ideal buried depth | Best use case |
|---|---|---|---|
| Pressure-treated pine | 5 to 6 inches | 36 to 42 inches | General farm fencing |
| Hardwood (oak, locust) | 5 to 6 inches | 36 to 42 inches | High-tension runs |
| Steel pipe (schedule 40) | 4 to 5 inches OD | 36 to 48 inches | Rocky or wet ground |
| Fiberglass brace post | 4 inches | 30 to 36 inches | Temporary or electric setups |
Choosing the right fence posts gives you a deeper breakdown of post selection for Canadian conditions, including how to account for ground freeze depth, which varies significantly from southern Ontario to northern Alberta.
Canadian climate adds a real complication. Frost heave can lift an improperly set post inches out of the ground over a single winter. Setting corner posts in concrete extends down below the frost line and dramatically reduces seasonal movement. It’s extra work upfront that pays for itself within two or three winters.
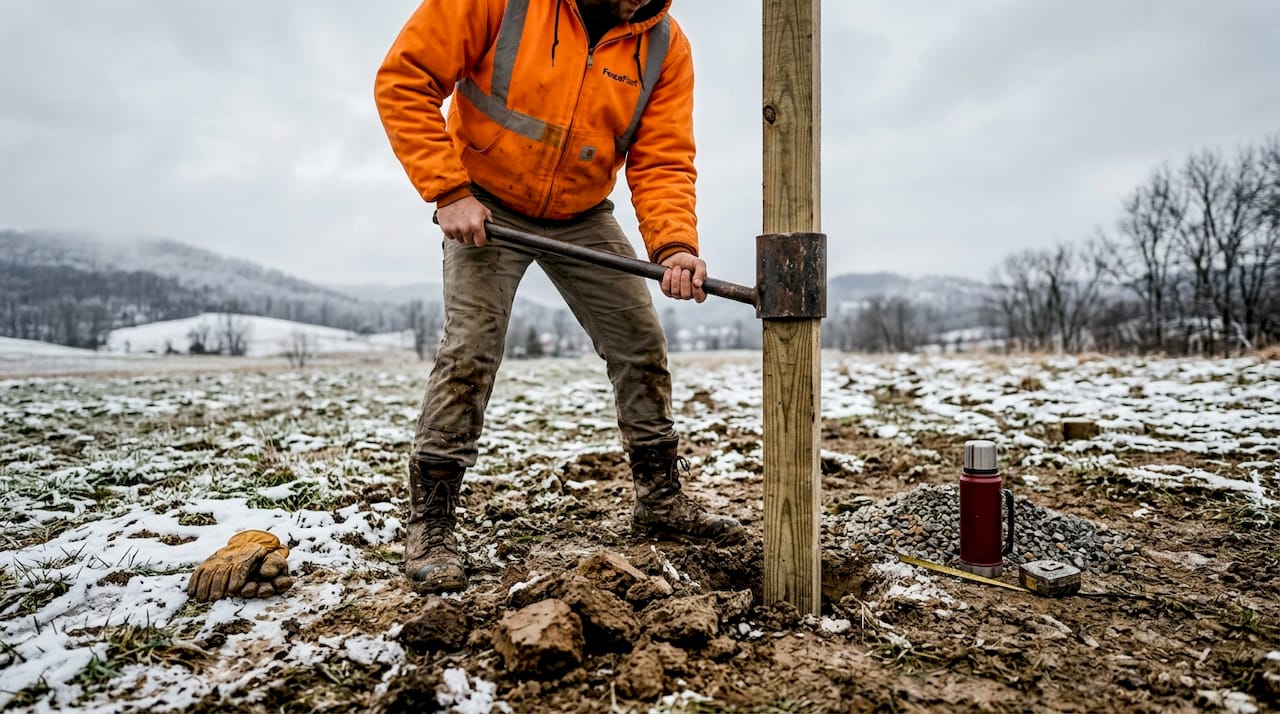
The one-third burial rule applies to brace posts too, not just the corner anchor post. Many farmers set a deep corner post and then shortcut the brace post depth. That undermines the entire system because both posts share the structural load.
Pro Tip: If you’re working in a region with a deep frost line, such as the Prairie provinces, consider using locally sourced black locust or tamarack for your corner posts. Both species resist rot naturally and handle the freeze-thaw cycle better than many pressure-treated alternatives.
Step-by-step standard H-brace installation
The H-brace is the industry standard for a reason. When built correctly, it transfers wire tension into ground compression so effectively that a well-set H-brace corner can outlast the fence wire itself. Here’s how to build one from start to finish.
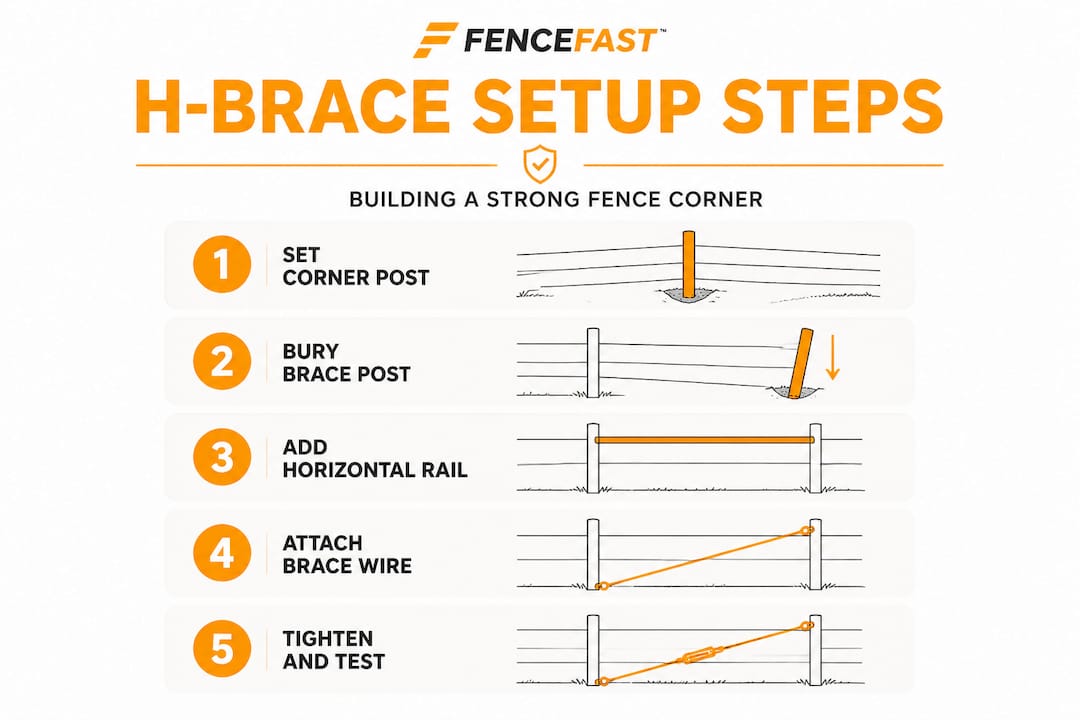
- Mark your corner location using stakes and string line. Confirm the angle of your fence runs before digging.
- Dig your corner post hole to at least one-third of post length, ideally 36 to 48 inches depending on post height and soil conditions.
- Set and plumb the corner post. Use a post level on two faces. Backfill in 6-inch lifts, tamping each layer firmly. Add concrete collar at the base if frost heave is a risk.
- Measure and dig the brace post hole 6 to 8 feet from the corner post along the fence line. The brace post should be the same diameter and burial depth as the corner post.
- Set and plumb the brace post using the same compaction method.
- Install the horizontal brace rail between the two posts at a height roughly two-thirds up the post length. Notch the posts or use metal brace bands to seat the rail securely.
- Route your brace wire from the top of the brace post diagonally down to the bottom of the corner post. Wrap and staple it at each end, leaving enough tail to tension.
- Twist the brace wire tight using a tensioning stick (a short hardwood dowel works perfectly). Twist until the wire feels drum tight, then lock it in place.
The field fence building guide goes into detail on attaching and tensioning line wires after your corners are set, which is the logical next step once your brace assembly is complete and solid.
Wire routing direction is not a minor detail. Brace wire must run from the top of the brace post down to the bottom of the corner post. Reversing that direction creates an upward lifting force on the corner post instead of a downward compressive one, which actively accelerates failure.
Never reverse your brace wire direction. Running wire from the bottom of the brace post to the top of the corner post creates a lifting force that fights gravity and works against your corner post every time the wire load increases.
| Brace style | Wire configuration | Pros | Cons |
|---|---|---|---|
| Single diagonal | One wire, top of brace to base of corner | Simple, faster to install | Less redundancy |
| X-brace | Two crossing diagonals | Redundant, handles bidirectional loads | More material, debate over necessity |
There is genuine practitioner debate about whether to use one diagonal wire or an X-pattern (two diagonals) inside the H-brace. Some experienced fence builders argue that the second wire adds meaningful redundancy. Others contend that the second wire can introduce conflicting forces depending on which direction the load comes from. For most straight fence runs with wire tension pulling in one direction only, a correctly installed single diagonal is sufficient.
Pro Tip: Tighten your brace wire and test the corner’s rigidity before you ever stretch a single line wire. If the corner moves when you push hard against the brace post with your body weight, the brace isn’t tight enough yet. Fix it now, not after everything is strung.
Advanced options: Floating braces and deadman anchors
Not every field offers textbook conditions. Bedrock sits 18 inches down on some Canadian hillsides. Other areas have peat or clay soils so wet that a brace post set in the ground tips over before the concrete cures. For these situations, you need alternative systems.
Common alternatives to the H-brace include floating braces and deadman anchors, each solving a specific problem the standard system can’t address.
Floating brace options are used when:
- Bedrock or large rocks prevent deep post setting
- The terrain only allows one post to be set at proper depth
- You’re in a temporary fence situation that needs some rigidity
- Access is too tight for standard H-brace post spacing
A floating brace uses a single deeply set corner post combined with a diagonal brace board or pipe that pushes against a surface-level plate or rock instead of a second buried post. It sacrifices some holding power in exchange for adaptability.
Deadman anchor systems are the right call when:
- Soil is too soft, wet, or sandy to hold a vertical post under load
- You’re fencing across a wetland margin or flood-prone area
- Seasonal water table movement makes vertical posts unreliable
- You need a semi-permanent installation in difficult terrain
A deadman anchor works by burying a horizontal log, timber, or steel plate perpendicular to the fence line at depth, then attaching wire or cable from that buried anchor up to the corner post base. The anchor relies on soil mass and friction rather than vertical post resistance. In soft soils, this system dramatically outperforms any vertical post-based brace.
Smart livestock fencing ideas also explores creative solutions for challenging terrain, with several case examples directly relevant to wet or rocky Canadian farm environments.
The honest advantage of knowing these advanced systems is that they free you to build a fence wherever the animal management plan requires it, not just where the soil cooperates.
Corner bracing on sloped ground: Key adjustments
Slope changes everything about brace geometry. What looks like a correct brace on flat ground can introduce serious lifting forces when the same assembly is built on a hillside. This is one of the most common mistakes on hilly Canadian farms.
Brace geometry on slopes must be managed so the horizontal brace member stays parallel to the slope surface and the brace wire angle stays well under 45 degrees. When the wire angle gets steeper than 45 degrees, it generates more lifting force than horizontal resistance, which is exactly the opposite of what you want.
Critical mistakes to avoid on sloped ground:
- Setting posts perfectly vertical to the horizon instead of perpendicular to the slope. Posts should lean slightly into the slope to counteract the pull direction.
- Using a standard flat-ground brace spacing on a steep slope. Wider post spacing lowers the wire angle and reduces lifting force.
- Ignoring water runoff paths. Sloped corners that sit in natural drainage channels experience accelerated soil erosion at the base, which loosens posts faster.
- Not accounting for wire tension direction. Wire tension pulls along the slope, which changes the vector forces acting on your corner post significantly.
Perimeter fence installation tips includes slope-specific guidance for complete perimeter builds, which is helpful context when you’re planning a multi-corner project across varied terrain.
Pro Tip: Before you dig any holes on a slope, sketch a rough side-view diagram of your proposed brace assembly and draw in the wire angle. If that angle looks steeper than 45 degrees on paper, move your brace post further out along the fence line until it flattens. A few minutes of pencil work saves hours of rework.
Our perspective: The corner is where a fence earns its reputation
Here’s something the standard fence-building advice doesn’t say clearly enough: you can tolerate minor compromises on line posts, spacing, or even wire gauge, and your fence will still function. But cut corners (literally) on your corner bracing, and everything fails. We’ve seen experienced farmers spend weeks building a 3-mile perimeter only to watch it sag within a single freeze-thaw season because they rushed the corner installation or skipped concrete on two posts.
The uncomfortable truth is that corner bracing is the least glamorous part of fencing. It doesn’t look impressive when it’s done. You dig, you set posts, you twist some wire, and then you move on. But that invisible work underground is what the entire fence leans on. Every foot of wire tension in a 1,500-foot run terminates at your corner assembly.
We’d argue that if you’re budgeting time and materials for a fencing project, you should weight your corner assembly at roughly 30 to 40 percent of total effort, even though it represents maybe 5 percent of the physical length. Use the best posts, set them the deepest, and take the time to tension the brace wire properly before you move on. That discipline is what separates fences that last 25 years from fences that need rebuilding every 5.
Build with confidence using the right supplies
Whether you’re replacing a failing corner or starting a new pasture build from scratch, having access to the right fencing components makes all the difference in the final result.

At FenceFast, we carry the full range of fencing components Canadian farmers and ranchers rely on, including quality wire, tensioners, staples, connectors, and post accessories that are suited to the demands of our climate and terrain. Our team understands the specific challenges of building in Canadian conditions, from prairie freeze-thaw to rocky Shield terrain, and we’re here to help you choose components that will hold up over the long term. Browse our full fencing product catalog or reach out for project-specific guidance. Nationwide shipping available.
Frequently asked questions
How deep should corner posts be set to prevent leaning?
Corner posts should be buried at least one-third of their total length underground to resist the uplift and outward lean that wire tension creates. In frost-prone Canadian regions, going deeper than the minimum is always worth the extra effort.
What happens if the brace wire is run in the wrong direction on an H-brace?
Running the brace wire the wrong way generates an upward lifting force rather than downward compression, which can pull the corner post out of the ground instead of stabilizing it. Always run brace wire from the top of the brace post down to the base of the corner post.
When should I use a floating brace or deadman anchor?
Floating braces work best when you can’t set a second post deep enough due to bedrock, while deadman anchors perform best in very soft, wet, or sandy soils where vertical posts won’t stay upright under load.
How does slope affect bracing setup?
On a slope, keep the brace rail parallel to the ground surface and maintain a wire angle under 45 degrees to prevent lifting forces from working against your corner post rather than stabilizing it.
Recommended
- How to Repair Fences: Practical Steps for Farmers and Landowners 2025 – FenceFast Ltd.
- Top fencing connectors for farms: options, uses, and tips – FenceFast Ltd.
- Top Fencing Solutions for Farms – Expert Comparison 2025 – FenceFast Ltd.
- How to Build Farm Fence: Step-by-Step for Strong Results – FenceFast Ltd.

