
TL;DR:
- Canadian winters challenge electric fences with frozen soil, snow, ice, and cold weather, causing grounding and connection issues that reduce voltage and effectiveness. Proper winterizing includes thorough ground rod preparation, vegetation clearing, connection inspection, and regular voltage testing, starting two weeks before freeze-up. Active, ongoing checks during winter are essential, as soil moisture and equipment performance vary, to ensure livestock safety in harsh conditions.
Canadian winters don’t ease up on electric fences. Frozen soil, heavy snow loads, ice bridging across wires, and plummeting temperatures all work against the reliability your livestock depend on every single day. The key winter failure modes for electric fences are loss of grounding conductivity, snow and ice creating shorts, and high-resistance connection problems at splices and joins. Get ahead of these issues before the ground freezes solid and you’ll keep your animals contained, safe, and well-managed through even the harshest prairie or northern Canadian winter.
Table of Contents
- Identifying winter risks for electric fences
- Tools and materials needed for winterizing
- Step-by-step winterizing process
- Troubleshooting common winter failures
- Winter safety protocols for electric fencing
- What most guides miss about winterizing electric fences
- Optimize your electric fence for Canadian winters with FenceFast
- Frequently asked questions
Key Takeaways
| Point | Details |
|---|---|
| Grounding is crucial | Proper ground rod placement in moist soil before freezing ensures fence reliability during winter. |
| Clearing obstacles matters | Removing vegetation and snow from fence lines prevents shorts and voltage drops. |
| Regular voltage checks | Testing with a voltmeter weekly and after storms maintains livestock deterrence and safety. |
| Safety comes first | Avoid fence contact after storms, especially if power lines are down or nearby. |
| Use expert resources | Leveraging guides and quality supplies streamlines winter prep and troubleshooting. |
Identifying winter risks for electric fences
Understanding what actually goes wrong helps you prioritize your prep work. Winter doesn’t just create one problem for electric fences. It creates several at the same time, often compounding each other until your fence is running at a fraction of its intended voltage.
Here are the most common threats Canadian farmers face each winter season:
- Frozen ground reduces the soil’s ability to complete the electrical circuit back to your energizer
- Snow and ice accumulation on wires and posts creates shorts that bleed voltage constantly
- Damaged or loose connections become high-resistance points that drop voltage significantly in cold conditions
- Vegetation contact under snow loads bridges the fence to ground in places you can’t easily see
- Brittle components like aged insulators and wire clips crack faster in extreme cold
The grounding system is where most winter failures begin. Frozen moisture and ice do not conduct electricity well, and ground rod beds placed in dry or compacted soil before freeze-up will severely underperform. Grounding reliability is where your entire circuit either works or fails, and shallow rods in dry, sandy, or rocky soils make the problem worse year-round, not just in winter.
The other major issue is snow and ice working against your fence line. Snow and ice can drain fence power and reduce the deterrence your animals rely on to stay put. A fence running at 3,000 volts instead of 6,000 volts might still feel uncomfortable to humans, but a large cow or a determined horse may push right through it.
“Voltage targets should always be treated as operational checks, not universal guarantees. Conditions on your specific land determine how much buffer you actually need.” — Electric fence safety guidance
Pro Tip: Start your winterizing process at least two weeks before your first expected hard frost. This gives you time to add soil amendments around ground rods and ensure moisture retention before the ground freezes. Once the frost sets in, you lose that window entirely.
For more context on keeping livestock safely contained year-round, our Canadian fence safety tips cover the broader principles that apply well beyond just winter prep.
Tools and materials needed for winterizing
Walking out to the fence line without the right tools wastes time and risks incomplete work. Before your first winterizing session, gather everything you need so the job gets done properly from start to finish.
Essential materials checklist:
- Digital fence voltmeter (not just a basic tester)
- Additional grounding rods (galvanized steel, minimum 1.2 meters long)
- Grounding rod clamps and lead-out wire
- Wire repair kit including ferrules, connectors, and split bolts
- Insulated pliers and wire cutters
- Moisture-retaining backfill or bentonite clay for ground rod areas
- UV-stable polywire or polytape repair sections
- Heavy-duty electrical tape rated for cold temperatures
- Non-conductive wooden or fiberglass post repair stakes
- Vegetation clearing tools including loppers and brush cutters
| Material | Purpose | Priority level |
|---|---|---|
| Digital voltmeter | Diagnose real-time voltage levels | Critical |
| Extra grounding rods | Strengthen ground bed before freeze | Critical |
| Grounding clamps | Maintain tight low-resistance connections | High |
| Cold-rated electrical tape | Seal splice points against moisture | High |
| Bentonite clay | Improve moisture retention at ground rods | Medium |
| Polywire repair sections | Replace brittle or broken segments | Medium |
Voltage benchmarks and targets vary by livestock species and fence design, so treat your voltmeter readings as operational checks rather than absolute pass/fail numbers. What matters is that your fence maintains enough voltage consistently across its entire length, not just near the energizer.
Pro Tip: Stock up on repair materials in early fall. Hardware stores in rural areas frequently run low on grounding rods and connectors once the cold prep season begins. Ordering ahead from a reliable source means you’re not driving an hour for a single part mid-prep.
If you haven’t set up your fence system from scratch before, our basic setup checklist walks through the core principles in plain terms. For a broader review of approaches before you start, our fencing methods overview covers everything from single wire cattle fences to multi-strand horse setups.
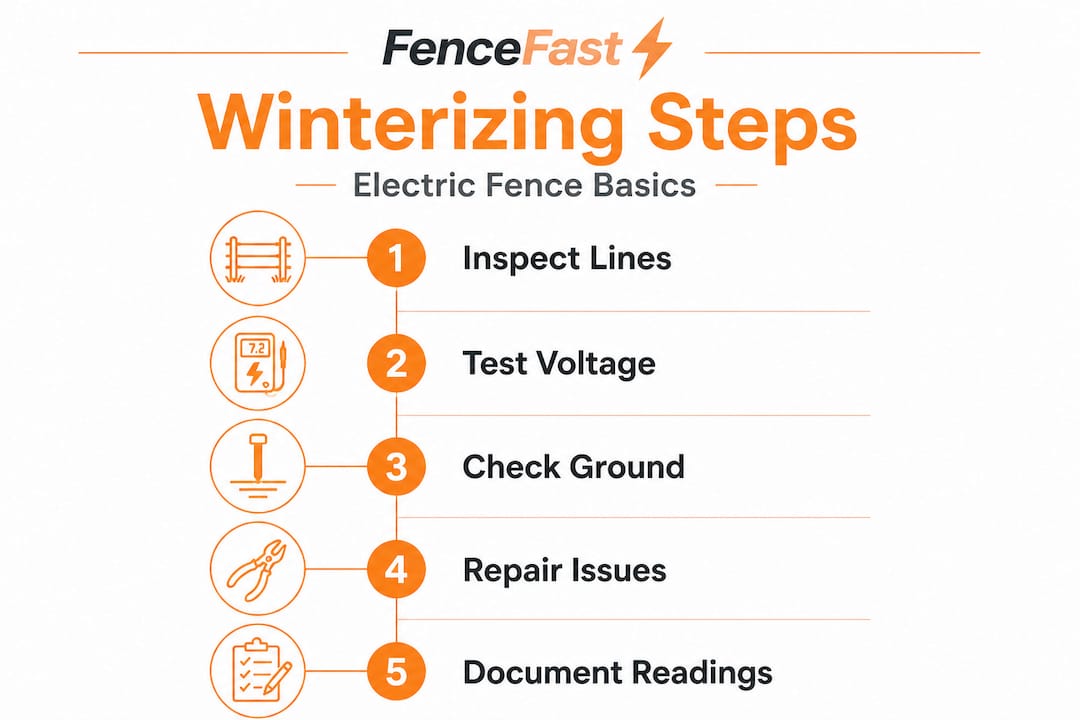
Step-by-step winterizing process
This is where preparation turns into action. Follow these steps in order, and you’ll cover every major vulnerability before winter locks things down.
-
Inspect and extend ground rod beds. Walk every ground rod location and check for loose clamps, corrosion, or rods that have shifted. Add rods if necessary. Ground rod beds should sit in moist soil before the ground freezes and in areas where undisturbed snow will accumulate naturally for additional moisture retention through the season.
-
Clear vegetation aggressively along the entire fence line. Cut back all grass, brush, and low branches that touch or overhang the fence. Vegetation under snow becomes a constant short circuit you can’t see or easily fix after a blizzard.
-
Inspect every splice and connection point. Squeeze each connector by hand and look for green corrosion or looseness. Frozen and cold conditions make weak connection points drop voltage dramatically. Replace any suspect connections now before they become a fault mid-winter.
-
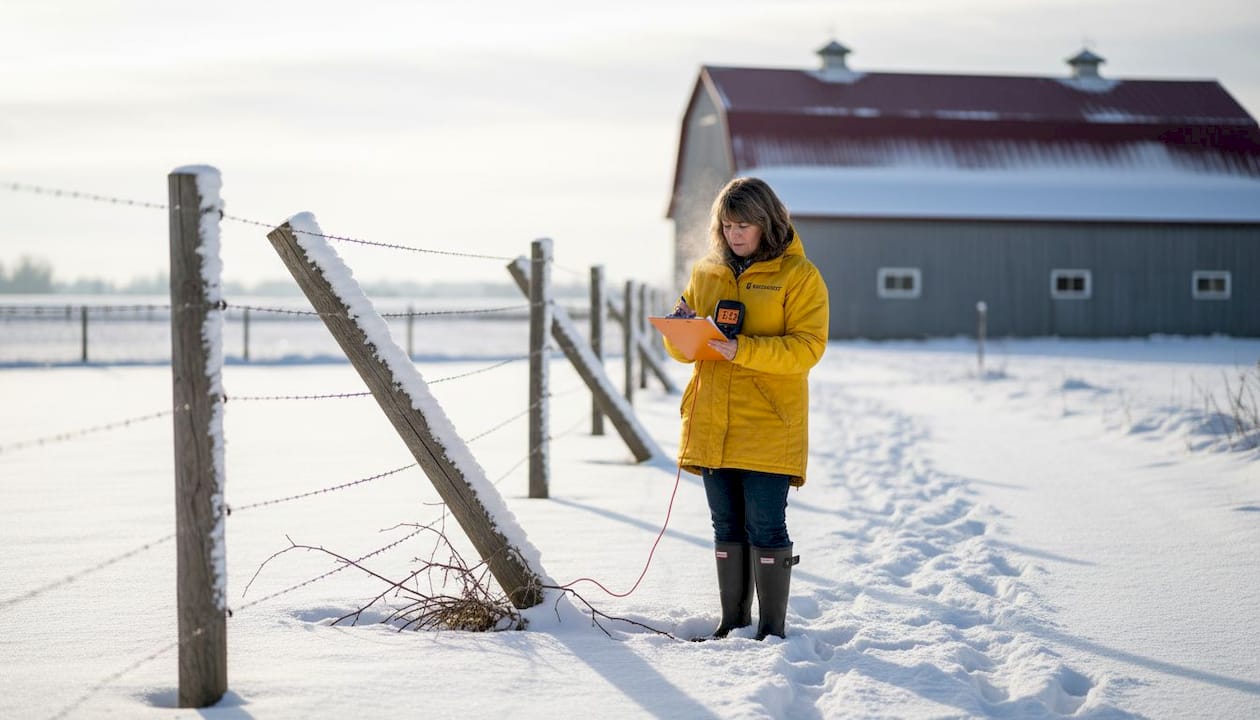
Test voltage along the full fence length. Take readings at the energizer, at the midpoint, and at the far end of the fence. This baseline reading tells you where energy is bleeding out before snow falls. Testing with a fence voltmeter after snow and ice buildup helps you verify that the fence maintains deterrence throughout the season, not just during setup.
-
Raise wire heights where possible. Adding an extra few centimeters of clearance between the lowest wire and ground level reduces the chance of snow bridging the circuit to earth.
-
Check and tighten all insulators and post hardware. Plastic insulators get brittle in extreme cold. Replace any that show cracking or discoloration now.
-
Test your energizer output independently. Disconnect the fence and test the energizer directly to confirm it’s performing to spec. This isolates whether a voltage problem comes from the energizer itself or from the fence system.
| Grounding approach | Winter performance | Best use case |
|---|---|---|
| Single deep rod in moist clay | Reliable if installed before freeze | Prairie and woodland farms |
| Multiple shallow rods in series | Inconsistent in hard freezes | Not recommended for Canadian winters |
| Deep rod with bentonite backfill | Excellent moisture retention | Sandy or fast-draining soil |
| Ground plate in permanent water | Outstanding conductivity | Near ponds or streams |
Pro Tip: Write down your voltage readings at each test point as you go. This documentation gives you a comparison baseline after the first snowfall, so you can immediately see whether voltage has dropped and by how much. It removes guesswork and speeds up troubleshooting significantly.
For a detailed review of how to get the most out of your ground system, our grounding methods guide covers setup specifics for different soil types. If you’re specifically managing horses or smaller livestock, our voltage test guidance outlines species-specific targets worth tracking.
Troubleshooting common winter failures
Even a well-prepped fence will sometimes develop problems mid-season. Knowing how to diagnose them fast limits both livestock risk and the time you spend outside in the cold.
Common symptoms and their likely causes:
- Low voltage across the full fence usually points to a grounding failure or a weak energizer output
- Voltage drop only in one section typically indicates a short circuit from snow-covered vegetation or a damaged wire
- Voltage fine at energizer but weak at far end signals high-resistance connections somewhere along the run
- Fence dead after a storm may mean a physical break, a tripped energizer, or an ice load that’s pulled a wire loose
Shorts created by snow and ice-covered vegetation are the most common mid-winter fault. The fix is usually clearing the snow and cutting back the offending vegetation. However, if the short is caused by a wire actually touching a post or a damaged insulator, you’ll need to make a proper repair.
Quick repair steps when you find a fault:
- Disconnect power before making any repairs
- Use a voltmeter to walk the fence and narrow down the fault location
- Clear snow and ice from any wire-to-vegetation contact points
- Retighten all visible splice points and clamp connections
- Replace any damaged insulators immediately
- Reconnect power and retest voltage from energizer to end of fence
Pro Tip: Start your diagnostic walk at the midpoint of the fence rather than at one end. This halves the amount of line you need to check to find a fault. Then move toward the problem half and repeat the process. It’s faster than walking the entire length every time.
For a structured approach to diagnosing your system, our troubleshooting guide walks through fault-finding in sequence, which is especially useful when conditions make the problem hard to see.
Winter safety protocols for electric fencing
Livestock safety matters, but so does yours. Winter creates specific hazards around electric fences that don’t exist the same way in warmer months.
Key winter safety practices:
- Never assume a downed wire is de-energized after a storm
- Keep children and pets away from fence lines during and after heavy snowfall events
- Mark fence locations with visible stakes before snow covers the line
- Inspect fence gate latches and handles regularly, as cold metal contracts and gates may become difficult or unsafe to operate
- Post clear signage at farm entry points indicating electric fencing is active
“After storms or downed power situations, treat any fence in contact with fallen electricity lines as extremely hazardous. Do not approach until power is confirmed off by the utility company.” — ESB Networks farm safety guidance
If you’re dealing with a livestock fault or containment breach during a storm, focus first on moving animals to a safe enclosed area before attempting fence repairs. A temporary corral or barn space is far safer than working on a live fence in poor visibility.
Regular winter inspection routines should include at minimum a visual walk of the entire fence after any significant weather event, weekly voltage checks at multiple points on the fence, and monthly inspection of all energizer connections, housing, and leads. Our resource on safety tips for landowners covers the broader safety landscape for anyone operating electric fencing on their property.
What most guides miss about winterizing electric fences
Here’s what we’ve seen across decades of working with Canadian farmers: most winterizing guides treat voltage targets as if they’re fixed standards that every fence must hit. They’re not. Voltage targets are benchmarks. The real question is whether your specific fence, on your specific soil type, in your specific climate zone, produces enough deterrence for your specific animals under real winter conditions.
A target of 3,000 volts might be perfectly adequate for calm, fence-trained cattle on heavy clay soil in a mild winter. That same number might be completely inadequate for younger animals on a sandy loam property in central Alberta during a stretch of minus thirty weather. The soil type, moisture levels, fence length, energizer age, and animal behavior all factor in together.
The other thing many guides skip entirely is the dynamic nature of winter soil moisture. Your ground bed doesn’t perform the same in November as it does in February. Early winter often brings enough freeze-thaw cycling and moisture to maintain decent grounding. Deep winter, after weeks of hard frost with no new snowmelt reaching the ground rods, is when grounding gets genuinely compromised. That’s why weekly voltage checks matter more than any single prep step you take in fall.
We’ve also seen farms where the physical fence prep is perfect but the energizer gets overlooked. Cold temperatures affect battery-powered and solar energizers significantly. Solar panels covered in frost don’t charge. Backup batteries in unheated enclosures lose capacity. If your energizer lives in a poorly insulated housing, that’s often the first failure point in January, not the fence itself.
The best advice we can give, based on real-world outcomes across Canada, is to check your fence after every significant weather event during winter, not just once at the start of the season. No amount of fall prep fully replaces active, consistent monitoring. For a complete reference on building and checking your system through the season, our build and test procedures guide gives you a solid framework to work from.
Optimize your electric fence for Canadian winters with FenceFast
Getting your fence winter-ready is one of the most important investments you make in livestock management each year. At FenceFast, we stock the grounding rods, connectors, energizers, voltmeters, and repair supplies you need to get the job done properly before temperatures drop.

Browse our full selection at FenceFast to find winter-ready electric fencing supplies shipped across Canada. Whether you’re reinforcing an existing system or building a new setup before freeze-up, our team of fencing specialists can help you choose the right components for your soil type, livestock species, and climate zone. Start with our winter checklist guide to make sure you’re covering every step, and reach out directly if you need a site-specific recommendation. Livestock safety doesn’t pause for winter, and neither do we.
Frequently asked questions
What is the most important step for winterizing an electric fence?
Ensuring proper grounding in moist soil before it freezes is the single most critical step. Ground rod beds should sit in undisturbed snow areas and moist soil before freezing for reliable winter performance.
How do I fix a fence with voltage drop during winter?
Check for loose splices or damaged connection points first, since weak tie points drop voltage dramatically in frozen conditions. Clear any snow and ice contact, then retest with a voltmeter to confirm the repair worked.
Is it safe to approach my fence after a severe storm?
No. If there is any chance of contact with downed power lines, stay away and wait for utility confirmation. Treat any fence contact with fallen electricity lines as extremely hazardous.
How often should I check voltage during winter?
Test voltage weekly and immediately after any storm or heavy snow event. Voltage sag after snow and ice buildup is a reliable early indicator that your fence needs attention before animals test it themselves.

